22
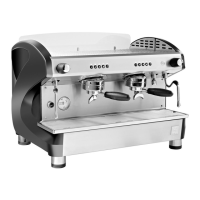
SELECTION Classic
4 - MACHINE INSTALLATION
4.1 Warning
The installation must be carried out by quali-
ed operators according to the manufacturer’s
instructions and applicable legal regulations.
4.2 Installation Presetting
Put the machine on a plane surface with sizes
and solidity suitable to overall dimensions of the
machine. The cup heating level should be po-
sitioned ideally approx. over 150 cm from the
ground. Do not use water jets or install in places
where water jets are used. To ensure proper
operation, the equipment must be installed in
places with a temperature between +5°C and
+32°C and humidity not exceeding 70%.
4.2.1 Electrical Connection
Warning:
- The power supply connection must be car-
ried out by qualied personnel.
- The installation must be carried out in com-
pliance with the applicable legal regulations
and the machine must be grounded prop-
erly.
The machine is provided with an electrical cord
with plug.
5 - USE OF THE MACHINE
5.1 Machine Start and Water Supply
Plug the power plug on the connection cable
into a power outlet approved for operating the
machine.
Fill the tank with water (Fig. 03). We recom-
mend ltering highly calcareous water.
Turn the main switch on position 1 (Fig. 01; pos.
1) (Green light ON).
Water is automatically supplied to the boiler.
During this operation, the green light lights up.
At the end of the water supply, the lights (green
and orange) will be on.
If the lights remain off after the water is dispensed,
press the ON/OFF switch until the lights light up.
5.2 Heating
The machine heats up to operating tempera-
ture after it is turned on. The portalter should
be inserted in the AromaPerfect brewing unit
during the warm-up phase so that it can heat
up to the same temperature as the brewing
unit. The machine is ready to be operated as
soon as the yellow control light (Fig. 1; Pos. 10)
lights up. If the control light is not on, this indi-
cates that there is not enough water in the tank
or in the boiler. In this case, check the water
level in the tank and rell water if necessary.
Warning:
- If the minimum water level is not supplied
to the boiler, a safety device allows the mo-
tor pump to stop after 120 seconds. The
machine turns off the yellow control light as
alarm signal
5.3 Coffee Preparation
1) Turn the portalter (Fig. 01; Pos. 5) to the left
and twist it out of the brewing unit.
2) Fill the lter with ground coffee and press the
coffee down so that it is packed tightly. Make
sure not to stain the edge of the portalter.
3) Place the portalter back into the brewing unit
and turn it to the right until it stops (Fig. 04 and
05).
4) Place a cup under the portalter nozzle and
press the dip-switch for coffee.
5) Once the cup is lled with the desired amount
of coffee, press the dip-switch in the opposite
direction.
Caution:
- Do not open or remove the portalter lled
with coffee when the machine is operating.
- Never touch the metal plating of the porta-
lter; danger of burns.
- The standard portions for the lters are 6/8
grams for a single portion and 12 grams for
a double portion
EN
 Loading...