Do you have a question about the Reolink E1 Pro and is the answer not in the manual?
Guides the user through the initial camera setup process and lists package contents.
Step-by-step instructions for configuring the camera using a Wi-Fi network connection via the app.
Instructions for setting up the camera using a wired network connection.
Instructions on how to install the camera to a ceiling, including bracket mounting and attachment.
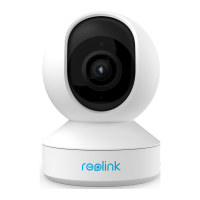
The Reolink E1 Pro is a compact indoor camera designed for seamless integration into your home, offering a range of smart features for enhanced home protection. This device is engineered to provide accessible and high-quality surveillance, making it an ideal choice for anyone looking to monitor their indoor spaces effectively.
The E1 Pro functions primarily as an indoor security camera, capable of capturing video footage and providing real-time monitoring. Its compact design allows it to blend discreetly into various home environments. A key functional aspect is its ability to rotate, enabling users to cover a wider area within a room without needing multiple cameras. This pan-and-tilt capability ensures that you can adjust the camera's view remotely to focus on specific points of interest or track movement.
Beyond basic video capture, the E1 Pro incorporates smart features such as customized motion alerts. This means the camera can detect movement within its field of view and notify you, allowing for prompt awareness of any activity. The camera is equipped with both a daylight sensor and 8 IR LEDs, indicating its capability to operate effectively in varying light conditions, from bright daylight to complete darkness, thanks to its infrared night vision.
Audio capabilities are also integrated, with a built-in microphone for capturing sound and a speaker, suggesting two-way audio communication. This allows users to not only hear what's happening in the camera's vicinity but also to speak through the camera, which can be useful for interacting with family members, pets, or deterring intruders.
For local storage of footage, the camera includes a Micro SD card slot, providing a convenient way to record and store video directly on the device without necessarily relying on cloud services. A reset button is also present for troubleshooting or reconfiguring the device.
Connectivity options include both Wi-Fi and a LAN port, offering flexibility in how the camera is integrated into your home network. This dual connectivity ensures reliable data transmission and allows for setup even if Wi-Fi is not immediately available or preferred.
The E1 Pro is designed for user-friendly operation, primarily managed through a dedicated mobile application. The setup process is streamlined, offering two main methods: Wi-Fi connection or network cable connection.
For Wi-Fi setup, users begin by tapping an icon in the app to add a new camera, then scanning a QR code located on the device. The app guides the user through selecting a Wi-Fi network, entering the password, and then scanning a QR code displayed on the phone screen with the camera lens. Voice prompts from the camera assist in confirming successful steps, such as hearing a beep sound or confirmation of connection to the router. This interactive setup minimizes potential errors and provides clear feedback.
Alternatively, for a network cable connection, the camera is powered on and connected to the router's LAN port via an Ethernet cable. If the "Add Devices Automatically" option is enabled in the app settings and all devices are on the same network, the camera can be quickly detected and selected from the Devices page. If not, users can manually add the camera by scanning its QR code and then selecting the "Choose Network Cable Connection" option in the app. This method also involves creating a device password and naming the camera, similar to the Wi-Fi setup.
Once set up, the camera's status is indicated by an LED light. A solid blue light signifies that the camera is starting up or that the Wi-Fi connection has succeeded. A blinking blue light indicates that Wi-Fi is not configured or that the connection has failed, providing immediate visual feedback on the camera's operational status.
The camera's rotational capability is a significant usage feature, allowing users to remotely pan and tilt the camera to monitor different angles of a room. This is particularly useful for covering large areas or following moving subjects. The ability to receive customized motion alerts directly to your phone means you can stay informed about any detected activity, enhancing the camera's role as a proactive security tool.
While the manual primarily focuses on initial setup and usage, it also touches upon aspects related to maintenance and troubleshooting. The presence of a reset button on the device is a key maintenance feature, allowing users to easily restore the camera to its factory settings if issues arise or if a complete reconfiguration is needed.
The status light serves as a diagnostic tool, providing immediate visual cues about the camera's connectivity and operational state. Understanding the meaning of solid blue versus blinking blue light helps users quickly identify whether a network configuration issue needs to be addressed.
For physical installation and potential adjustments, the manual provides clear instructions on how to install the camera to the ceiling using a mounting plate, screws, and plastic anchors. It also details how to attach and remove the camera from the bracket, by turning it clockwise to lock and counterclockwise to remove.
A specific maintenance feature related to installation is the ability to adjust the image orientation. If the camera is mounted upside down, the picture can be rotated using the "Flip Vertical" option within the Reolink App/Client, found under "Device Settings > Display." This ensures that the video feed is always displayed correctly, regardless of the camera's physical mounting orientation.
The flexibility of connectivity options (Wi-Fi and LAN) also contributes to ease of maintenance and troubleshooting. If one connection method proves problematic, users can switch to the other, providing a fallback for maintaining surveillance. The app's guidance through the setup process, including prompts for re-entering Wi-Fi information if a connection fails, further aids in self-troubleshooting.
Overall, the Reolink E1 Pro is designed for straightforward use and maintenance, with features that empower users to manage their home security effectively and address common issues with minimal hassle.
| Sensor type | CMOS |
|---|---|
| Number of sensors | 1 |
| Optical sensor size | 1/2.7 \ |
| Type | IP security camera |
| Placement supported | Indoor & outdoor |
| Connectivity technology | Wireless |
| Maximum operating distance | 12 m |
| Infrared (IR) cut-off filter | Yes |
| Total megapixels | 4 MP |
| Maximum resolution | 2560 x 1440 pixels |
| Video compression formats | H.264 |
| Pan range | 355 - 30 ° |
| Minimum illumination | 0 lx |
| DC output current | 1 A |
| DC output voltage | 5 |
| Power source type | DC |
| Built-in HDD | No |
| Compatible memory cards | MicroSD (TransFlash) |
| Maximum memory card size | 128 GB |
| Audio system | 2-way |
| Ethernet LAN | - |
| Number of users | 20 user(s) |
| Wi-Fi standards | 802.11a, 802.11b, 802.11g, Wi-Fi 4 (802.11n) |
| User access level | Administrator, User |
| Supported network protocols | SSL, TCP/IP, UDP, IPv4, UPnP, RTSP, SMTP, NTP, DHCP, DNS, DDNS, P2P |
| Mac operating systems supported | macOS |
| Mobile operating systems supported | Android, iOS |
| Security algorithms | WPA-PSK, WPA2-PSK |
| Storage temperature (T-T) | -40 - 70 °C |
| Operating temperature (T-T) | -10 - 55 °C |
| Storage relative humidity (H-H) | 10 - 90 % |
| Operating relative humidity (H-H) | 20 - 85 % |
| Form factor | Turret |
| Mounting type | Desk |
| Product color | White |
| Harmonized System (HS) code | 85258900 |
| Length | 106 mm |
|---|---|
| Weight | 200 g |
| Diameter | 76 mm |