Wiring
48 PIN CONNECTOR
E4. Pink/White............UART-SPEED
F4. Gray/White...........UART-TX
G4. Blue/White...........UART-RX
H1. Green/Black.........RL-
H4. Red/White............UART-12V
J1. Green.......................RL+
J3. Orange/Whike...Illumination
J4. Black/White.........UART-GND
K1. Purple......................RR+
K2. Purple/Black........RR-
K3. Blue...........................ANT
K4. Red...........................ACC
L1. White/Black.........FL-
L2. White.......................FL+
L3. Black.........................Ground
L4. Black.........................Ground
M1.Gray.........................FR+
M2.Gray/Black...........FR-
M3.Yellow.....................Battery+
M3.Yellow.....................Battery+
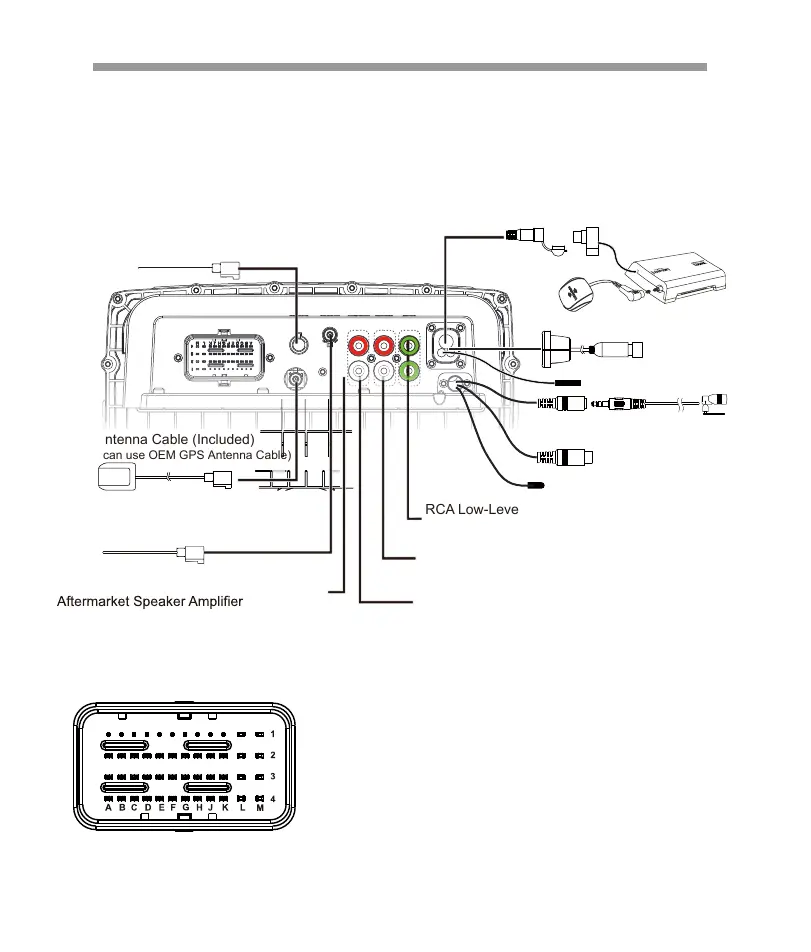
RCA Low-Level Front Channel Output for
Aftermarket Speaker Amplifer (RCA Included)
RCA Low-Level Rear Channel Output for
Aftermarket Speaker Amplifer (RCA Included)
RCA Low-Level Subwoofer Output for
Aftermarket Subwoofer Amplifer (RCA Included)
GPS Antenna Cable (Included)
(Or you can use OEM GPS Antenna Cable)
OEM USB Cable Connector
(USB cable not included)
OEM Radio Antenna Connector
(antenna cable not incl.)
RCA Low-Level Front Channel Output for
(RCA not incl.)
Bluetooth Antenna
3.5mm Connection for Included
Bluetooth Calling Microphone
Camera in (Yellow)
CAM +12V(Max0.5A)(Pink)
SXM Tuner(Not included)
USB Type-C for
Charging
Connect the OEM GPS,USB and radio antenna cables disconnected during removal of
the OEM head unit to matching SOCKETS on the back of V2. If all are difficult to connect,
verify the orientation of the connector(s) is correct. If any afternarket audio amplifiers will be
used in the audio system,take a moment to connect the RCA cables to the corresponding
audio outputs. Although not required, if the Bluetooth calling microphone will be used,se-
cure it to the desired installation location, then route its cable to the
corresponding input on the back of v2.
6
 Loading...