5
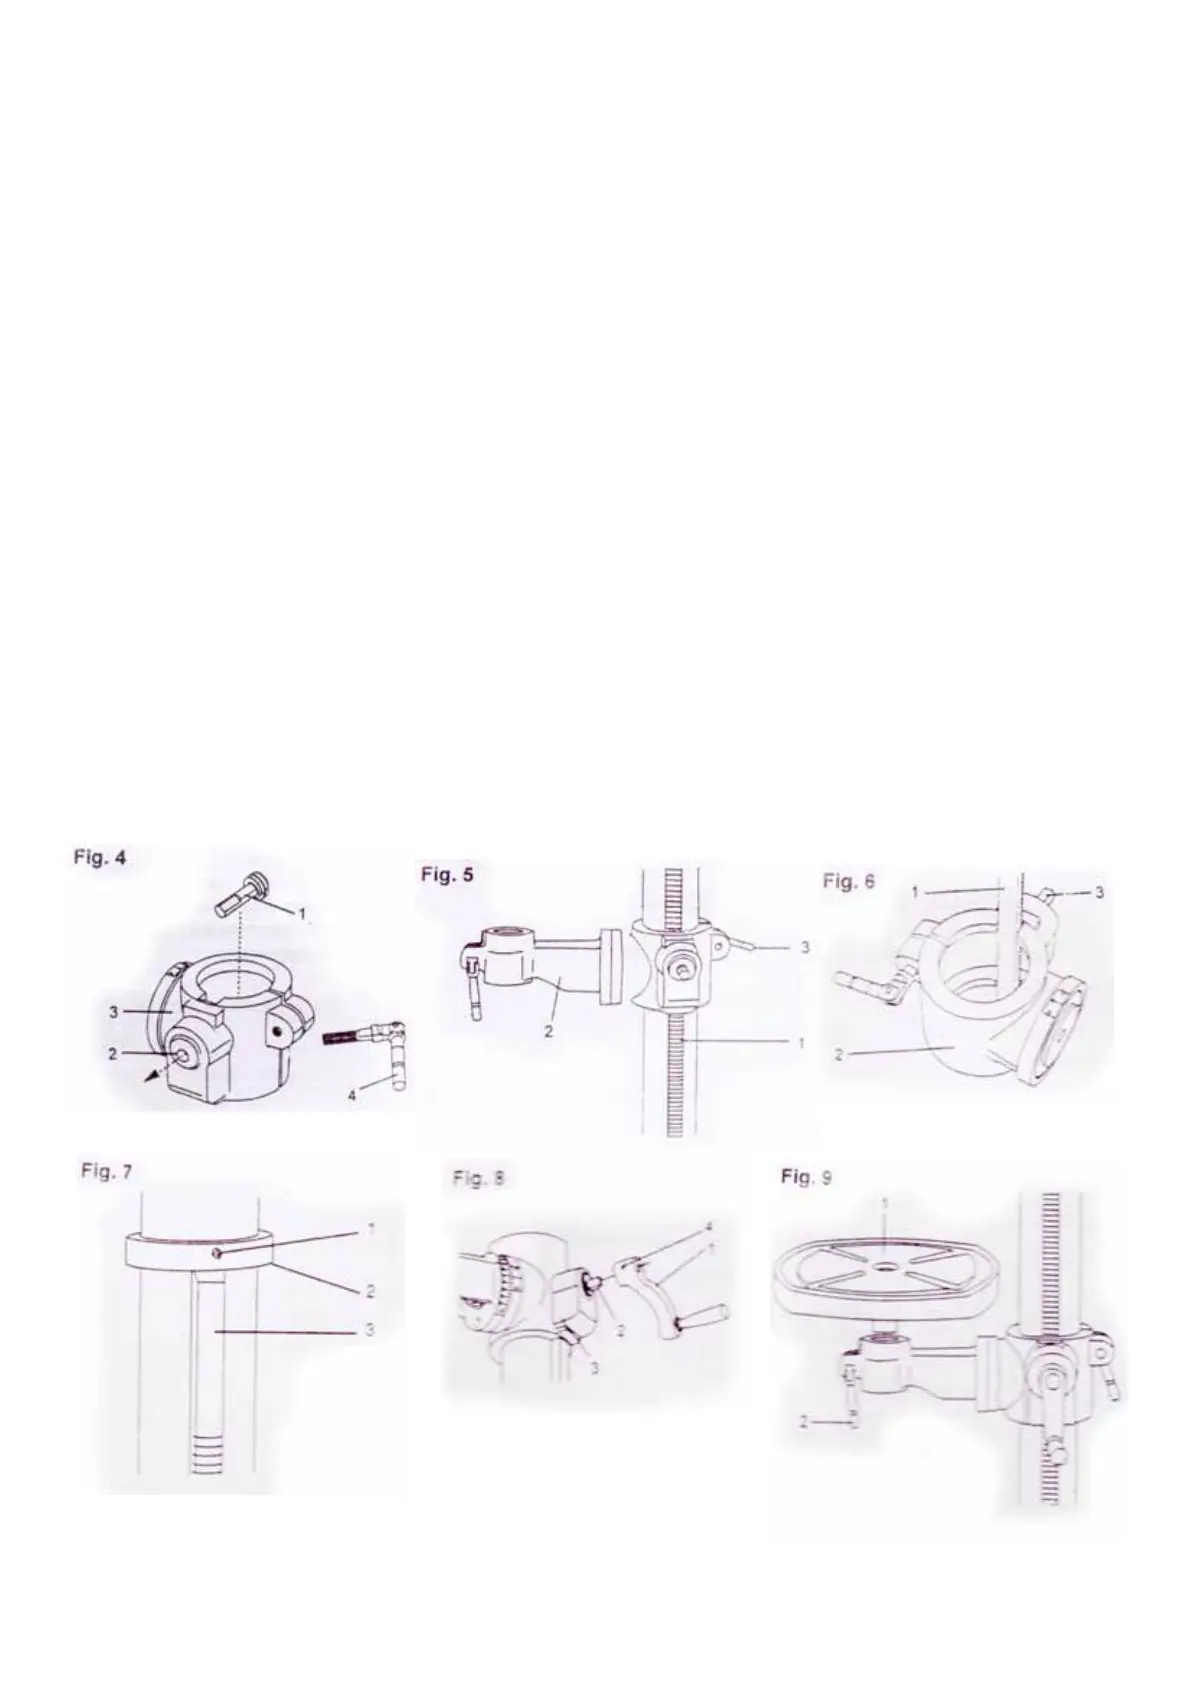
FOR THE TABLE WITH TABLE BRACKET(FIG. 4,5,6,7,8,9)
1. Insert the worm gear(1) into the table crank handle hole(2)
from inside the table bracket(3). Make sure the worm gear(1)
matches with the inside gear. (Fig. 4)
2. Insert the table lock handle(4) into the hole at the rear of
the table bracket. (Fig. 4)
3. Place the rack(1) in position inside the table bracket(2),
making sure the worm gerar(3) on the inside of the table
bracket is engaged with the teeth of the rack. (Fig. 5)
Note:
Table removed from bracket in Fig. 4 & 5 for clarity.
4. Slide the table bracket assembly together with the rack
onto the column.
5. Enagage the bottom of the rack(1) with the lip of the
column holder(2). Tighten the bracket lock handle(3) to lock
the table bracket assembly to the column. (Fig. 6)
6. Install the collar(1) to the top end of the rack(2) on the
column. (Fig. 7)
IMPORTANT: The bottom of the collar must not be pushed
all the way down onto the top of the rack. Make sure the top
of the rack is under the bottom of the collar and that there is
enough clearance to allow the rack to rotate freely around
the column. Tighten the set screw(3). (Fig. 7)
7. Install the table crank handle(1) to the worm gear shaft(2)
on the side of the table bracket(3). (Fig. 8)
8. Line up the flat side of the shaft with the set screw(4)
in the crank handle and tighten the screw with a hex wrench.
(Fig. 8)
9. Place the table(1) in the table arm assembly. Tighten the
table lock handle(2). (Fig. 9)
테이블 브래킷와 테이블(그림. 4,5,6,7,8,9)
1. 테이블 브래킷(3) 안쪽의 테이블 크랭크 핸들 홀(2)에
웜 기어(1)를 넣어주세요. 웜 기어(1)가 안쪽 기어에 맞도록 확실히
해 주세요. (그림. 4)
2. 테이블 고정 핸들(4)을 테이블 브래킷의 뒤쪽 구멍에
넣어주세요. (그림. 4)
3. 테이블 브래킷(2) 안쪽에 랙(1)을 놓고, 테이블 브래킷 안쪽의
웜기어가 랙의 이빨에 연결되도록 해 주세요. (그림. 5)
알림:
그림. 4 & 5에서 설명을 위해 브래킷은 보이지 않습니다.
4. 테이블 브래킷 부품을 기둥의 랙에 밀어 넣으세요.
5. 기둥 홀더(2)의 표면에 랙(1)의 바닥을 연결시켜 주세요.
브래킷 고정 핸들(3)을 테이블 브래킷 부품을 기둥에 고정시키기
위해 조여주세요. (그림. 6)
6. 기둥 위 랙(2) 끝의 탑에 콜라(1)를 설치해 주세요. (그림. 7)
중요: 콜라의 바닥이 랙의 탑부분 까지 내려가야 합니다. 랙의 탑은
콜라의 바닥 아래에 닿아야 하고 기둥 주위로 자연스럽게 회전할 수
있도록 말끔하게 해야 합니다. 세트 스크류(3)를 조여주세요.
(그림. 7)
7. 테이블 브래킷(3) 측면 웜 기어 샤프트(2)에 크랭크 핸들(1)을
설치하세요. (그림. 8)
8. 크랭크 핸들 안의 세트스크류(4)로 샤프트의 가장자리의 평평한
면을 정열시키세요. 육각렌치로 조여주세요.
9. 테이블(1)을 테이블 암 부품에 놓아주세요. 테이블 고정 핸들(2)
을 조여주세요. (그림. 9)
 Loading...