EasyManua.ls Logo

Rfiver TW2002 - User Manual

Rfiver TW2002
2 pages
Print Icon
To Next Page IconTo Next Page
Loading...
Make Sure the small hole on
Part 6 face backward.
Make Sure part 2 the matt surface
face upward during assembling.
1 x1
2 x2
4 x2
3 x2
5 x2
6 x1
8 x1
7 x1
9 x2
11 x2
M6x485
M8x470
M10x675
(17#)
C1 x2
S1 S6
...
12 x1
13 x2 14 x2 15 x2
10 x1
A1 x1
G2 x1
G1 x1
D1 x2
D2 x2
B1 x2
C2 x2
F1 x2 F2 x2
E1 x2 E2 x2
G3 x1
(13#)
S
PARTS LIST
Screws for TV
(Rubber washer)
Parts In The Mount Box.
A2 x1
16 x1 17 x2
Tools Requried
(Not included)
No Spacer.
2019.06
TW2002
x1
x1
x2
1
16
x2
x1
3
Read this assembly manual carefully and make sure you have all the parts list below before you begin to instau. Keep this
assembly manual for future reference.
Protect finishes by placing furniture pieces on a soft carpeted surface during assembly.
Do not place very hot/cold objects on top of any surface. Always use a coaster or mat. Never leave liquids on the surface:
Clean immediately with a mild soap and a damp cloth. Never use scouring powder based cleanser. Don't touch the glass
surface with a hard/acute object it may cause the glass to shatter.
DO NOT ASSUME CHILD SAFETY WITH ANY PIECE OF FURNITURE!
Do not allow children to climb on furniture. Improper use can cause death or serious injury. If you are placing a TV on top use
safety straps on your TV to prevent the risk of a toppling television. Furniture straps fastened to a wall can also be used to help
ensure safety.
Damaged parts or furniture put together incorrectly can lead to serious injuries. Make sure to follow instructions correctly.
Series
No.
Model
No.
Move this stand gently with 2 persons.
NOTICE
x2
18
18 x9
19 x1
15
X2
X1
X2
X1
6
18
4
2
10
VESA:100-600mm
VESA:100-400mm
We strive to make sure each item you got is perfect and ensure all parts and hardware are included in our package.However if you are
experiencing a shortage of any parts or hardware, PLEASE do not return the product to any local store directly. Try to contact us, we will
do our best to solve your problem and expedite the missing item to you as soon as possible from our local custom er service center.
SERVICE CARD
Please provide following information when you contact us. Your detail information will help us to bring you a more
faster and effective service for you . Appriciate your kindly understanding and patience !
1. Your Order No. (Comes from your marketplace dashboard) . Model No. (On the left side below) Series No. (On the right side below )
2. Marketplace you place the order : Amazon, Walmart, Ebay or Others
3. What's the problem you had and the help you need
Thank you for purchasing
Customer Service Supports
North America
Europe
Asia
CA
MX
JP
UK
DE
FR
IT
ES
US
CN
IN
1 626 400 2997
CST 8AM - 5PM Mon.-Fri. )
cs@rfiver.com
0086 574 87385830
UTC 9AM -5PM Mon-Fri)
jpcs@rfiver.com
eucs@rfiver.com
Question and Answer IconNeed help?

Do you have a question about the Rfiver TW2002 and is the answer not in the manual?

Summary

Customer Service and Support

Contact Information

Provides contact details for North America, Europe, and Asia, along with email addresses for customer support.

Information for Assistance

Details required information when contacting support, including order number, model number, and marketplace.

Service Card and Notices

Service Card Instructions

Guidance on contacting customer service for missing parts or hardware, advising against returning to local stores.

Important Handling and Safety Notices

Key instructions for safe assembly and use, including moving the stand, protecting surfaces, and child safety.

Parts List and Assembly Overview

Parts Identification

A comprehensive list of all included parts and hardware, with quantities and identifiers for assembly.

Assembly Steps Overview

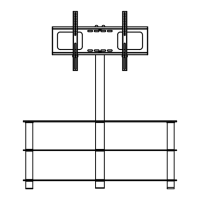
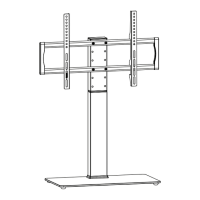
Visual guide for initial assembly steps, highlighting critical checks for part orientation and surface contact.

Detailed Assembly Instructions

Step 4-5: Base and Support Assembly

Instructions for assembling the base and vertical supports, ensuring correct orientation of components.

Step 6-7: Shelf and Bracket Attachment

Guidance on attaching shelves and the steel bracket, including specific placement instructions for B1.

Step 8-9: Final Tightening and Screw Selection

Ensuring all screws are tightened and advising on the selection of correct screws and spacers for TV mounting.

Step 10: TV Mounting

Final step involving locking the TV onto the mount, with options for different TV types (curved/flat panel).

Rfiver TW2002 Specifications

General IconGeneral
ColorBlack
Max Screen Size70 inches
MaterialSteel
VESA Compatibility100x100mm to 600x400mm
Recommended TV Size32 to 70 inches
Height AdjustmentAdjustable

Related product manuals