Do you have a question about the RH Teen KIERAN and is the answer not in the manual?
Contact RH Baby&Child for missing parts or questions, providing model number, color, and part description. Call 1-800-762-1751.
Avoid abrasive chemicals. Protect finish from scratches. Store in a cool, dry place with hardware packaged.
Key Wrench included. Two people recommended. Tighten bolts partially, then fully after assembly.
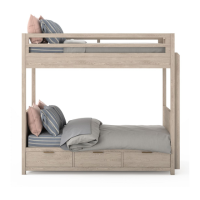
Follow all warnings, use specified mattress size, keep mattress 5" below guardrail, no children under 6 on top bunk, no horseplay.
Use guardrails on both sides, ensure mattress fits snugly, do not allow hanging items, use ladder for entry/exit.
Specific mattress dimensions for Twin/Full bunks. Mattress surface must be 5" below top guardrail.
Never attach or hang items not designed for the bunk bed, like hooks or ropes.
Visual guide to all parts, including posts, rails, panels, slats, and ladder, with quantities.
List of all included hardware items such as bolts, nuts, washers, and wrenches, with their respective quantities.
Requires a Phillips-head screwdriver (not included) for assembly.
Requires two people. Read instructions carefully. Do not fully tighten bolts until all steps are complete.
The bunk bed can be assembled with the ladder on either the left or right side.
Steps to remove crossbars, convert orientation, and re-attach crossbars using screws.
Insert threaded rods into footboard posts and lay out short guard rail, side rail, and stretcher bar.
Attach short side rail and stretcher bar to footboard posts using small bolts. Attach short guard rail with washers, nuts, and bolts.
Position and attach short guard rail, headboard panel, and stretcher bars to headboard posts using hardware.
Connect headboard panel to threaded rods with washers and nuts. Insert plastic plugs into the panel.
Connect long guard rail, front guard rail, long side rails, and long stretcher bars to the headboard/footboard posts.
Attach long side rails and stretcher bars using small bolts. Secure long guard rail and front guard rail with long bolts.
Insert washers and nuts to threaded rods and tighten. Secure guard rails to the frame using long bolts.
Position the ladder and hook it over the front guard rail and side rail, securing with short screws.
Place support bars between the long guard rail and front guard rail, fastening with screws.
Lay top platform panels on support bars and attach using 40 long screws.
Place slat roll between side rails and fasten end slats to side rails using long screws.
After assembly, return to each bolt and tighten to a snug fit. Do not overtighten.
Specifies mattress dimensions for Twin/Twin and Full/Full bunks, including thickness limits for the top bunk.
Details the construction of the upper and lower bed platforms, including dimensions of platform pieces and slats.
Emphasizes strict adherence to bedding specifications to prevent falling or entrapment.
Dust with a soft, dry cloth. Blot spills immediately. Use a damp cloth for cleaning. Avoid chemical cleansers.
| Brand | RH Teen |
|---|---|
| Model | KIERAN |
| Category | Indoor Furnishing |
| Language | English |