11
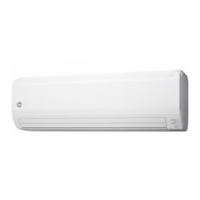
H1
Outside
Wall
Vent Terminal Base (Outside)
Attaching the 6” (15.2 cm) Diameter
Main Tube
From the outside of the building, insert the
6” (15.2 cm) vent tube/base assembly through the
hole in the exterior wall and onto the 6” (15.2 cm)
elbow. Slide as needed into place. (H1).
An improper seal can cause product performance and
nuisance pilot outages.
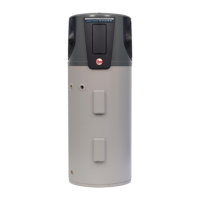
G1
G2
G3
Sheet Metal Screws &
Silicone Sealant
Vent Terminal Base (Outside)
Assembling the 6” (15.2 cm)
Diameter Vent Tube Assembly w/
vent terminal base.
Inspect the vent tube upon opening the kit to assure
two silicone sealing bands are included and
positioned at the sealing points.
Attach the outer 6” (15.2 cm) main tube to the vent
terminal base as shown on left.. (G1)
Drill a
1
/
8
”
inch diameter hole through the tube and the
collar of the base. (G2)
Secure with a #8 sheet metal screw, supplied. Repeat
with a second hole and screw approximately 180°
from the first. (G3)
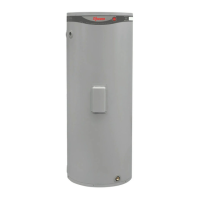
Placing 3" (7.6 cm) Diameter Main
Vent Tube through Exterior Wall
Inspect the vent tube upon opening the kit to assure
three silicone sealing bands are included and
positioned at the sealing points.
Install the 3" main vent tube onto the end of the 3"
inner elbow & seal with silicone band by folding the
band back over the seam of both tubes.
Extend the 3” (7.6 cm) tube assembly to its required
length. Be sure a minimum of 2 1/2" extends beyond
the outer wall. (F1)
Move high temperature silicone band to connecting
joints as shown. (F2)
F4
3" Tube
F1
F2
"X" Optional kit that provides additional adjustment up to 48" (121.9 cm) can be purchased seperately.
"X"
Gallons "X" Inches (cm)
40 9 1/8" (23.17 cm) -
19 1/8" (48.57 cm)
50 8 1/8" (20.63 cm)
- 18 1/8" (46 cm)
2 1/2" Minimum extension
beyond wall.
 Loading...