Do you have a question about the ring Floodlight Battery and is the answer not in the manual?
Guides users to download and use the Ring app for setup and management of their Floodlight Battery.
Explains the Ring Bridge's role in connecting Ring Smart Lights and refers to app/manual for setup.
Instructions on how to twist and separate the floodlight from its back cover.
Steps to press side buttons to remove the battery lid and access the compartment.
Details on inserting four D Cell batteries, matching flat ends with springs, and securing the lid.
Steps to tap 'Set Up a Device' in the app, select 'Smart Lights', and follow instructions.
Instructions to press a tab and slide the mounting plate off the back cover.
Guidance on using the mounting plate as a template to mark pilot holes, especially for masonry surfaces.
Instructions to hold the mounting plate firmly and drive the three mounting screws.
Steps to align the floodlight with the mounting plate and slide it left to lock it. Mentions motion sensor adjustability.
Provides phone numbers for US, Canada, and Worldwide support, and a link for more numbers.
Directs users to warranty coverage, patents, and copyright details.
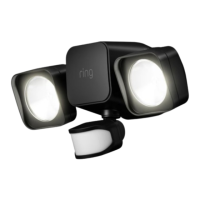
The Ring Floodlight Battery Smart Lighting device is a battery-powered floodlight designed to provide smart outdoor illumination and enhance security around your home. This device integrates with the Ring ecosystem, allowing for remote control and interaction with other Ring devices through the Ring app.
The primary function of the Ring Floodlight Battery is to provide bright, motion-activated lighting for outdoor areas. It features two adjustable floodlights that can be directed to illuminate specific zones, enhancing visibility and deterring potential intruders. The integrated motion sensor detects movement within its adjustable range, triggering the lights to turn on automatically. This smart lighting solution is designed to work in conjunction with the Ring Bridge, which acts as a central hub to connect your Ring Smart Lights to the Ring app and other Ring devices. This connectivity enables advanced features such as customizable motion zones, scheduling, and linking the floodlight's activation to other Ring devices, like cameras or doorbells, for a more comprehensive security setup. The battery operation offers flexibility in placement, as it does not require hardwiring to an electrical source, making installation simpler in various locations around your property.
Setting up and using the Ring Floodlight Battery involves several straightforward steps. The initial setup requires downloading the Ring app, available on both the Apple App Store and Google Play, or by visiting ring.com/app. Through the app, you will be guided through the process of configuring your Floodlight Battery and managing its settings. Before setting up the floodlight itself, it is crucial to set up the Ring Bridge, which is the communication link for your Ring Smart Lights. The Bridge connects your smart lights to the Ring app and allows them to interact with your other Ring devices. Instructions for setting up the Bridge are provided within the Ring app or its user manual.
Once the Bridge is set up, you can proceed with preparing the Floodlight Battery. This involves removing the back cover by twisting it counter-clockwise to unlock and separate it from the main unit. Next, the battery lid needs to be removed by pressing the side buttons to open the battery compartment. The device requires four D Cell batteries (not included) for operation. When inserting the batteries, ensure that the flat ends align with the springs in the compartment. After inserting the batteries, place the lid back onto the compartment and push down until it snaps securely into place.
With the batteries installed, you can then set up the Floodlight Battery within the Ring app. Open the app and tap "Set Up a Device." When prompted, select "Smart Lights" and follow the on-screen instructions to complete the setup. After the in-app setup is finished, remember to replace the back cover of the floodlight, ensuring that the arrows on the cover and the main unit are properly aligned for a secure fit.
The physical installation of the Floodlight Battery begins by removing the mounting plate from the back cover. This is done by pressing a tab on the side and sliding the mounting plate off. If you are installing the floodlight on a masonry surface, the mounting plate serves as a template for marking pilot holes. It is important to ensure that the "UP" arrow on the mounting plate is pointing upwards when marking the holes. After marking, drill the holes and insert the appropriate anchors. Once the anchors are in place, hold the mounting plate firmly against the surface and drive the three mounting screws to secure it. Finally, align your Floodlight Battery with the mounted plate and slide it to the left until it locks securely into position.
A key usage feature is the adjustability of the motion sensor. Users can experiment with various angles to optimize motion detection for their specific home environment, ensuring that the lights activate precisely when needed. This customization helps in preventing false triggers while maintaining effective coverage. The Ring app provides a comprehensive interface for managing these settings, allowing users to fine-tune motion sensitivity, create custom motion zones, and set schedules for when the lights should be active or inactive. This level of control ensures that the smart lighting system adapts to your lifestyle and security needs.
The Ring Floodlight Battery is designed for ease of maintenance, primarily focusing on battery replacement. Since it is battery-powered, there is no need for complex electrical wiring maintenance. The device will likely provide notifications through the Ring app when the battery levels are low, prompting you to replace them. The process of replacing the batteries is straightforward, as outlined in the usage features: remove the back cover, open the battery lid, replace the four D Cell batteries, and then reassemble the unit. This simple battery replacement mechanism ensures continuous operation without requiring professional assistance.
For any additional help or troubleshooting, Ring provides extensive customer support. Users can visit ring.com/help for online resources, FAQs, and guides. For direct assistance, customer support is available via phone. US customers can call 1 800 656 1918, Canadian customers can call 1 855 300 7289, and worldwide customers can call +1 310 929 7085. A comprehensive list of all customer support numbers can be found at ring.com/callus.
Information regarding warranty coverage is available at www.ring.com/warranty, and details about patents can be found at www.ring.com/patents. Regular software updates, delivered through the Ring app, ensure that the device benefits from the latest features, security enhancements, and performance improvements, contributing to its long-term reliability and functionality. The "Last updated" date (01/04/19) indicates the version of the manual, implying that Ring regularly updates its documentation and software. This commitment to ongoing support and updates helps maintain the device's optimal performance and user experience over time.
| Power Source | Battery |
|---|---|
| Connectivity | Wi-Fi |
| Camera Resolution | 1080p HD |
| Field of View | 140° diagonal |
| Video Resolution | 1080p HD |
| Color | White |
| Operating Temperature | -20°C to 50°C (-4°F to 122°F) |
| Siren | Yes |
| Light Type | LED |
| Two-Way Audio | Yes |
| Smart Home Compatibility | Amazon Alexa |
| Weather Resistance | Weather Resistant |