Do you have a question about the ring Solar Floodlight and is the answer not in the manual?
Guides setup and management via the Ring app. Search or visit ring.com/app.
Required to connect Smart Lights to the Ring app and other devices. Follow in-app or manual instructions.
Twist the Floodlight counter-clockwise to unlock and separate it from the back cover.
Push the metal tab to remove the included battery from the compartment.
Carefully remove and discard the protective strips from the battery before use.
Fully charge the battery using the provided orange cable until only one light is lit.
Insert the included battery and push until it snaps in place. A second battery can be added.
Tap "Set Up a Device" in the app, select "Smart Lighting", and follow instructions. Replace back cover.
Press the tab on the side and slide the mounting plate off of the back cover.
Use the mounting plate as a guide to mark holes, ensuring the "UP" arrow points upwards.
Drill holes (3/16" bit for masonry, use anchors) or screw directly into wood using a Philips screwdriver.
Hold the mounting plate firmly against the surface and drive the three mounting screws until secure.
Align the Floodlight with the mounting plate and slide it left to lock. Next, set up the Solar Panel.
Select install location for solar panel within 13 ft of Floodlight for direct sunlight. Use mounting arm as template.
Drive mounting screws into the wall (or anchors) until the mounting arm is secure.
Position slots on the rear of the Solar Panel over the mounting arm and slide down to secure it.
Loosen the screw on the mounting arm, adjust the panel to the desired angle, and re-tighten the screw.
Insert the solar panel's power plug into the power input at the bottom of the Floodlight.
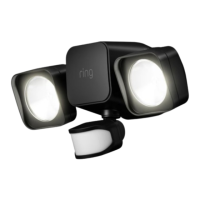
The Ring Solar Floodlight is a smart lighting solution designed to enhance security and convenience around your home. This device combines powerful LED floodlights with a motion sensor and is powered by a rechargeable battery, which is continuously charged by an included solar panel. This setup allows for flexible placement without the need for electrical wiring, making it an ideal choice for areas where traditional power sources are not readily available.
The primary function of the Ring Solar Floodlight is to provide bright, motion-activated illumination. When the integrated motion sensor detects movement within its adjustable range, the floodlights automatically turn on, deterring potential intruders and lighting up pathways or dark areas. This immediate response to motion enhances safety and security, giving you peace of mind.
Beyond simple motion activation, the Solar Floodlight integrates seamlessly with the Ring ecosystem through the Ring Bridge. The Ring Bridge acts as a central hub, connecting your Ring Smart Lights to the Ring app on your smartphone or tablet, as well as to other compatible Ring devices. This connectivity unlocks a range of smart features, transforming the floodlight from a standalone light into an intelligent component of your home security system.
Through the Ring app, you can customize the floodlight's behavior to suit your specific needs. You can adjust motion sensitivity, set schedules for when the lights should be active, and even link the floodlight with other Ring devices. For example, you could configure the floodlight to turn on when a Ring doorbell or camera detects motion, creating a synchronized security response. This interconnectedness allows for a more comprehensive and responsive security setup.
The solar panel component is crucial for the floodlight's self-sustaining operation. It continuously converts sunlight into electrical energy, which is then stored in the floodlight's rechargeable battery. This eliminates the need for manual battery replacements or running power cables, offering an eco-friendly and low-maintenance lighting solution. The floodlight is designed to operate effectively even when direct sunlight is rare, especially if a second battery is installed, ensuring consistent performance.
Setting up and using the Ring Solar Floodlight is designed to be straightforward, guided by the Ring app. The initial setup involves downloading the Ring app and setting up your Ring Bridge, which is essential for connecting the floodlight to your smart home network. Once the Bridge is established, the app walks you through the process of adding the floodlight, including selecting "Smart Lighting" when prompted.
Physical installation begins with preparing the floodlight itself. You'll need to remove the back cover by twisting it counter-clockwise, then remove the included battery by pushing a metal tab. Before inserting the battery back into the floodlight, it's crucial to fully charge it using the provided orange cable. The charging indicator will show when the battery is fully charged, ensuring optimal performance from the start. If you desire extended battery life or live in an area with limited sunlight, the option to purchase and install a second battery is available. After charging, the battery is inserted back into the floodlight, snapping into place. The back cover is then replaced, aligning the arrows to secure it.
Mounting the floodlight involves a few simple steps. First, the mounting plate is removed from the back cover by pressing a tab and sliding it off. This plate serves as a template for marking pilot holes on your chosen installation surface. Whether you're mounting on masonry or wood, the process is adapted accordingly. For masonry surfaces like stucco or brick, you'll drill 3/16" holes and insert wall anchors before driving the screws. For wood surfaces, you can screw the plate directly into the wall using a Philips head screwdriver. Once the mounting plate is securely installed, the floodlight is aligned with the plate and slid to the left to lock it in place. The motion sensor on the floodlight is adjustable, allowing you to fine-tune its angle for optimal detection in your specific environment.
The solar panel also requires careful placement to ensure it receives adequate direct sunlight. You'll select an installation location within 13 feet of your floodlight, marking pilot holes using the mounting arm as a template. Similar to the floodlight, the mounting arm is then screwed into the wall, with wall anchors used for hard surfaces. Once the mounting arm is secure, the solar panel is attached by positioning its rear slots over the arm and sliding it down. The angle of the solar panel can be adjusted by loosening a screw on the mounting arm, tilting the panel to the desired orientation for maximum sun exposure, and then re-tightening the screw. Finally, the solar panel's power plug is inserted into the power input at the bottom of the floodlight, completing the connection and enabling continuous charging.
The Ring Solar Floodlight is designed for low maintenance, primarily due to its solar-powered operation. The solar panel continuously charges the internal battery, reducing the need for manual intervention. However, regular checks of the solar panel's surface are recommended to ensure it remains clean and free of debris, such as leaves or dirt, which could obstruct sunlight and reduce charging efficiency. A simple wipe-down with a soft, damp cloth should suffice to keep the panel performing optimally.
Battery management is also simplified. The initial full charge of the battery is a one-time setup step, and the solar panel takes over from there. The option to install a second battery provides an additional layer of redundancy, ensuring the floodlight remains powered even during extended periods of cloudy weather or low sunlight. While the battery is designed for longevity, if you notice a significant decrease in performance over time, checking the battery status in the Ring app or considering a battery replacement might be necessary.
Software updates for the floodlight and Bridge are managed through the Ring app, ensuring that your devices always have the latest features and security enhancements. These updates typically occur automatically when the devices are connected to your network, requiring no direct action from you.
The physical components of the floodlight, such as the motion sensor and light heads, are designed to be durable and weather-resistant. Periodically checking for any physical damage or obstructions to the motion sensor's field of view can help maintain its effectiveness. The adjustable nature of the motion sensor and solar panel allows for easy re-orientation if your environmental conditions or lighting needs change.
In summary, the Ring Solar Floodlight offers a smart, self-sufficient, and connected lighting solution that integrates seamlessly into the Ring smart home ecosystem. Its solar charging capability, motion-activated lighting, and app-controlled features provide enhanced security and convenience with minimal ongoing maintenance.
| Motion Sensor | Yes |
|---|---|
| Battery Type | Rechargeable Lithium-Ion |
| Solar Panel Included | Yes |
| Connectivity | Wi-Fi |
| Weather Resistance | IP66 |
| Adjustable Settings | Motion sensitivity, light duration |
| Motion Detection Range | Up to 30 feet |
| Installation Type | Wall Mount |
| Compatibility | Alexa |
| Adjustability | Adjustable light heads |