3
Table of contents / Table des matières
- Valve body installation / Installation du corps de la valve page : 5
- Warning / Mise en garde page : 6
- Practical tips before installation / Conseils pratiques avant l'installation page : 7
- Kit #1 / #142 : Thermostatic system with hand shower on rail /
Système thermostatique avec douchette sur rail page : 8
- Kit #2 / #242 : Thermostatic system with hand shower on rail and 4 body jets /
Système thermo. avec douchette sur rail et 4 jets de corps page : 9
- Kit #3 / #342 : Thermostatic system with hand shower on rail and shower head /
Système thermo. avec douchette sur rail et tête de douche page : 10
- Kit #4 : Thermostatic system with 4 body jets, hand shower on rail
and shower head /
Système thermostatique avec 4 jets de corps, douchette sur rail
et tête de douche page : 11
- Kit #5 / #542 :Thermostatic system with 2 hand showers on rail and shower head /
Système thermostatique avec 2 douchettes sur rail
et tête de douche page : 12
- Kit#6 / #642 : Thermostatic system with hand shower on rail,
3 body jets and shower head /
Système thermostatique avec douchette sur rail,
3 jets de corps et tête de douche page : 13
- Thermostatic system with 6 body jets, hand shower on rail
and shower head /
Système thermostatique avec 6 jets de corps,
douchette sur rail et tête de douche page : 14
- Thermostatic system with 6 independent body jets,
hand shower on rail and shower head /
Système thermostatique avec 6 jets de corps indépendants,
douchette sur rail et tête de douche page : 15
- Thermostatic system / Système thermostatique page : 16
- Typical thermostatic system + 4 body jets /
Système thermostatique typique + 4 jets de corps page : 17
- Trim installation / Installation de l'habillage page : 18
- Flow chart / Charte de dédit page : 19
- Cartridge maintenance / Entretien des cartouches page : 20
- Troubleshooting guide / Tableau de dépannage
page : 22
- Maintenance of the check valve / Entretien de la valve d’arrêt page : 23
-Changing a variable position cartridge / page : 24
Changement de la cartouche à position variable
Gui-22 rev 09 03/2012
4
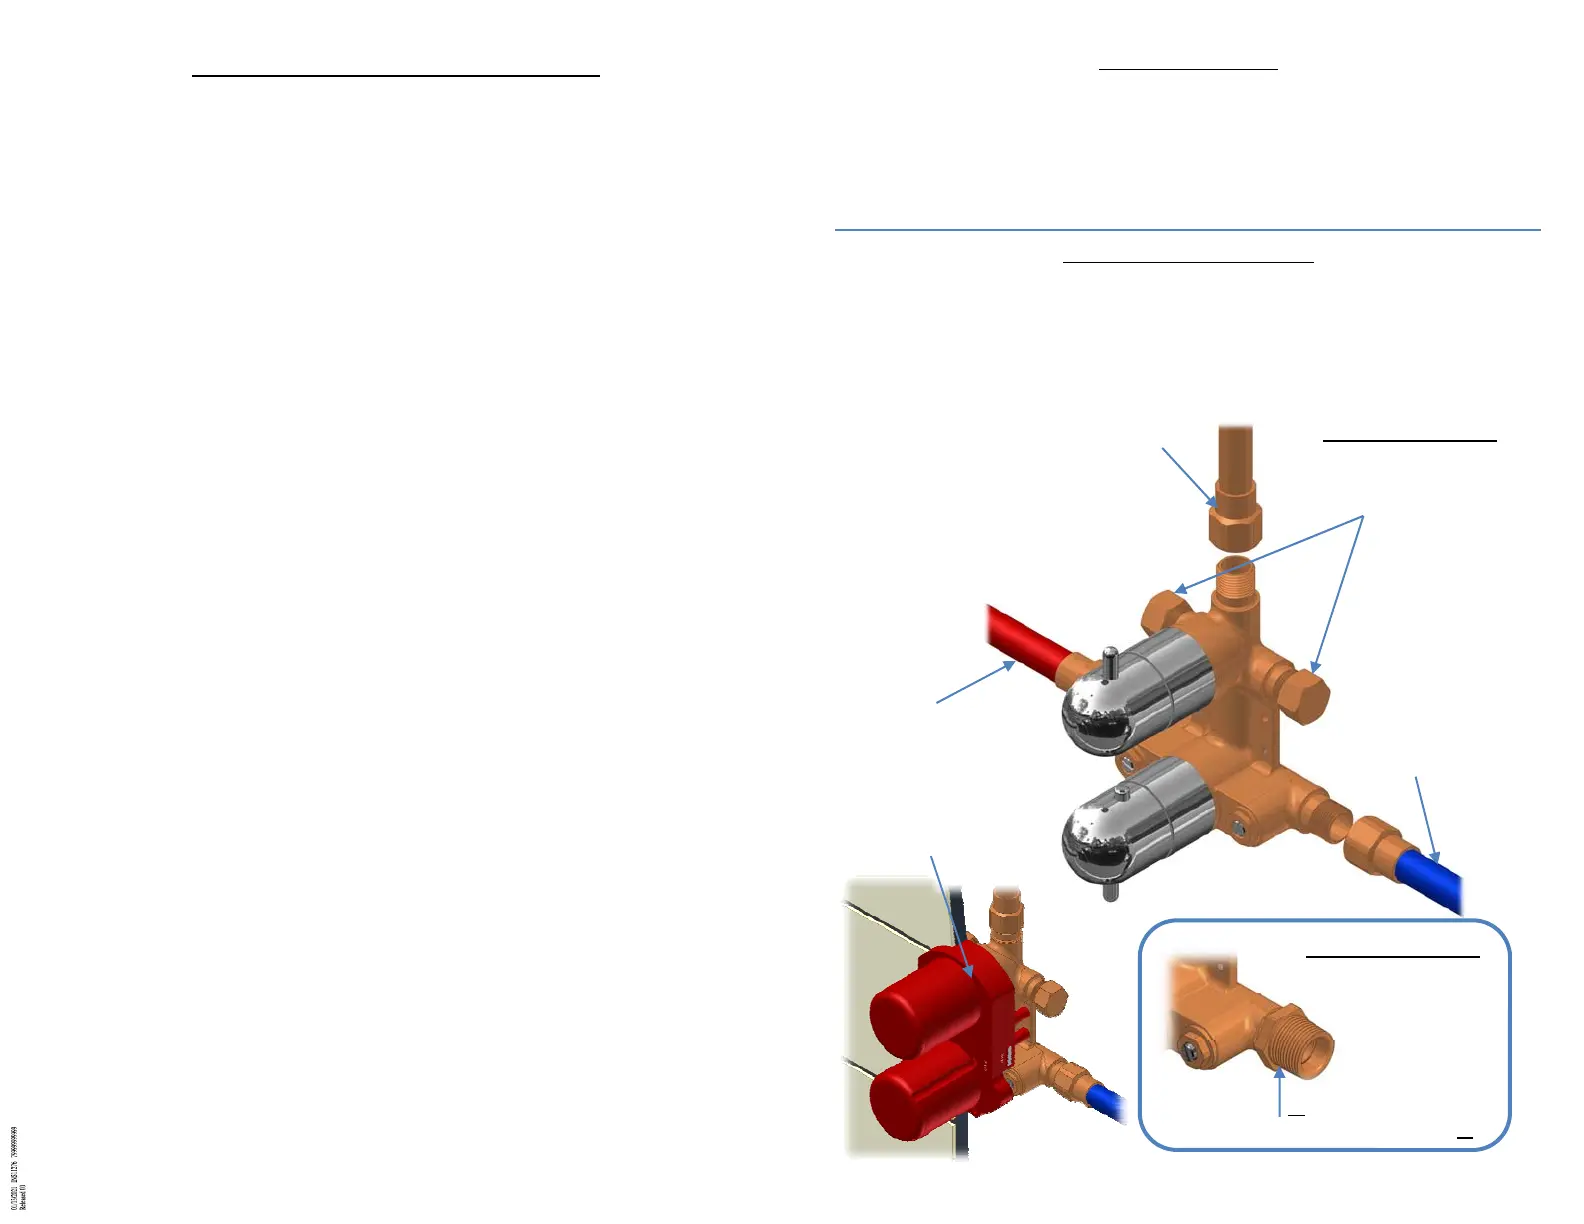
Valve body installation
A. Establish the valve position into the wall.
B. Position the template in the appropriate position, mark and cut out the wall liner.
C. Install the water supply (identified "HOT" and "COLD") and outlet connection on the
valve.
D. Fix the valve to the right depth (measure your depth from the finished wall with the
template).
E. Put the template on the valve until the work ends.
Installation du corps de la valve
A. Déterminer la position de la valve dans le mur.
B. Placer le gabarit dans la position prévue, tracer et découper la paroi murale.
C. Installer les entrées (identifiées "HOT" et "COLD") et les sorties d'eau sur la valve.
D. Solidifier la valve à la bonne profondeur (mesurer votre profondeur à partir du mur fini à
l'aide du gabarit).
E. Laisser le gabarit sur la valve jusqu'à la fin des travaux
.
¾” inlet piping /
Tuyau d’alimentation en ¾
Supply pipe of shower and / or body jet. The
flow will be adjusted with the top handle. /
Tuyau d'alimentation de douche et/ou de jet
de corps. Le débit sera ajusté avec la poi-
gnée du haut.
Optional outlet /
Sortie optionnelle
Cold side (supply) /
Coté froid (alimentation)
Hot side supply) /
Coté chaud (alimentation)
Template /
Gabarit
¾” Valve / Valve ¾”
½” Valve / Valve ½”
Add a volume
control for these
outlets. / Ajouter
un contrôle de
volume pour ces
sorties.
Gui-22 rev 09 03/2012