Do you have a question about the RITFIT BLP01 and is the answer not in the manual?
Essential safety guidelines for operating fitness equipment, including user conduct and environmental factors.
Advice on recognizing adverse symptoms during exercise and the importance of medical consultation.
Guidelines for maintaining the equipment, authorized repairs, and general operational care.
Important warnings regarding maximum weight capacity and regular part inspection.
Details on what RitFit LLC's basic warranty covers, including parts and labor for manufacturing defects.
Defines warranty coverage period, purchaser eligibility, and outlines conditions not covered by the warranty.
Information on how to get technical support, register the warranty, and report missing or damaged parts.
Emphasizes reading the manual carefully and provides contact details for customer service inquiries.
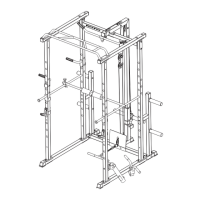
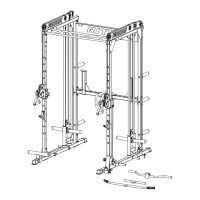
Familiarization with labeled parts of the leg press machine through an accompanying diagram.
States the maximum weight capacity of the leg press machine.
Lists and illustrates various bolts, nuts, washers, and tools included for assembly.
Lists and illustrates primary structural parts of the leg press machine, numbered 1 through 12.
Lists and illustrates secondary components like frames, handrails, and plates, numbered 13 through 24.
Lists and illustrates seat cushions, shoulder pads, springs, and other functional parts, numbered 25 through 33.
Instructions for assembling the bottom cross beam using specific bolts, washers, and sleeves.
Assembling the weldment frame with connection frames using bolts, nuts, and washers.
Attaching the support frame using bolts, nuts, washers, and bolt plates.
Installing the upper cross beam and L-shaped reinforced plate with bolts, nuts, and washers.
Attaching side frames and slide frame bases using bolts, nuts, washers, and bolt plates.
Securing the seat cushion frame and bolt plates with bolts, nuts, and washers.
Mounting the slider and rubber pads onto the guiding rods.
Fastening reinforced frames using bolts and washers.
Installing the reinforced frame, plate carriage, and bolt plates with bolts, nuts, and washers.
Attaching shoulder pad frames and shoulder pads using bolts and washers.
Securing frame components with bolts, nuts, washers, and bolt plates.
Mounting the push-off frame onto the assembled unit.
Securing pegs using bolts and nuts.
Attaching handrails, springs, and connection frames with various fasteners and washers.
Mounting the backrest using bolts, nuts, and washers.
Installing the bottom adjusting frame with bolts, nuts, and washers.
Securing the seat cushion using bolts and washers.
Attaching the back cushion and fixing plate using bolts and washers.
Inserting the L-pin for securing a component.
| Brand | RITFIT |
|---|---|
| Model | BLP01 |
| Category | Fitness Equipment |
| Language | English |