Do you have a question about the RITFIT PPC03A and is the answer not in the manual?
Guidelines for cleaning, inspecting, and maintaining the exercise equipment to ensure safety.
Details on parts and labor covered for manufacturing defects in material or workmanship.
Specifies warranty periods and lists conditions not covered by the warranty.
Instructions on contacting customer service for technical support and warranty claims.
Comprehensive list of all bolts, nuts, washers, and tools included for assembly.
Details of included accessories such as J-Hooks, safety bars, and foot tubes.
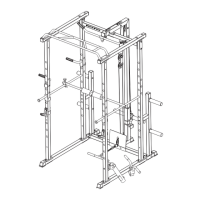
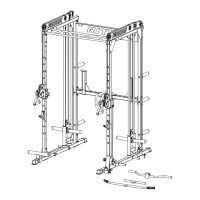
Identification and listing of the primary structural parts of the power cage.
Listing of all parts related to the pulley system, including cables, pulleys, and handles.
Instructions for assembling the base frame of the power cage.
Step-by-step guide to attaching the plate holder frame.
Instructions for securely attaching the upright frames to the base assembly.
Installation of guide rods for the pulley system.
Instructions for attaching the upper and rear cross beams.
Steps for assembling the upper portion of the power cage structure.
Guide for installing the chrome pull-up bar.
Attaching pulleys and pulley pegs to the frame structure.
Connecting the cables, handles, and pulley blocks for the crossover system.
Adding band pegs and the landmine attachment.
Final installation of accessories like J-hooks and safety bars.
| Brand | RITFIT |
|---|---|
| Model | PPC03A |
| Color | Black |
| Weight Capacity | 220 lbs |
| Display | LCD |
| Material | Steel |