Do you have a question about the RITFIT M1-C and is the answer not in the manual?
Details what is covered, who is covered, and warranty duration for the power cage.
Lists power cage warranty exclusions and provides contact information for support.
Lists all fasteners and tools included with the power cage.
Lists all accessory attachments for the power cage.
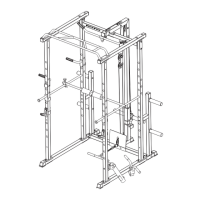
Details the primary structural parts of the power cage.
Lists parts specific to the power cage's pulley system.
Connects base frames and bottom cross beam for the power cage.
Attaches upright frames and sliders to the power cage base.
Installs pulley carriages, guide rods, and rubber pads on the power cage.
Connects upper cross frames to the power cage uprights.
Installs the rear cross beam for the power cage.
Attaches the RitFit nameplate to the power cage.
Secures the pull-up bar to the power cage.
Connects cables and carabiners for the power cage pulley system.
Attaches the plate holders to the power cage.
Installs quick release band pegs on the power cage.
Attaches J-hooks, foot tube, and landmine to the power cage.
Mounts the safety arms onto the power cage.
Installs the dip handles onto the power cage.
Connects landmine, lat, and low row bars to the power cage.
Secures components using expansion bolts for the power cage.
Outlines what the Smith attachment warranty covers and its duration.
Lists Smith attachment warranty exclusions and provides contact information.
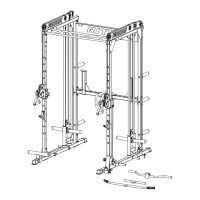
Lists the main structural parts of the Smith attachment.
Lists all fasteners and washers for the Smith attachment.
Attaches the left and right Smith frames to the power cage.
Secures Smith attachment frames using bolts, nuts, and washers.
Installs the Smith barbell onto the Smith attachment frames.
| Motor Power | 2.5 HP |
|---|---|
| Display | LCD |
| Foldable | Yes |
| Connectivity | Bluetooth |
| Type | Treadmill |
| Sensors | Heart rate monitor |