Do you have a question about the Roberts Rambler BT and is the answer not in the manual?
Connect the radio to the mains power supply using the adaptor.
Turn the radio on and initial station scan.
Store and recall favourite DAB or FM radio stations.
Tune into FM radio stations using search tuning.
Connect a smart device to play music wirelessly.
Reset the radio to its initial factory state.
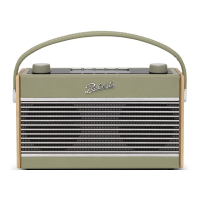
The Roberts Rambler BT is a portable DAB/DAB+/FM radio with Bluetooth audio streaming capabilities, designed for versatile listening at home or on the go. It features a classic, retro-inspired design combined with modern functionalities, allowing users to enjoy a wide range of audio sources.
The primary function of the Rambler BT is to provide high-quality radio reception across DAB/DAB+ and FM RDS wavebands. DAB/DAB+ offers access to digital radio stations with clearer sound and more station choices, while FM RDS provides traditional analogue radio with station information. The radio can store up to 20 station presets (10 DAB and 10 FM), allowing users to quickly access their favorite stations.
Beyond radio, the device integrates Bluetooth 4.1 for wireless audio streaming. This enables users to connect a smartphone, tablet, or laptop and play music or other audio content through the radio's speaker. The Bluetooth functionality supports A2DP and AVRCP profiles, allowing for control of playback (play/pause, next/previous track) directly from the radio, depending on the connected device and application.
The Rambler BT also includes an Auxiliary input socket, enabling wired connection to external audio sources. When an external device is connected via the auxiliary input, the radio plays audio in mono through its speaker and in stereo through headphones.
For personal listening, a 3.5mm headphone socket is provided, which automatically mutes the internal loudspeaker when headphones are plugged in.
The radio is designed for ease of use with a clear LCD display and intuitive controls.
The Rambler BT can be powered either by mains electricity using the included AC adaptor or by 4 x C size (LR14) batteries, offering true portability. An Eco power saving mode is available, which significantly extends battery life by minimizing power consumption when in standby, making it ideal for occasional use or when not connected to mains power. This mode keeps the internal clock running for days or weeks, allowing alarm functions to remain active.
The device features a built-in clock with alarm functions. Users can set two independent alarms, choosing to wake up to DAB radio, FM radio, or a buzzer. Alarms can be configured to sound once, daily, on weekdays, or on weekends. The radio allows users to select a specific radio station (either the last listened or a preset) and a desired volume for the alarm. A "humane wake" feature ensures a gentle start to the day, with the buzzer alarm gradually increasing in volume. A snooze function is also included, allowing for a temporary silence of the alarm for 5 minutes.
A multi-level display dimmer allows users to adjust the brightness of the LCD display to suit their environment. For DAB radio, the display can cycle through station name, scrolling text, program type, signal strength, multiplex name, frequency, bit rate, time, or date. For FM radio, options include station name, scrolling text, program type, frequency, time, or date.
The radio offers a Dynamic Range Control (DRC) feature for DAB, which can make quieter sounds easier to hear, especially in noisy environments. Users can also adjust the stereo/mono setting for FM radio, which can improve reception quality for weaker signals by reducing hiss.
For DAB radio, an auto-tune function scans for available stations and adds them to the station list. A "prune station" option allows users to remove stations that are no longer available. For FM radio, the auto-tune function scans upwards or downwards, stopping automatically when a station of sufficient strength is found. Manual tuning is also possible.
Storing and recalling presets is straightforward. Users can long-press the Preset button to store a station and then rotate the Tuning control to select the desired memory number. A short press of the Preset button allows for quick recall of stored stations.
A comprehensive menu system is accessible via a long press of the Info/Menu button. This allows users to configure various settings, including:
The radio features a clear layout of buttons and a rotary Tuning/Select control. Key controls include:
The manual provides guidance on battery installation and replacement. It recommends removing batteries if the radio will not be used for an extended period and suggests using the AC adaptor whenever possible for economy. The Eco power saving mode is highlighted as a way to maximize battery life during long-term battery-powered use.
The device is designed for simple operation, with no specific user-level maintenance beyond battery management and keeping the unit clean. The manual advises reading the provided safety leaflet before connecting the radio to the mains. In case of issues, a factory reset option is available to revert the radio to its default settings. The telescopic aerial should be fully extended for optimal reception.
| Antenna type | External |
|---|---|
| MP3 playback | - |
| Product color | Blue |
| Volume control | Rotary |
| Audible alarm(s) | Yes |
| Number of alarms | 2 |
| Country of origin | China |
| Bluetooth version | 5.0 |
| Headphone outputs | 1 |
| Headphone connectivity | 3.5 mm |
| Radio type | Portable |
| Tuner type | Analog & digital |
| FM band range | 87.5 - 108 MHz |
| DAB band range | 174.928-239.200 MHz |
| Supported radio bands | DAB, DAB+, FM |
| Preset stations quantity | 20 |
| Clock mode | 24h |
| RMS rated power | - W |
| Power source | AC/Battery |
| Cables included | AC |
| Customs product code (TARIC) | 8527990090 |
| Battery type | C |
| Number of batteries supported | 4 |
| Package type | Gift box |
| Package depth | 1280 mm |
| Package width | 2900 mm |
| Package height | 1520 mm |
| Package weight | 1112 g |
| Depth | 90 mm |
|---|---|
| Width | 214 mm |
| Height | 125 mm |
| Weight | 770 g |