R2N and R2N Ultra
Operation Manual
5
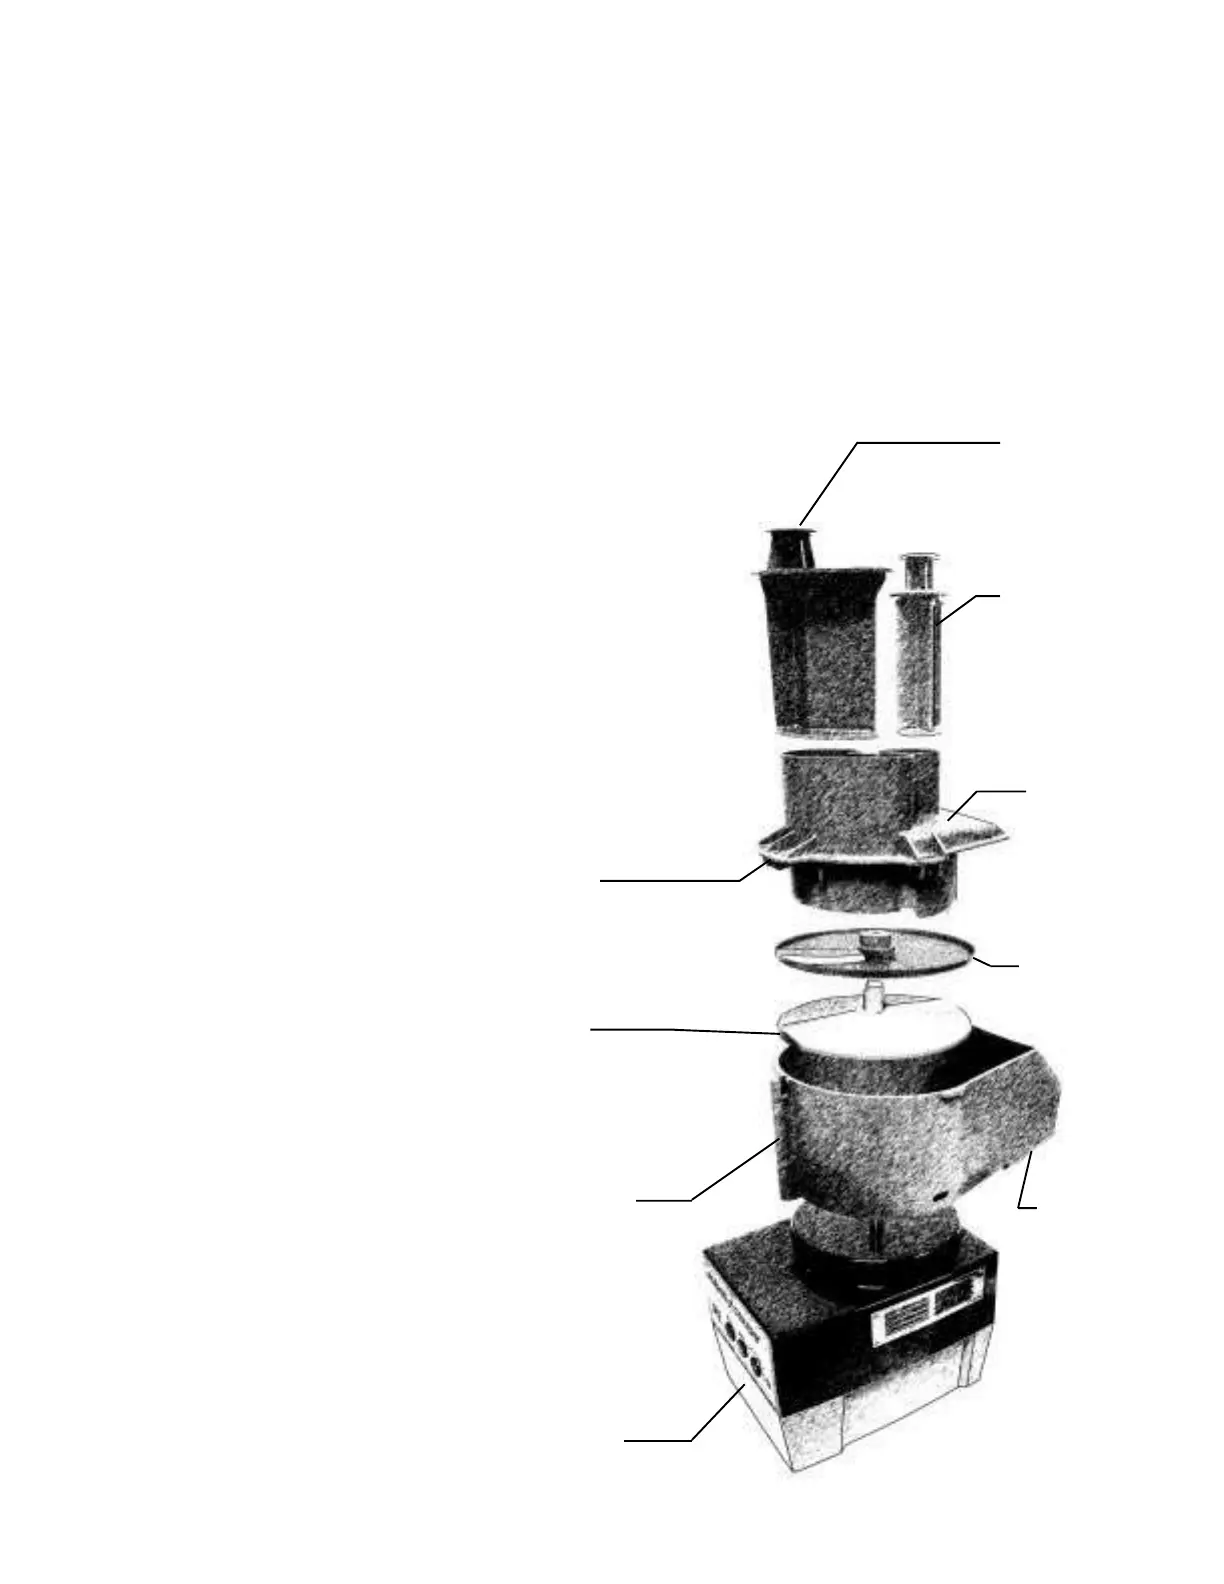
B. CONTINUOUS FEED ATTACHMENT ASSEMBLY INSTRUCTIONS
1. THE CORD SHOULD ALWAYS BE UN-
PLUGGED DURING ASSEMBLY AND DISASSEM-
BLY!
2. Place the continuous feed attachment on the mo-
tor base with the discharge chute to the back (as you
are facing the front of the motor base).
3. Looking from the top, turn the attachment slightly
clockwise, and with a gentle downward pressure, turn
it back counterclockwise; until it locks into place. The
attachment should be level with the top surface of the
motor base.
4. Place the plastic discharge plate on the motor shaft,
and rotate the plate until it drops fully into place on
the motor shaft. When properly installed, it should be
level with and just off the bottom of the continuous
feed attachment.
5. Place the cutting plate of your choice on the dis-
charge plate. Rotate the plate until it drops into place
and is fully seated on the discharge plate.
6. Press the off button in case the ma-
chine was left turned on.
9. DO NOT OPERATE THE MACHINE UN-
LESS IT IS PROPERLY ASSEMBLED AND
THE CONTINUOUS FEED LEAD IS FULLY
SEATED AND CENTERED OVER THE AT-
TACHMENT!
LargeLarge
LargeLarge
Large
PusherPusher
PusherPusher
Pusher
MotorMotor
MotorMotor
Motor
BaseBase
BaseBase
Base
AssemblyAssembly
AssemblyAssembly
Assembly
ExitExit
ExitExit
Exit
ChuteChute
ChuteChute
Chute
ContinuousContinuous
ContinuousContinuous
Continuous
FeedFeed
FeedFeed
Feed
AttachmentAttachment
AttachmentAttachment
Attachment
DischargeDischarge
DischargeDischarge
Discharge
PlatePlate
PlatePlate
Plate
ContinuousContinuous
ContinuousContinuous
Continuous
FeedFeed
FeedFeed
Feed
LeadLead
LeadLead
Lead
SmallSmall
SmallSmall
Small
PusherPusher
PusherPusher
Pusher
CuttingCutting
CuttingCutting
Cutting
PlatePlate
PlatePlate
Plate
7. Facing the front of the mo-
tor base assembly, place the
continuous feed lead on the
continuous feed attachment
with the ramp on the lead
aligned over the safety switch
rod on the continuous feed at-
tachment. While looking
down at the top, turn the lead
slightly clockwise then back
counterclockwise, locking it in
place. The lead should be
aligned with the top surface of
the continuous feed attach-
ment.
8. Place the pushers in their
corresponding openings in the
continuous feed lead.
RampRamp
RampRamp
Ramp