EasyManua.ls Logo

Rockford Fosgate 3SIXTY.3 User Manual

Rockford Fosgate 3SIXTY.3
27 pages
To Next Page IconTo Next Page
Page #1 background imageLoading...
Page #1 background image
Serial Number:
Date of Purchase:
Installation & Operation
INTERACTIVE
SIGNAL PROCESSOR
3SIXTY.3
Quick Setup Guide
1. Install 3Sixty.3 software
2. Open 3Sixty.3 Software (See pg 9)
3. Connect 3Sixty.3 USB cable to 3Sixty.3 and then to the PC. (See pg 9)
4. Open the 3Sixty.3 user interface (UI). A pop up window will appear telling you the unit is not configured.
Click “OK” (See pg 10)
5. If the configuration pop up window above does not appear telling you that the unit is not configured,
open the “Device” tab and select “Configuration” in the top left corner
. (See pg 9)
6. When the input configuration page appears, select your source interface type and label your input
channels. Click “Next” (See pg 15)
7. When the output configuration page appears, label your output channels if one or more channels is not
being used select “Not Connected”. Click “Next” (See pg 15)
8. When the input channel summing page appears, select the output channel from the vehicle illustration,
then select the input(s) you would like to use/sum to create that output channel. After assigning ALL
output channels there inputs, Click “Next” (See pg 15)
9. When the assign source presets page appears, select the preset(s) you would like to assign to each
source. Click “Next” (See pg 16)
10. When the input level setup prompt appears, insert the 3Sixty.3 setup disk and play track #1 at max
volume and follow the on screen directions. Click “Next”(Outputs will be muted) (See pg 16)
11. When the adjust source level appears, reduce the volume of the source until all the level meters are
green. Click “Next” (The 3Sixty
.3 is not looking for a hard clipped signal you would typically see when
level setting an amplifier) (Make a note of the MAXIMUM volume level on the source unit achieved
keeping the level meters green for future steps) (See pg16)
12. When the input attenuator controls appears, select “Auto Range” to automatically match the input
voltage, to the input voltage range of the DSP
. (See pg 16)
13. a) If using a low level input, the mute warning page will appear prompting you to reduce your
volume. Click “Finish” and go to Step #15 (See pg 17)
b) If using a high level input, the input denormalization setup prompt appears, use the 3Sixty.3 setup
disk and play track #2 at half of the noted source volume in step #11. Click “Next” (See pg 17)
14. During the input normalization page, select “Auto Normalize”. This may take up to 5 min. Once
completed, Click “Next” (See pg 17)
15. The mute warning page will appear prompting you to reduce your volume, and Click “Finish”. Device
setup is now complete. Please proceed with system tuning.
16. Select the crossover type, class, slope, and frequencies for each channel. (See pg 13 & 21)
17. Level set the amplifiers to the main source unit, then adjust each additional source level. (See pg 14
& 22)
18. Select the time delay for each channel. (See pg 14 & 28)
19. Adjust the EQ for each channel, for each source or preset. (See pg 14 & 28)
20. After adjusting the EQ, level set the amplifiers to the main source unit, then adjust each additional
source level. (See pg 22)
21. Under the ”File” tab select “Save File”. (See pg 10)
Question and Answer IconNeed help?

Do you have a question about the Rockford Fosgate 3SIXTY.3 and is the answer not in the manual?

Rockford Fosgate 3SIXTY.3 Specifications

General IconGeneral
BrandRockford Fosgate
Model3SIXTY.3
CategoryComputer Hardware
LanguageEnglish

Summary

Quick Setup Guide

Product Overview

Introduction

Overview of the Rockford Fosgate brand and product quality.

Safety Precautions

Essential safety advice for using the audio system and preventing hearing damage.

Technical Specifications

Detailed electrical and performance parameters of the 3Sixty.3 processor.

Design and Installation

Design Features Overview

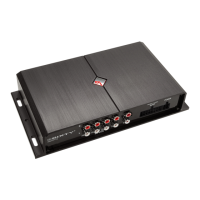
Highlights key physical and connectivity features of the 3Sixty.3 processor.

Installation Process Steps

Guides through essential installation considerations, mounting, and wiring.

Initial Setup and Configuration

File and Device Management

Covers saving/loading settings and managing device configurations via software.

Input Configuration and Level Setting

Details input assignment, summing, level setting, and signal denormalization.

Preset and Firmware Management

Manages EQ presets, loading them, storing them, and upgrading processor firmware.

EQ Setup and Tuning

Preferences and User Interface

Configures general settings, remote control, Bluetooth, and explains the main UI.

EQ Graph and Controls

Explains the graphical EQ display and the 31-band parametric EQ adjustment controls.

Crossover Network Settings

Details how to configure crossover types, classes, slopes, and frequencies.

System Configuration Screens

Input and Output Channel Assignment

Assigning and naming input and output channels to vehicle speaker locations.

Input Summing and Source Presets

Combining input channels and assigning EQ presets to different audio sources.

Tuning Procedures

Input Level Calibration

Guides through setting input levels and adjusting source volume for optimal signal.

Input Attenuator and Denormalization

Adjusting input attenuators and performing input denormalization for signal correction.

Advanced Adjustments

Normalize Source Unit Response

Visualizes and applies corrections to the source unit's frequency response.

Remote Control Settings

Configures mounting options and knob functions for the wired remote controller.

Troubleshooting

Common Troubleshooting Scenarios

Addresses power, audio, connectivity, and system response problems.

Troubleshooting Noise Problems

Guides on identifying and resolving audio noise floor or engine whine.

Warranty and Support

Warranty Coverage and Limitations

Details warranty coverage, limitations, and how to obtain service.

Related product manuals