EasyManua.ls Logo

RockJam RJ760MD User Manual

RockJam RJ760MD
8 pages
To Next Page IconTo Next Page
Page #1 background imageLoading...
Page #1 background image
RJ760MD Drum Kit with MIDI
User’s Guide
Please read this user’s guide first before operating the unit and save it for
future reference.
Congratulations on your purchase of this Roll-up Drum kit. To get the most from your purchase, please take a few minutes to
read these instructions.
1. Safety instructions
This product should not be exposed to water by dripping or splashing and no objects filled with liquids, such as vases,
should be placed near to the product. Do not place the unit on a wet surface.
Do not expose the product to temperatures above 35°C and keep it out of direct sunlight.
This product has no user-serviceable parts. Do not attempt to repair this product yourself. Only qualified service
personnel should perform servicing.
Do not subject the plastic part of the product to harsh impacts. Do not drop the product as this may result in damage.
Disconnect the product from the power source before cleaning. Never handle the USB cable with wet hands as this could
cause electric shock. Unplug the product when it will be unused for long periods of time.
This product is designed for indoor use only.
If the USB cable or power adapter needs to be replaced, ensure that the replacement complies with the manufacturer’s
specifications.
2. Preparation for use
Unpack the drum kit carefully. We recommend that you save the box and packing materials in case you wish to store the
drum kit. Before setting up the unit, verify that the following accessories are present:
CONTENTS:
1 x RJ760MD Drum kit with MIDI
2 x Pedals
2 x Drum sticks
1 x USB Power adapter
1 x USB Power/Data cable
1 x 3.5mm AUX input cable
1 x Windows software CD
1 x Printed user guide
3. Power source
Unwind the USB power cable to its full length; connect one end to the USB/DC 5V input on the rear of the drum kit.
Connect the other end to the USB power adapter. Plug in the USB power adapter to a 110V power socket and switch on.
Alternatively, the drum kit can be powered from a computer USB port using the USB power cable supplied.
4. Location of controls and indicators
1 - VOL- : Press to reduce the output volume. There are 9
volume levels available.
7 – RHY: Press to cycle between the 9 available rhythms.
2 – VOL+: Press to increase the output volume. There are
9 volume levels available.
8 – START/STOP: Press to start playback of the selected
rhythm. Press to stop playback of the rhythm or demo song
that is playing.
3 – STYLE: Press to cycle between the 7 drum kit sounds
available.
9 – T-: Press to lower the tempo of the selected rhythm or
demo song.
4 – DEMO: Press to cycle between the 12 demo songs
available.
10 – T+: Press to raise the tempo of the selected rhythm or
demo song.
5 – REC: Press to start the record function. A maximum of
336 beats can be recorded.
11- POWER: Power indicator LED, lights red when
switched on.
6 – PLAY: Press to play back the recorded beats. 12 – REC: Record indicator LED, lights green when
recording.
Question and Answer IconNeed help?

Do you have a question about the RockJam RJ760MD and is the answer not in the manual?

RockJam RJ760MD Specifications

General IconGeneral
TypeElectronic Drum Kit
Pads7
Demo Songs10
ConnectivityUSB
Included AccessoriesDrumsticks
PowerAC Adapter

Summary

Safety Instructions

General Safety Precautions

Precautions regarding water, temperature, service, impacts, cleaning, and usage environment.

Preparation for Use

Included Accessories

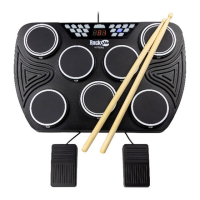
List of accessories included with the RJ760MD Drum kit with MIDI.

Power Source Options

Connecting the Power Adapter

Instructions for connecting the USB power adapter or USB port for power.

Controls and Indicators

Control Panel Overview

Details the functions of buttons like VOL-, VOL+, STYLE, DEMO, REC, PLAY, RHY, START/STOP, T-, T+, and indicator LEDs.

Rear Panel Connections

Connecting External Devices

Details connections for USB adapter, pedals, headphones, and auxiliary devices.

Drum Pad Layout and Identification

Pad Identification Chart

Identifies each drum pad by number and name (Snare, Hi-hat, Toms, Cymbals, Bass drum).

Basic Operation

Powering On and Volume Control

Instructions for switching the unit on and adjusting the volume levels.

Drum Kit and Rhythm Selection

How to select different drum kit sounds and rhythms.

Pedal Operation

Pedal Functions

Explains how pedals control Bass drum and Hi-hat functions.

Demo Songs

Selecting Demo Songs

How to cycle through and select the 12 available demo songs.

Rhythm Selection

Choosing Rhythms

How to cycle through and select the 9 available rhythms.

Tempo Control

Adjusting Rhythm and Demo Tempo

Using T+ and T- buttons to adjust playback tempo for rhythms and demos.

Recording and Playback

Recording Drum Beats

Instructions for recording drum beats and playback.

Switching Unit Off

Powering Down the Device

How to switch off the drum kit using the power switch.

Playing Along with External Audio

Connecting Audio Devices

How to connect and play along with iPhone, iPod, MP3 players, etc.

Headphone and Speaker Connection

Connecting Audio Output

Connecting headphones or external speakers for practice or playback.

Power Saving Feature

Automatic Power Save Mode

Details the power save function that activates after 1 minute of inactivity.

MIDI Operation

Connecting to a Computer

Instructions for connecting the drum kit to a PC/MAC via USB for MIDI.

Software Installation

Guide to installing the included MIDI drum software from the CD.

Troubleshooting and Support

Common Problems and Solutions

Table of common issues like no power, abnormal sound, no sound, and unresponsiveness with remedies.

Product Specifications

Technical Details

Lists DC power requirements, dimensions, functions, weight, and material.

FCC Compliance Statement

FCC Class B Part 15 Compliance

Details compliance with FCC rules regarding radio frequency energy and interference.