Do you have a question about the Rockler Beadlock Pro and is the answer not in the manual?
Attaching the drill guide, positioning it, setting drilling depth with the stop collar, and chucking the bit.
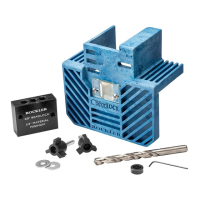
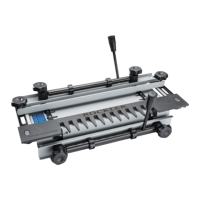
The Rockler Beadlock Jig with 3/8" Accessory Kit is a woodworking tool designed to create strong, precise mortise and tenon joints, specifically for use with Beadlock tenon stock. This jig simplifies the process of drilling the necessary mortises, ensuring accurate alignment and consistent results for various woodworking projects. It is intended for specific applications as defined in the instructions and should not be modified or used in any manner not described within this manual.
The primary function of the Beadlock Jig is to guide a drill bit to create a series of overlapping holes that form a mortise. This mortise is designed to accept Beadlock tenon stock, which features a unique beaded profile that locks into the corresponding mortise, creating a strong mechanical joint. The jig is particularly useful for joining pieces of wood at right angles, such as in frame and panel construction, cabinet making, or furniture assembly. The 3/8" Accessory Kit included with the jig is specifically configured for creating mortises that accommodate 3/8" Beadlock tenon stock.
The jig's design incorporates a drill guide that ensures the drill bit remains perpendicular to the workpiece, preventing angled or misaligned holes. This precision is crucial for the integrity and strength of the Beadlock joint. The jig also features a depth stop mechanism, which, when properly set, ensures that the mortises are drilled to the correct depth, allowing for optimal tenon insertion and glue squeeze-out.
The Beadlock Jig is designed for ease of use, even for woodworkers with varying levels of experience. Before any use, it is critical to read, understand, and follow all instructions and safety warnings provided in the manual. This includes reviewing product-specific safety warnings, setup procedures, and step-by-step instructions.
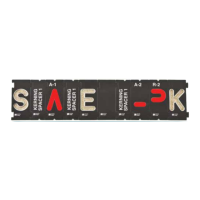
One of the key usage features is the adjustable drill guide. The 3/8" Drill Guide attaches to the Jig Frame using two Three-Wing Knobs and Washers. The lettering on the Drill Guide should face backward (away from the Jig Frame) for readability. The left Three-Wing Knob is inserted into the slot marked for the 3/8" block, and the posts of the Three-Wing Knobs thread directly into the Drill Guide. Initially, these knobs should not be fully tightened.
The drill guide can be slid to different positions, marked "A" and "B" on the Jig Frame, to create the full mortise. For the initial drilling sequence, the 3/8" Drill Guide is slid to the "A" position, following the directional arrow, and then the Three-Wing Knobs are tightened. This "A" position allows for drilling the first series of three holes that begin to form the mortise. Once these holes are drilled, the Three-Wing Knobs are loosened, and the Drill Guide is shifted to the "B" position to complete the mortise by drilling the remaining holes. It's important to note that in the "B" position, one hole may be partly covered, and no attempt should be made to drill into this covered section.
Setting the drilling depth is another important usage feature. The jig includes two scales molded into its back face for this purpose. The 3/8" Stop Collar is slid onto the 3/8" Split-Point Drill Bit, and the bit is inserted into the hole in the 3/8" Drill Guide closest to the desired scale. For 3/8" Beadlock tenon stock, the bit is lowered until the outside of its cutting edge (not the tip) aligns with the 3/8" line on the scale. The included Hex Key is then used to tighten the Stop Collar. If using the inch scale, the bit depth should be set to one-half the length of the Beadlock tenon stock plus 1/8" to allow for glue squeeze-out. Once the cutting depth is set, the bit is chucked into a handheld drill.
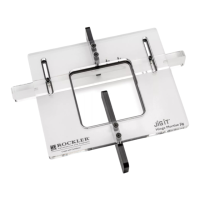
To prepare for drilling, the user first determines and marks the centerline of the joint on both workpieces. One workpiece is then secured in a vise or clamp with the marked line in a vertical orientation. The Beadlock Joinery Jig is positioned on the workpiece, aligning the jig's centerline with the workpiece's centerline. The bottom of the Drill Guide must be tight to the workpiece, and the jig securely clamped in place.
When drilling, it is recommended to drill about 1/2" at a time, backing out the bit frequently to clear chips and dust, rather than forcing the bit or attempting to drill the entire depth at once. This technique helps prevent overheating of the bit and ensures cleaner holes.
The included 3/8" Drill Guide is designed to center the Beadlock joint on 3/4"-thick stock. For different stock thicknesses, the Beadlock Spacer Kit (50917, sold separately) would be required.
After drilling both workpieces, a dry test fit of the joint is recommended. This involves inserting a piece of 3/8" Beadlock tenon stock into the mortise of one workpiece and then fitting the mortise of the other workpiece onto the tenon. A rubber or dead-blow mallet may be used to bring the pieces together if needed. This test fit allows for checking the alignment of the centerlines. If the centerlines are slightly off, the clear hairline indicator on the front of the jig can be adjusted by half the distance they are off in the direction of the error. Once satisfied with the fit, glue can be applied, and the joint clamped.
While the manual does not explicitly detail maintenance features for the jig itself, general woodworking tool maintenance practices apply to ensure its longevity and continued accuracy.
The manual emphasizes the importance of using the most recent version of instructions and safety warnings, which can be checked on Rockler.com. This suggests that updates to usage or maintenance recommendations may be provided over time, and users should stay informed. For further questions or support, Rockler's Technical Support Department is available.
| Brand | Rockler |
|---|---|
| Product Name | Beadlock Pro |
| Product Type | Joinery Jig |
| Compatibility | Wood |
| Joint Type | Mortise and Tenon |
| Dowels Included | No |
| Tenon Size | 3/8 inch |
| Includes | Jig, drill bits |
| Drill Bit Sizes | 3/8 inch, 1/2 inch |
| Material | Aluminum, Steel, Plastic |