2
Panel Descriptions
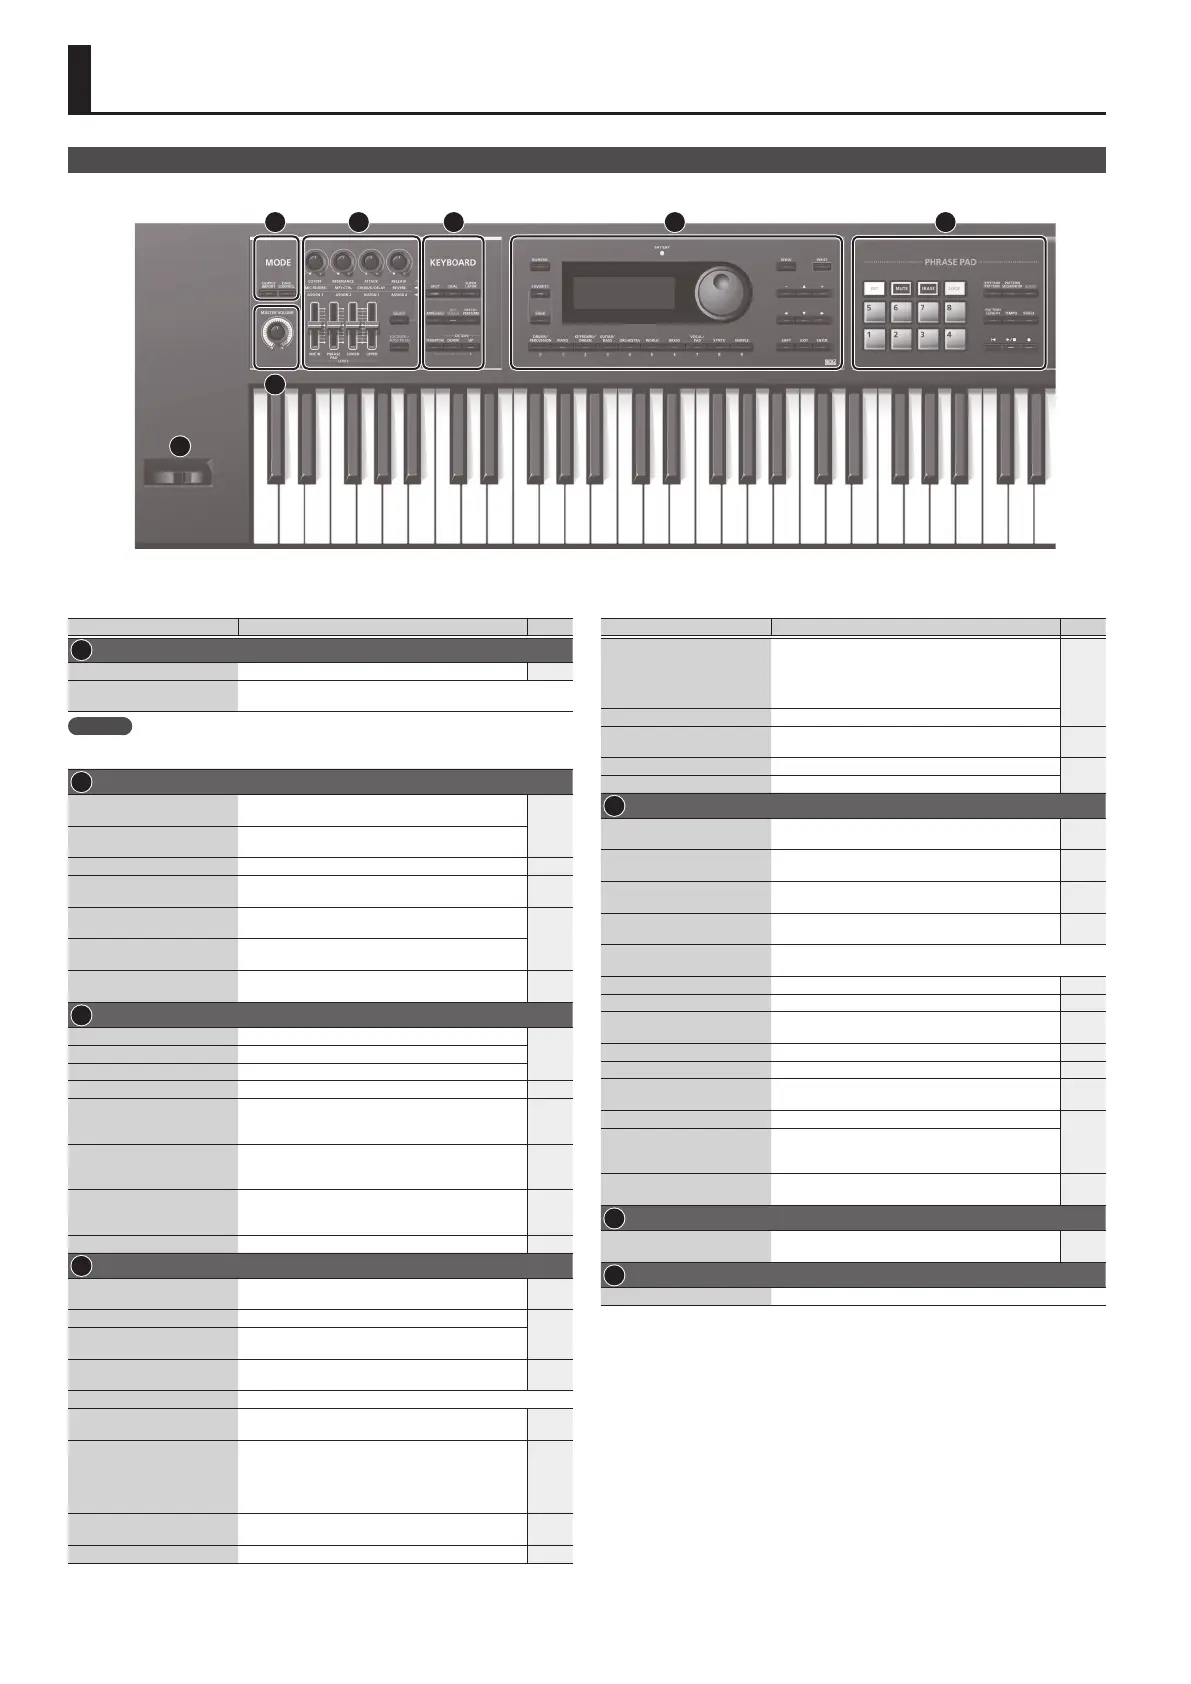
Top Panel
1 2 3 4 5
6
7
Controller Explanation Page
1
MODE
[SAMPLE IMPORT] button Used to import an audio le (sample) into the JUNO-DS. p. 9
[DAW CONTROL] button
Used to control DAW software from the JUNO-DS.
For details, refer to “Parameter Guide (English)“ (PDF).
MEMO
You can move to the EDIT MENU screen by pressing the [SAMPLE IMPORT] button and [DAW
CONTROL] button simultaneously.
2
Control knobs
Control the parameters that you’ve selected by the
[SELECT] button.
p. 7
[SELECT] button
Selects the group of parameters that is controlled by
the Control knobs.
[MIC IN] LEVEL slider Adjusts the volume of the input from MIC INPUT jack. p. 8
[PHRASE PAD] LEVEL slider
Adjusts the volume of the rhythm pattern / audio
player.
p. 11
p. 12
[LOWER] LEVEL slider
Split: Adjusts the volume of the lower part.
Dual: Adjusts the volume of part 2.
p. 6
[UPPER] LEVEL slider
Split: Adjusts the volume of the upper part.
Dual: Adjusts the volume of part 1.
[VOCODER/AUTO PITCH]
button
Accesses settings for the Vocoder function and Auto
Pitch function.
p. 8
3
KEYBOARD
[SPLIT] button Turns the split function on/o.
p. 6[DUAL] button Turns the dual function on/o.
[SUPER LAYER] button Turns the super layer function on/o.
[ARPEGGIO] button Turns the arpeggiator on/o. p. 8
[KEY TOUCH] button
Used to change the touch response of the keyboard.
Depending on the KEY TOUCH setting, the [KEY TOUCH]
button is lit or unlit.
p. 7
p. 16
[PATCH/PERFORM] button
When this button is on (lit), the JUNO-DS is in
Performance mode. When this button is o (unlit), the
JUNO-DS is in Patch mode.
p. 5
[TRANSPOSE] button
Hold down this button and use the OCTAVE [DOWN]
[UP] buttons to raise or lower the pitch range in
semitone steps.
p. 7
OCTAVE [DOWN] [UP] buttons Raise or lower the pitch range in steps of an octave. p. 7
4
[NUMERIC] button
When this button is on (lit), you can use the [0]–[9]
buttons to enter numeric values.
p. 4
[FAVORITE] button Turns the Favorite function on/o.
p. 7
[BANK] button
When this button is on (lit), you can use the [0]–[9]
buttons to select Favorite banks.
BATTERY indicator
The indication changes depending on the remaining
battery amount.
p. 3
Display Shows various information depending on operation.
Value dial
Changes a value. If you hold down the [SHIFT] button
and turn the dial, the value changes more greatly.
p. 4
[DRUMS/PERCUSSION]–
[SAMPLE] (Category) buttons
([0]–[9] buttons)
Select categories (types) of sound (such as patches
or drum kits). You can also use the value dial to select
other sounds within the same category.
* When the [NUMERIC] button is on (lit), these buttons
operate as [0]–[9] buttons to enter numeric values.
p. 5
[MENU] button Displays a menu screen.
p. 4
p. 16
[WRITE] button Saves the modied settings in internal memory. p. 10
Controller Explanation Page
[–] [+] buttons
Changes a value.
* If you press one of these buttons while holding
down the other, the value changes more rapidly. If
you press one of these buttons while holding down
the [SHIFT] button, the value changes more greatly.
p. 4
[
H
] [
I
] [
K
] [
J
] buttons Move the cursor position up/down/left/right.
[SHIFT] button
Accesses the corresponding edit screen when pressed
together with another button.
p. 4
p. 22
[EXIT] button Exits a screen or cancels an operation.
p. 4
[ENTER] button Used to execute an operation.
5
PHRASE PAD
[TAP] button
Sets the tempo to the interval at which you press this
button during pattern playback.
p. 11
p. 13
[MUTE] button
When using the pattern sequencer, mutes the specied
track.
p. 13
[ERASE] button
When using the pattern sequencer, erases the recorded
pattern or a portion of the pattern.
p. 14
[LOOP] button
When using the pattern sequencer, turns loop playback/
recording on/o.
p. 13
Pads [1]–[8]
Play back phrases (rhythm patterns / patterns / samples) that are
assigned to the pads.
[RHYTHM PATTERN] button Press this button to use rhythm patterns. p. 11
[PATTERN SEQUENCER] button Press this button to use the pattern sequencer. p. 13
[AUDIO] button
Press this button to use the “audio player” which plays
back audio les from a USB ash drive.
p. 12
[PATTERN LENGTH] button Changes the number of measures in the pattern. p. 14
[TEMPO] button Adjusts the tempo. p. 11
[MIXER] button
When using the pattern sequencer, species settings
such as level or pan for each track.
p. 13
[
u
] button Moves to the beginning of the pattern or audio le.
p. 11
p. 12
p. 13
[
s
] button
Starts/stops playback of the rhythm pattern, pattern,
or audio le that is selected for the rhythm pattern
function, the pattern sequencer, or the audio player.
[
t
] button
When using the pattern sequencer, press this button to
record a pattern.
p. 13
6
[MASTER VOLUME] knob
Adjusts the volume that is output from the OUTPUT
jacks and the PHONES jack.
p. 5
7
Pitch bend/Modulation lever Varies the pitch or applies vibrato.