2
JUPITER-Xm Version 1.10 Supplementary Manual
TR-REC Input Method Supported in STEP
EDIT Mode
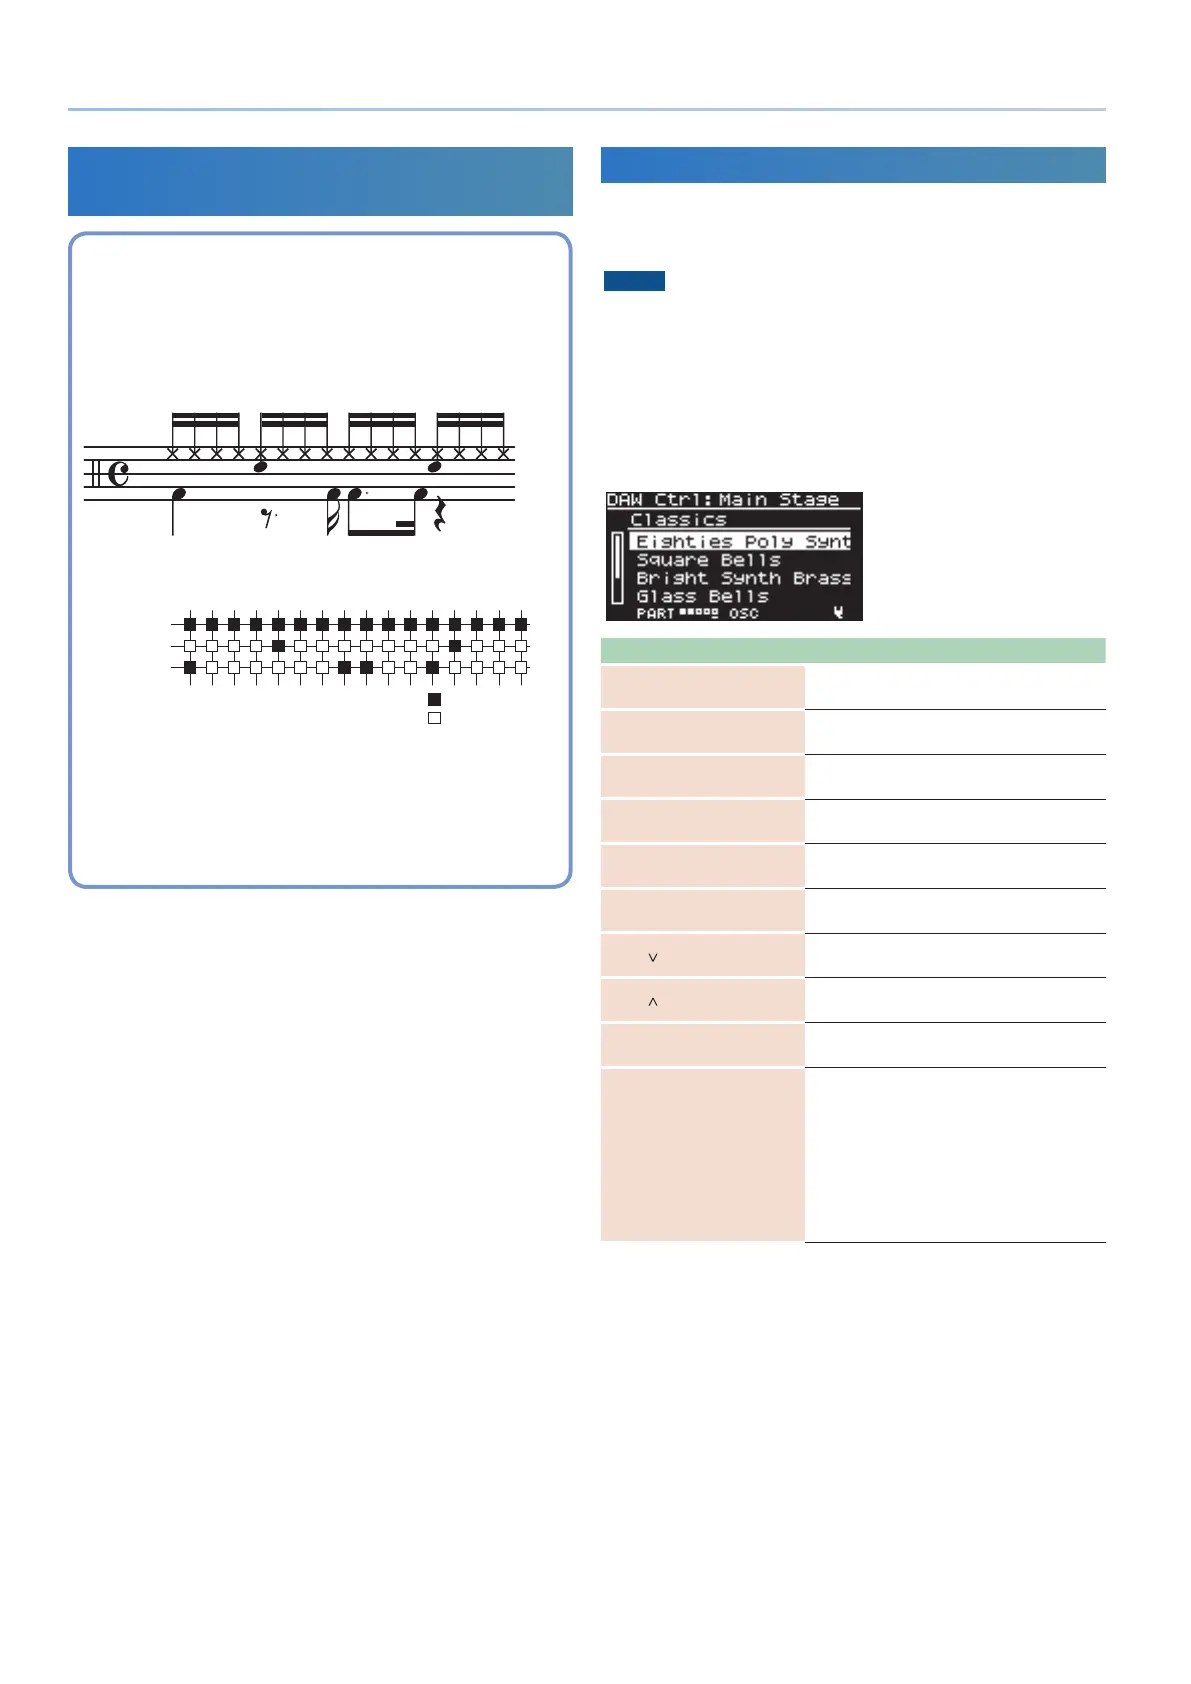
What is TR-REC?
TR-REC is a method in which you use the [1]–[16] buttons to
specify the timing at which each key plays a note.
You can use it while listening to a rhythm that you yourself created.
For example to create the drum pattern shown in figure 1, you
would make the settings shown in figure 2.
Closed Hi-Hat
Step Number
Snare Drum
Bass Drum
01 0905 1303 1107 1502 1006 1404 1208 16
Button lit
Button unlit
figure 1
figure 2
When pressing a key of its corresponding note that you want to
edit, the [1]–[16] buttons light or go dark to indicate the steps on
which that instrument will sound.
Pressing one of the [1]–[16] buttons switches it between lit and
unlit, changing whether the instrument will or will not sound on
that step.
1. Press the [STEP EDIT] button.
Arpeggio playback stops, and the STEP EDIT - COPY I-ARPEGGIO
screen appears.
2. Use the [2] knob to select the data that you want to edit,
and then press the [ENTER] button.
3. Press the key for which you want to enter a note.
4. Use the [1]–[16] buttons to illuminate each step at which
you want a note to sound.
5. To check the playback, use the [S3] button to play/stop.
If you want to change the number of steps, or the grid and
shuffle settings, you can edit these in the ARP PART EDIT screen.
If you want to change the tempo, use the [TEMPO] knob.
6. When you have finished editing, press the [EXIT] button.
To save the pattern data that you created, save the scene.
&“Saving a Scene” (Owner’s Manual)
When you exit STEP EDIT mode, the ARP PART EDIT Switch and
Step Mode are automatically turned “ON” for parts whose steps
you edited in STEP EDIT mode.
Instead of an arpeggio, you can immediately play the pattern
data that you created in STEP EDIT mode.
DAW Control Functions Added
If JUPITER-Xm is connected to your Mac via USB, you can use the
controllers of the JUPITER-Xm to control MainStage (DAW CTRL
function).
NOTE
5
Connecting to a Mac requires that you install the USB driver.
For details on how to install the USB driver, refer to “Connecting
a Computer” (Owner’s Manual).
5
To use the DAW CTRL functions, you must also install the
dedicated “MainStage profile” in addition to the USB driver.
For details on how to use the DAW CTRL functions and how to
install the profile, refer to “Using the MainStage Profile” (PDF).
Controller Function
[SHIFT] + [MENU] button
Select DAW mode
Switches the JUPITER-Xm to DAW mode.
[EXIT] button
Select normal mode
Switches the JUPITER-Xm to normal mode.
[1] knob
Set Select
Changes the set.
PAGE [>] button
Next Set
Recalls the next set.
PAGE [<] button
Previous Set
Recalls the previous set.
[2] knob
Patch Select
Changes the patch.
PAGE [
] button
Next Patch
Recalls the next patch.
PAGE [
] button
Previous Patch
Recalls the previous patch.
[AMP LEVEL] knob
Volume
Adjusts the master volume.
[LFO RATE] knob
[LFO FADE TIME] knob
[LFO DEPTH] knob
[ENV ATTACK] knob
[ENV DELAY] knob
[ENV SUSTAIN] knob
[ENV RELEASE] knob
[ENV DEPTH] knob
Smart Control
Edit the Smart Control parameters.
* MainStage is an either registered trademark or trademark of Apple Inc.

 Loading...


