EasyManua.ls Logo

Roland RDH-100 User Manual

Roland RDH-100
10 pages
To Next Page IconTo Next Page
Page #1 background imageLoading...
Page #1 background image
Owner’s Manual
Descriptions
RDH-102
Beater
Pedal (left) Pedal (right)
Beater fastening bolt
Beater angle adjustment bolt
Clamp bolt
Foot board
Pedal plate
Foot board
Adjustment bolt
Upper nut
Lower nut
Memory lock
Length adjustment bolt
Pedal attachment bolt
Beater holder
Connector pipe
Chain
RDH-100
Refer to the RDH-102 pedal (right).
Check the Included Items
RDH-100
No. Part Pieces
1
Pedal 1
2
Drum key with hex wrench 1
3
Shock absorber 2
4
Beater 1
1
2
3
4
1 2
4
5
6
3
RDH-102
No. Part Pieces
1
Pedal (left) 1
2
Pedal (right) 1
3
Drum key with hex wrench 1
4
Connector pipe 1
5
Shock absorber 2
6
Beater 2
Assembly
1.
Attaching the beater (two locations)
1–1.
Using the included drum key with hex wrench, loosen the beater fastening
bolt.
1–2.
Insert the beater into the beater holder, and retighten the beater fastening
bolt.
Beater holder
Beater fastening bolt
2.
Attaching the connector pipe
2–1.
Loosen the pedal attachment bolt of the connector pipe.
2–2.
Attach the connector pipe to the pedal (right), and tighten the pedal
attachment bolt (right) located on the right side of the connector pipe.
At this time, ensure that the shape of the connector section is correctly
matched.
Pedal attachment bolt
2–3.
Attach the connector pipe to the pedal (left).
Rotate the belt toward yourself, and with the pedal lifted, tighten the pedal
attachment bolt (left) to secure it.
Pedal attachment bolt
3.
Attaching to the bass drum
3–1.
Attach the Shock absorber to your kick pad or bass drum.
Insert it into the anchor bolt located on the bottom of the bass drum, and turn
the
Shock absorber into the screw threads to tighten it (two locations).
3–2.
Using the included drum key with hex wrench, loosen the clamp bolt of the
pedal (right).
* If you use the drum key that is included with the V-drum or KD series, you will
be able to adjust the clamp bolt more easily.
3–3.
Insert the bass drum between the pedal plate and the clamp.
Clamp
Adjustments
4.
Adjusting the beater position
Examples of correct setup
RDH-100
RDH-100
RDH-102
RDH-102
Examples of incorrect setup
4–1.
Adjust the left/right beater position.
Set the beater position so that it is in the center of the striking surface, and
tighten the clamp bolt that you loosened in 3-2 to fasten it. Verify that the bass
drum and pedal plate are in rm contact with the oor so that they are stable.
Verify that they contact the oor
4–2.
Adjust the beater height.
Loosen the memory lock (two locations) and the beater fastening bolt
(four locations), and adjust the beater height so that it is in the center of the
striking surface. When you have set the height, tighten the fastening bolt rst
and then the memory lock.
Center
RDH-102 only
© 2020 Roland Corporation
Before using this unit, carefully read “USING THE UNIT SAFELY and “IMPORTANT NOTES. After reading, keep the document
where it will be available for immediate reference.
* 5 1 0 0 0 7 4 9 3 0 - 0 1 *
RDH-100/RDH-102
Kick Pedal
1
Question and Answer IconNeed help?

Do you have a question about the Roland RDH-100 and is the answer not in the manual?

Roland RDH-100 Specifications

General IconGeneral
BrandRoland
ModelRDH-100
CategoryDrums
LanguageEnglish

Summary

Check the Included Items

RDH-100 Parts List

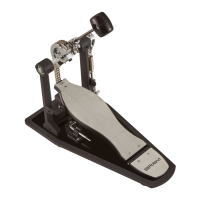
Lists the parts included with the RDH-100 kick pedal.

RDH-102 Parts List

Lists the parts included with the RDH-102 kick pedal.

Component Descriptions

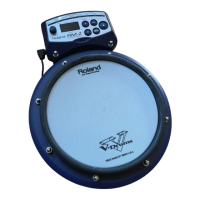
Provides detailed diagrams and labels for kick pedal components.

Assembly

Attaching the Beater

Instructions for attaching the beater to the beater holder.

Attaching the Connector Pipe

Guides for connecting pedal sections using the connector pipe.

Attaching to the Bass Drum

Instructions for attaching the shock absorber to the bass drum.

Adjustments

Adjusting Beater Position

How to set the beater position relative to the striking surface.

Adjusting Beater Height

Guidance on setting the beater's vertical position.

Adjustments

Adjusting Pedal Separation

Adjusts the distance between the left and right pedals.

Adjusting Beater Angle

Instructions for setting the angle of the beater.

Adjusting Foot Board Angle

Guidance on modifying the angle of the foot board.

Adjustments

Adjusting Pedal Tension

How to change the pedal's resistance and feel.

Main Specifications

Using the Unit Safely

Safety Precautions Overview

General safety guidelines to prevent fire, shock, or injury.

Understanding Symbols

Explains the meaning of warning, prohibition, and mandatory symbols.

Safety Warnings

Critical Warnings (WARNING)

Alerts users to risks of death or severe injury from improper use.

Usage Location Restrictions

Lists environmental conditions to avoid for safe operation.

Stability Warnings

Warning about placing the unit where it could tip over.

Safety Cautions

Important Cautions (CAUTION)

Alerts users to risks of injury or material damage from improper use.

Avoid Climbing or Placing Objects

Warning against overloading or standing on the unit.

Finger Pinch Hazard

Advice on avoiding finger injuries during setup or disassembly.

Keep Small Parts Away from Children

Warning about small parts posing a choking hazard.

Important Notes

Placement Considerations

Considerations for placing the unit on different surfaces.

Maintenance Guidelines

Recommendations on cleaning agents to avoid damage.

Additional Precautions

Advice on managing operational noise and waste disposal.

Intellectual Property Information

Information on Roland's trademarks.

Related product manuals