TBS228 ©2005 Roland Corporation U.S.
www.RolandUS.com
Faxback #20261 Page 2
Pad Pattern
As we noted earlier, you can hit one of the pads in a
kit to start and stop—or tap through—a pattern. Use
the following steps to assign a pattern to a pad:
1. Select the desired kit.
2. Press INST so it’s lit.
3. Press F4 (CONTROL).
4. Hit the pad to which you want to assign a
pattern.
5. Turn the VALUE dial or press the + / - buttons to
select the desired pattern.
6. Strike the same pad again to start and stop the
pattern.
Tip: Some of the TD-12’s preset kits have a pattern
already assigned to a pad. If you’d like to turn off the
Pad Pattern feature for such a kit, follow Steps 2-5
above. At Step 5, turn the VALUE dial counter-
clockwise or press the - button to select OFF. If you’d
like to turn the Pad Pattern feature off for all kits,
press
to select the Pad Ptn Master SW setting,
and then turn the VALUE dial to choose ALL OFF.
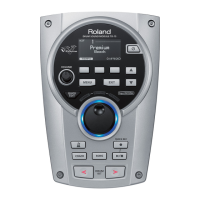
Mix Edit
You can adjust the volume levels of instruments
using the TD-12’s Group Faders. The Mix Edit
feature provides a visual representation of volume
and effect levels in the display to make quick
adjustments easy and precise. Here’s how to use Mix
Edit for adjusting volume:
1. Press MIXER so it’s lit.
2. Press F1 (VOLUME).
3. Hold SHIFT and press MIXER a couple of times
so the red indicator next to the word “RIDE” is lit.
4. Slide the faders up and down to adjust the levels
of the instruments as desired.
5. Press KIT when you’re finished.
Starting Over
If you’d like to redo the TD-12’s settings from scratch,
you can use the following procedure to clear the
TD-12’s internal memory and reload its factory
settings.
Caution: When you perform the following steps, all
USER data is lost. Be sure to back up anything you
wish to keep first.
1. Press SETUP so it’s lit.
2. Press F5 (F RESET) three times.

 Loading...