About the Wireless LAN Function
3
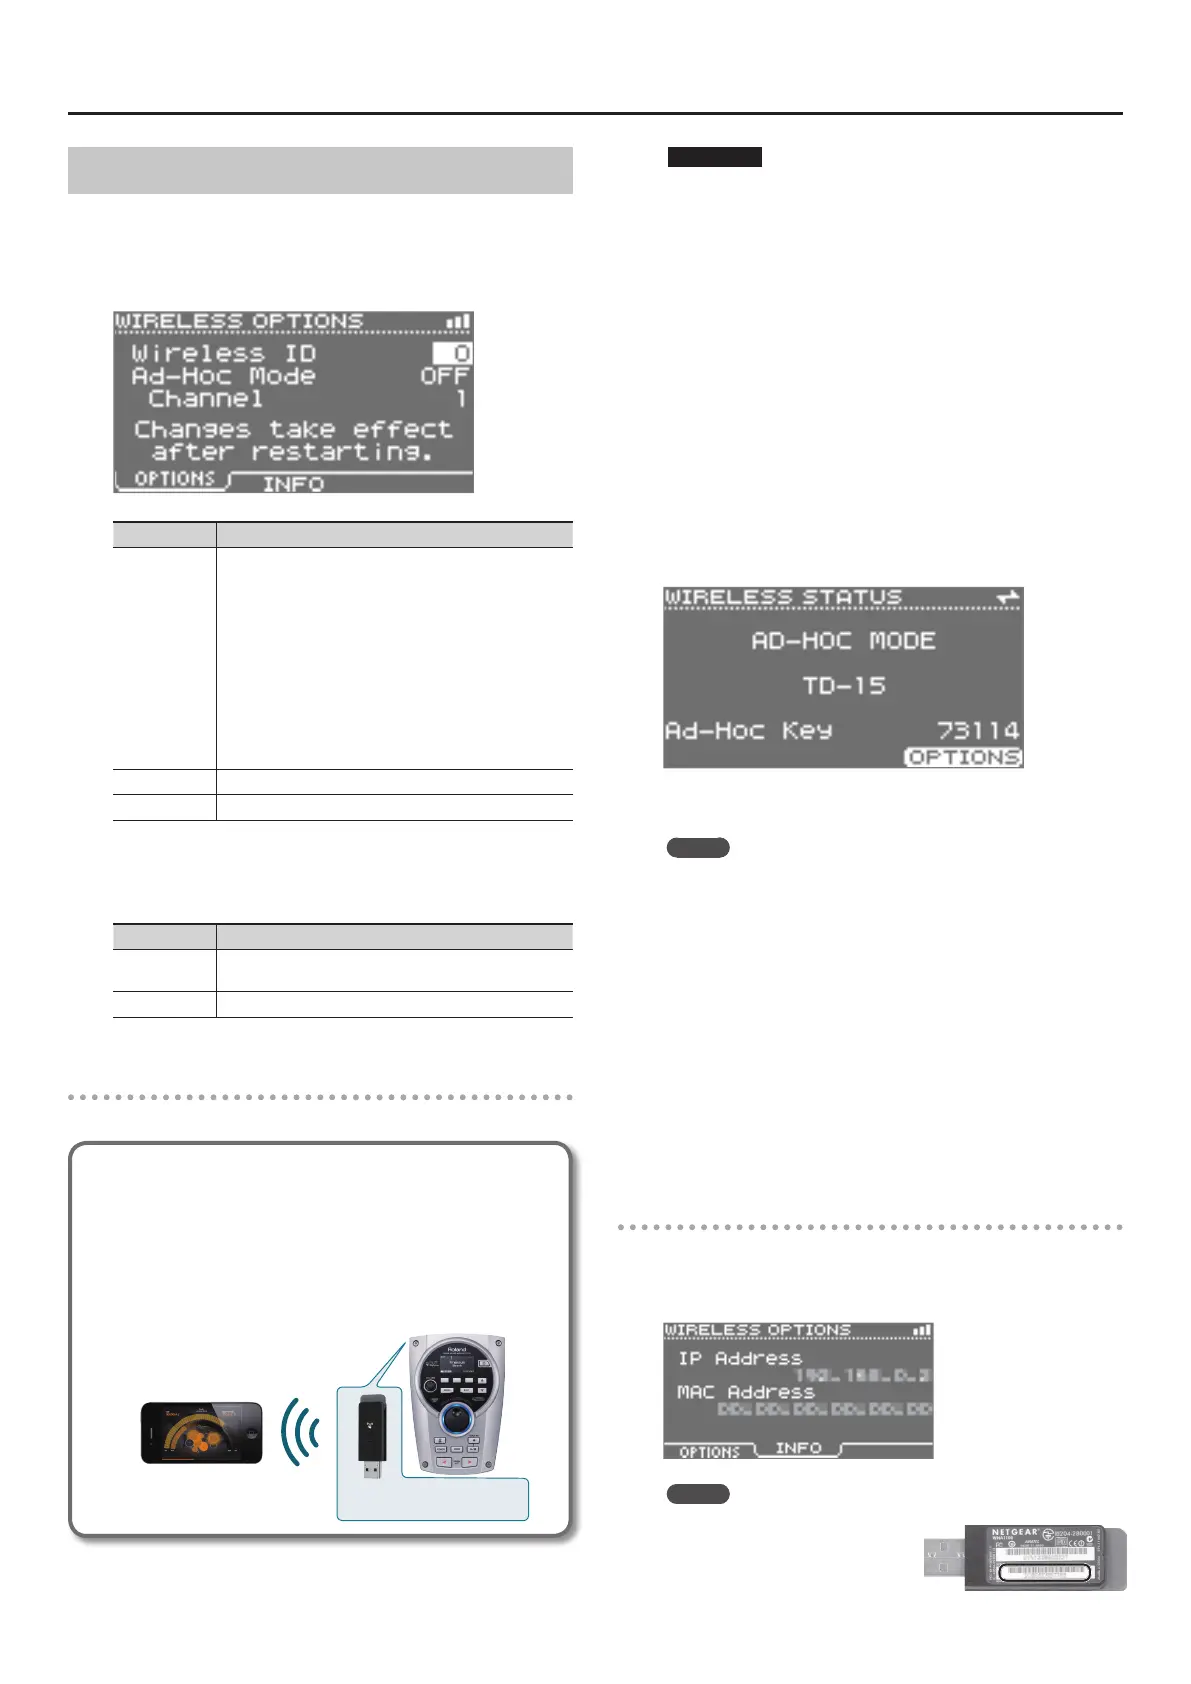
Other Settings (WIRELESS OPTIONS)
Make settings for Wireless ID or Ad-Hoc mode (Ad-Hoc Mode).
1. Select the [MENU] button g “SYSTEM” g “Wireless” g
[F3] (OPTIONS) button.
The WIRELESS OPTIONS screen will appear.
Parameter Explanation
Wireless ID
Species the nal digits of the
TD-15/TD-11
’s device name
and Ad-Hoc SSID (“TD-15” or “TD-11”) that will be shown as
the instrument in the wirelessly connected app.
Normally, you should specify “0,” but if you have more than
one of the same instrument, you can set the Wireless ID in
the range of 1–99 to change the device name and Ad-Hoc
SSID for each instrument, as follows.
If Wireless ID=0, “TD-15” (default value)
If Wireless ID=1, “TD-15-1”
:
If Wireless ID=99, “TD-15-99”
Ad-Hoc Mode Turns Ad-Hoc mode on/o.
Channel Species the channel (1–11) for Ad-Hoc mode.
* These settings will take eect after you’ve turned the unit o,
then back on again.
What the function buttons do
Button Explanation
[F1] (OPTIONS)
Make settings for Wireless ID or Ad-Hoc mode (Ad-Hoc
Mode).
[F2] (INFO) View the IP address and MAC address.
Connecting in Ad-Hoc mode (Ad-Hoc Mode)
Here’s how to connect in Ad-Hoc mode.
What is Ad-Hoc mode?
Ad-Hoc mode lets you connect the TD-15/TD-11 directly to an
iPhone or other wireless device without using a wireless LAN
access point. This is a convenient way to use the TD-15/TD-11
with an iPhone or other wireless device if you’re in a location
where the wireless LAN access point you normally use is
unavailable, such as when you’re away from home.
TD-15/TD-11
Wireless USB Adapter (sold
separately: WNA1100-RL)
Wireless LAN
iPhone etc.
Limitations
The iPod touch or other wireless device connected in Ad-Hoc
mode will be unable to communicate with the Internet or with
another wireless device. However, an iPhone or other wireless
device that has cellular capability will be able to connect to the
Internet via the cellular connection.
Please be aware that if you use a cellular connection for Internet
connectivity, you may incur costs depending on your rate plan.
1. Select the [MENU] button g “SYSTEM” g “Wireless” g
[F3] (OPTIONS) button.
The WIRELESS OPTIONS screen will appear.
2. Turn the Ad-Hoc Mode “ON.”
You can use Channel to specify a channel (1–11) for Ad-Hoc mode.
Normally, you won’t need to change the channel. Try changing the
channel only if you have problems connecting.
3. Turn the unit o, then on again.
4. Select the [MENU] g “SYSTEM” g “Wireless” to access the
WIRELESS STATUS screen.
The Ad-Hoc SSID (“TD-15” or “TD-11”) and the Ad-Hoc Key (a ve-
character text string) will be displayed.
MEMO
The Ad-Hoc SSID (“TD-15” or “TD-11”) will be the value that you
specied in the WIRELESS OPTIONS screen “Wireless ID” setting.
5. On the iPhone or other wireless device that you want to
connect, select the Ad-Hoc SSID shown in the above screen
to make the connection. (For example, on an iPhone,
choose [Settings] g [Wi-Fi] g [Choose a Network] to select
the above Ad-Hoc SSID. A password entry screen will
appear; enter the above Ad-Hoc key.)
For details on how to connect to a wireless LAN from an iPhone or
other device, refer to the owner’s manual of that device.
6. When you want to end the Ad-Hoc mode connection,
restore the iPhone settings in [Settings] g [Wi-Fi] g
[Choose a Network] to their previous state.
Checking the IP Address and MAC Address (INFO)
Here’s how to check the IP address and MAC address.
1. Select the
[MENU] button
g
“SYSTEM”
g
“Wireless”
g
[F3] (OPTIONS) button
g
[F2] (INFO) button.
MEMO
The MAC address shows the value
indicated on the bottom of the
wireless USB adapter (WNA1100-
RL; sold separately).
 Loading...