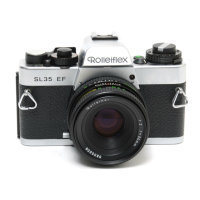
THE ROLLEIFLEX T
This
is a comparatively simplified Rolleiflex without some of the
trimmings
of
the
more
advanced models. It has
a
3
in.
(75
mm.)
Zeiss
Tessar/3.5
lens in Synchro-Compur
shutter,
and is available with
or
without
dual range
exposure meter. The model without rneter is
pre-wired
for subsequent
installation
of the
meter. The focusing
hood
is removable
(for
replacement
by the
pentaprism),
but no eye-level
mirror
is fitted. A single
lever
controls exposure
values and
aperture-
speed
selection,
with facility for individual adjustment.
The
self-
adjusting film
counter is suitable
for
12 exposures or for
16
pictures
with a
special
masking
set.
A
back for single exposures
on
plates
or cut
film can be fitted.
Cameras with serial Nos.
above
2,151,000
are
fitted
with the dual-size
camera back
and
can
be
used also with the 24x36
mm. Rolleikin.
Models of lower
serial NoS. can
be converted together
with the ever-ready case.
The
camera takes all
optical
accessories
with
size
I
bayonet
mount; filters, hood, close-up, soft
focus and attachment
lenses for tele and
wide-angle effect, etc., may be used. Other accessories
include the
Rolleifix
tripod head,
Rollei
pistol
grip,
panorama
head,
extension
hood,
flash
guns,
and micro attachment.
Loading
Open the
camera
back.
fniert
the
film. First
transfer
the empty
spool
in the bottom
chamber
to the top chamber.
Pull
out the
film retaining
knob, remove
the
empty
spool
and insert it in the top chamber after
pulling
out
the
corresponding
retaining knob. The
grooved
end of the
spool
should
engage
the cross bar of the film transport
peg.
Insert
the film
ro11 into
the bottom
chamber after breaking
the
seal.
Draw the
pointed paper
end
over the two
glide
rollers
into
the
wide
slot
of the top spool. Tighten the
paper
on
this
spool.
Now
wind the
transport crank until the triangular
marks
(or
arrows)
on the backing
paper
are
opposite
the red dots on either side
near
the base of the
film
aperture.
3. Close the camera,
4.
Get
the
film
,."dy
for the first exposure by turning
the transport
lever crank till
it
comes to a
definite
stop.
Then turn
it
back
and
fold over
to the rest
position.
The
exposure
counter sets
itself
automatically to
No. 1.
5. Set the
fiIm speed and type. On the Rolleiflex
T without exposure
meter,
set the
film
speed
indicator by turning the bar
in centre of
focusing
knob
to the right until
the DIN or ASA speed appears
in
the
appropriate cut out. Set the
film type to
ortho,
pan,
artificial
light
colour
or
daylight colour, by
turning
the same
bar to the
left.
On the
Rolleiflex T with built-in exposure
meter,
set
the speed
by
turning
the
serrated outer
rim
of
the meter beyond
the
left
or
right
stop until
the
speed of
the film loaded
into
the
camera
appears
in
I
t4
T
t
I
+
1.
)
 Loading...