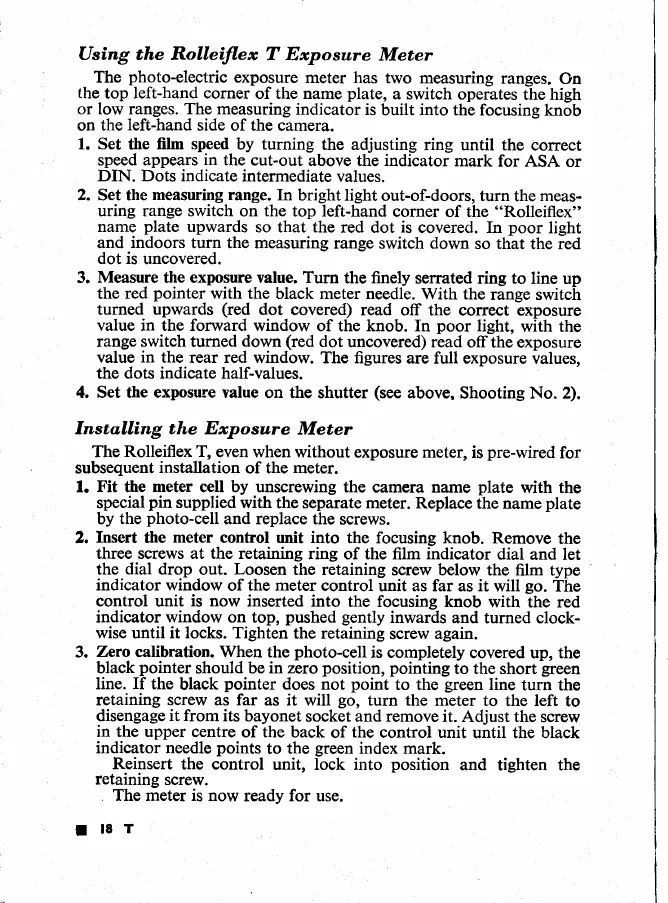
Using the Rolleitlex
T Exposure
Meter
The
photo-electric
exposure
meter has
two measuring
ranges.
On
the
top
left-hand corner
of the name
plate,
a
switch operates
the high
or low ranges. The measuring
indicator
is
built into the
focusing knob
on
the
left-hand
side
of
the
camera.
1. Set
the
fihn speed
by turning
the adjusting
ring until the
correct
speed appears
in
the cut-out
above
the
indicator
mark
for
ASA or
DIN. Dots indicate
intermediate
values.
2. Set the
measuring range.
In
bright light
out-of-doors, turn
the
meas-
uring range switch
on
the
top left-hand
corner of the
"Rolleiflex"
name
plate
upwards
so that the
red dot
is
covered. In
poor
light
and
indoors
turn the measuring
range switch down
so that
the red
dot is
uncovered.
3. Measure the exposure value. Turn
the
finely
serrated ring
to line up
the
red
pointer
with the
black
meter needle.
With the
range
switch
turned upwards
(red
dot covered)
read
off the correct exposure
value in the forward
window of the knob. In
poor
light,
with the
range switch turned
down
(red
dot
uncovered) read
offthe exposure
value in
the rear red
window. The figures
are full exposure
values,
the dots indicate half-values.
4. Set the exposure value
on the shutter
(see
above.
Shooting No. 2).
Installing the Exposure
Meter
The Rolleiflex
T,
even when
without exposure meter,
is
pre-wired
for
subsequent
installation
of the meter.
1.
Fit
the
meter
cell by unscrewing
the camera name
plate
with the
special
pin
supplied with the separate meter.
Replace the name
plate
by the
photo-cell
and replace the
screws.
2.
Insert the
meter
control unit into
the focusing knob.
Remove
the
three screws at the retaining
ring
of
the
film
indicator
dial
and let
the dial drop
out.
Loosen
the retaining
screw below
the film type
indicator window
of the meter control
unit as far
as
it
will
go.
The
control
unit
is now
inserted into
the focusing knob
with the red
indicator window on top,
pushed gently
inwards
and turned clock-
wise until it locks. Tighten
the retaining
screw
again.
3.
Zero
calibration. When the
photo-cell
is completely
covered up, the
black
pointer
should be
in
zero
position, pointing
to the short
green
line. If the
black
pointer
does not
point
to the
green
line
turn
the
retaining screw as far
as it will
go,
turn the
meter to the left
to
disengage
it from
its
bayonet
socket
and
remove it.
Adjust
the
screw
in the upper centre
of the back
of
the
control unit
until the black
indicator needle
points
to the
green
index
mark.
Reinsert
the control
unit, lock into
position
and
tighten the
retaining
screw.
. The meter is now
ready for use.
llST
 Loading...