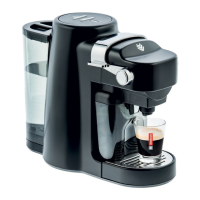
The XPRESS'OH coffee machine is designed to prepare coffee using 1,2,3 SPRESSO® pods. It offers two pre-programmed coffee sizes: a small coffee (6 cl) and a large coffee (12 cl), with the option to customize these volumes. The machine features an automatic standby mode, activating after 20 minutes of inactivity to conserve energy.
Technical Specifications:
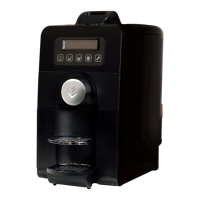
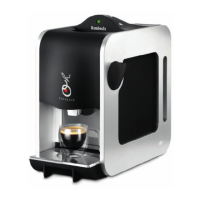
- Colours: Available in Black, White, or Gun Metal Grey.
- Capacity: 1300 W
- Voltage: 230 V
- Weight: 3.0 kg
- Pump: 16 bars
- Water Tank: 1.2 litres
- Box Dimensions: 400 x 196 x 345 mm
Machine Components:
- Cover: The top casing of the machine.
- Handle: Used to open and close the pod insertion mechanism.
- White light: An indicator light that shows the machine's status (heating, ready, programming mode).
- Small coffee button: Activates the small coffee brewing cycle.
- Large coffee button: Activates the large coffee brewing cycle.
- Tank lid: Covers the water tank.
- Tank: The water reservoir.
- O/I switch: The main power switch (On/Off).
- Pod basket: Collects used coffee pods.
- Strainer: Part of the brewing unit.
- Strainer grid: Supports the cup and collects drips.
- Coffee spout: Where the brewed coffee dispenses.
Usage Features:
Preparing a Coffee:
- Fill the water tank (no. 7) with fresh water.
- Connect the power cable.
- Switch the machine ON using the O/I switch (no. 8).
- Wait for the machine to heat up. The white light (no. 3) will flash during heating and then stay ON steadily when ready.
- Open the coffee pod packaging, remove the foil lid, and take out the pod.
- Raise the handle (no. 2) and insert the pod into the machine.
- Lower the handle (no. 2).
- Press either the Small coffee button (no. 4) or the Large coffee button (no. 5) to start brewing.
- The coffee cycle stops automatically or can be stopped manually by pressing the selected button again.
- After brewing, raise the handle (no. 2) to eject the used pod into the pod basket (no. 9). The machine is then ready for the next coffee.
Programming Coffee Volumes:
The machine allows customization of the small and large coffee volumes.
- Start the machine (button no. 8) and ensure the white light is ON steady (machine is at brewing temperature).
- Raise the handle (no. 2) and insert a pod.
- Press and hold both the "Small coffee" (no. 4) and "Large coffee" (no. 5) buttons simultaneously for at least 5 seconds. The white light will flash rapidly, indicating programming mode.
- Lower the handle (no. 2) and press the coffee option you wish to program (no. 4 for small, no. 5 for large).
- Once the desired volume of coffee has been poured, press the same button again to stop serving and save the new volume.
- The white light will then stay ON, confirming the programming has been saved.
Safety Instructions:
- The machine is designed for preparing drinks as per these instructions.
- Do not use for unintended purposes.
- Do not switch on without a pod or without water.
- Repairs must be undertaken by an approved technical support centre.
- For indoor use only, at non-extreme temperatures.
- Protect from direct sunlight, water splashes, and humidity.
- Intended for domestic use, and similar environments like kitchenettes in shops, offices, farms, hotels, and guest houses.
- Can be used by children over 8 and individuals with reduced physical, sensory, or mental capabilities, provided they are supervised and instructed on safe use. Children under 8 must not perform maintenance or cleaning unsupervised.
- Keep the machine and its power cable out of reach of children under 8.
- The manufacturer is not liable for commercial use, inappropriate use, mishandling, or repairs by non-professionals.
- In an emergency, unplug immediately.
- Only plug into suitable, earthed power sockets with the correct voltage.
- Only plug in after setup.
- Do not pull the power cable against sharp edges or let it hang loose.
- Keep the power cable away from heat and humidity.
- A damaged power cable must be replaced by the manufacturer or qualified personnel. Do not use if the cable is damaged.
- If an extension lead is needed, use an earthed cable with a cross-section of at least 1.5 mm.
- Never place the machine near hot surfaces or naked flames.
- Place on a stable, horizontal, heat- and fluid-resistant surface.
- Unplug when not in prolonged use.
- Unplug by pulling the plug, not the cable.
- Unplug and cool down before cleaning.
- Never touch the power cable with wet hands.
- Do not immerse the machine in water or other liquids.
- Never place the machine or parts in a dishwasher.
- Do not open the machine; internal voltage is dangerous.
- Do not place anything in the openings.
- The surface of the heating element will remain hot after use; use levers or buttons.
- The coffee maker should not be placed in a cabinet when in use.
Maintenance Features:
Cleaning:
- Turn off the machine and allow it to cool completely.
- Clean the machine body, water tank (no. 7), pod basket (no. 9), and strainer with a sponge and mild detergent regularly.
- Never immerse the machine in water.
- Never place the machine or its accessories in a dishwasher.
Descaling:
- The machine should be descaled every 6 months if 2 to 4 coffees are served daily.
- Use a scale remover kit specifically designed for "1,2,3 SPRESSO®" machines, available from your distributor.
- Damage caused by scale is not covered by the warranty.
Dismantling the Coffee Unit (for cleaning or trapped pods):
- Stop and unplug the machine.
- Set the machine switch (no. 8) to the O position.
- Remove the machine cover (no. 1) by raising the handle (no. 2) to maximum, pressing the two silver-plated handle discs simultaneously, and pulling the cover upwards.
- Release the coffee unit by pulling the bolt towards you.
- Rotate the unit anti-clockwise to remove it.
- Reverse this procedure to refit the unit.
- Important: If the bolt is not fitted correctly in the unit, the cover cannot be closed, and a safety device will prevent refitting.
Refitting the Machine Cover:
- Ensure the coffee unit is in the open position (vertical lateral slots) and locked (grey catch clipped upwards).
- Raise the handle (no. 2) to maximum.
- While pressing the two silver-plated handle discs simultaneously, bring the cover (no. 1) over the coffee unit.
- Align the cover (no. 1) with the machine and push it downwards until the two silver-plated discs are clipped into position. The cover should then be impossible to raise upwards.
Troubleshooting (Anomalies):
"I CAN'T MAKE COFFEE."
- Check that the switch (no. 8) is set to I (On).
- Check that the white light is ON steady. If it's flashing slowly, the machine is heating, which is normal.
- Check that the machine is not on standby. If it is, press a coffee button (no. 4 or no. 5) or use the handle (no. 2, open/close) to turn it ON.
- Wait until the white light stays ON steady, indicating the machine has reached the required temperature.
- Check that the handle (no. 2) is lowered.
"THE POD FAILS TO EJECT."
- Check that the pod basket is empty.
- Raise or lower the handle (no. 2) several times if necessary to eject the pod.
"NO COFFEE IS SERVED."
- Check the water level in the tank (no. 7).
"THE WHITE LIGHT FAILS TO COME ON."
- Check that the machine is plugged in.
"THE WHITE LIGHT FLASHES RAPIDLY (UNLESS PROGRAMMING MODE IS SELECTED)."
- Check that the water tank (no. 7) is in position.
Environmental Responsibility:
- Electrical and electronic equipment should be sent to selective sorting sites for recycling. Do not dispose of it at unsorted municipal tips.
The machine benefits from a 12-month warranty from the date of purchase within the European Union.