How to assemble your appliance
Mounting the blade unit into the glass jar
Placing glass jar and top cover
How to assemble your appliance
Before assembling the unit make sure it is switched off.
Mounting the blade unit into the glass jar
Turn the jar upside down and place it on a level non
mounting the blade unit use
Placing glass jar and top cover
How to assemble your appliance
Always handle cutting tools with care to avoid injuries!
Handle the glass jar with care to avoid injuries due to breakage
Before assembling the unit make sure it is switched off.
otary knob to the left to
Mounting the blade unit into the glass jar
Turn the jar upside down and place it on a level non
mounting the blade unit use
Placing glass jar and top cover
How to assemble your appliance
Always handle cutting tools with care to avoid injuries!
Only assemble the appliance at standstill!
Handle the glass jar with care to avoid injuries due to breakage
Before assembling the unit make sure it is switched off.
otary knob to the left to
position and disconnect the powe
Mounting the blade unit into the glass jar
Turn the jar upside down and place it on a level non
Always handle cutting tools with care to avoid injuries!
Only assemble the appliance at standstill!
s made of glass and thus, it is fragile.
Handle the glass jar with care to avoid injuries due to breakage
Before assembling the unit make sure it is switched off.
position and disconnect the powe
Turn the jar upside down and place it on a level non
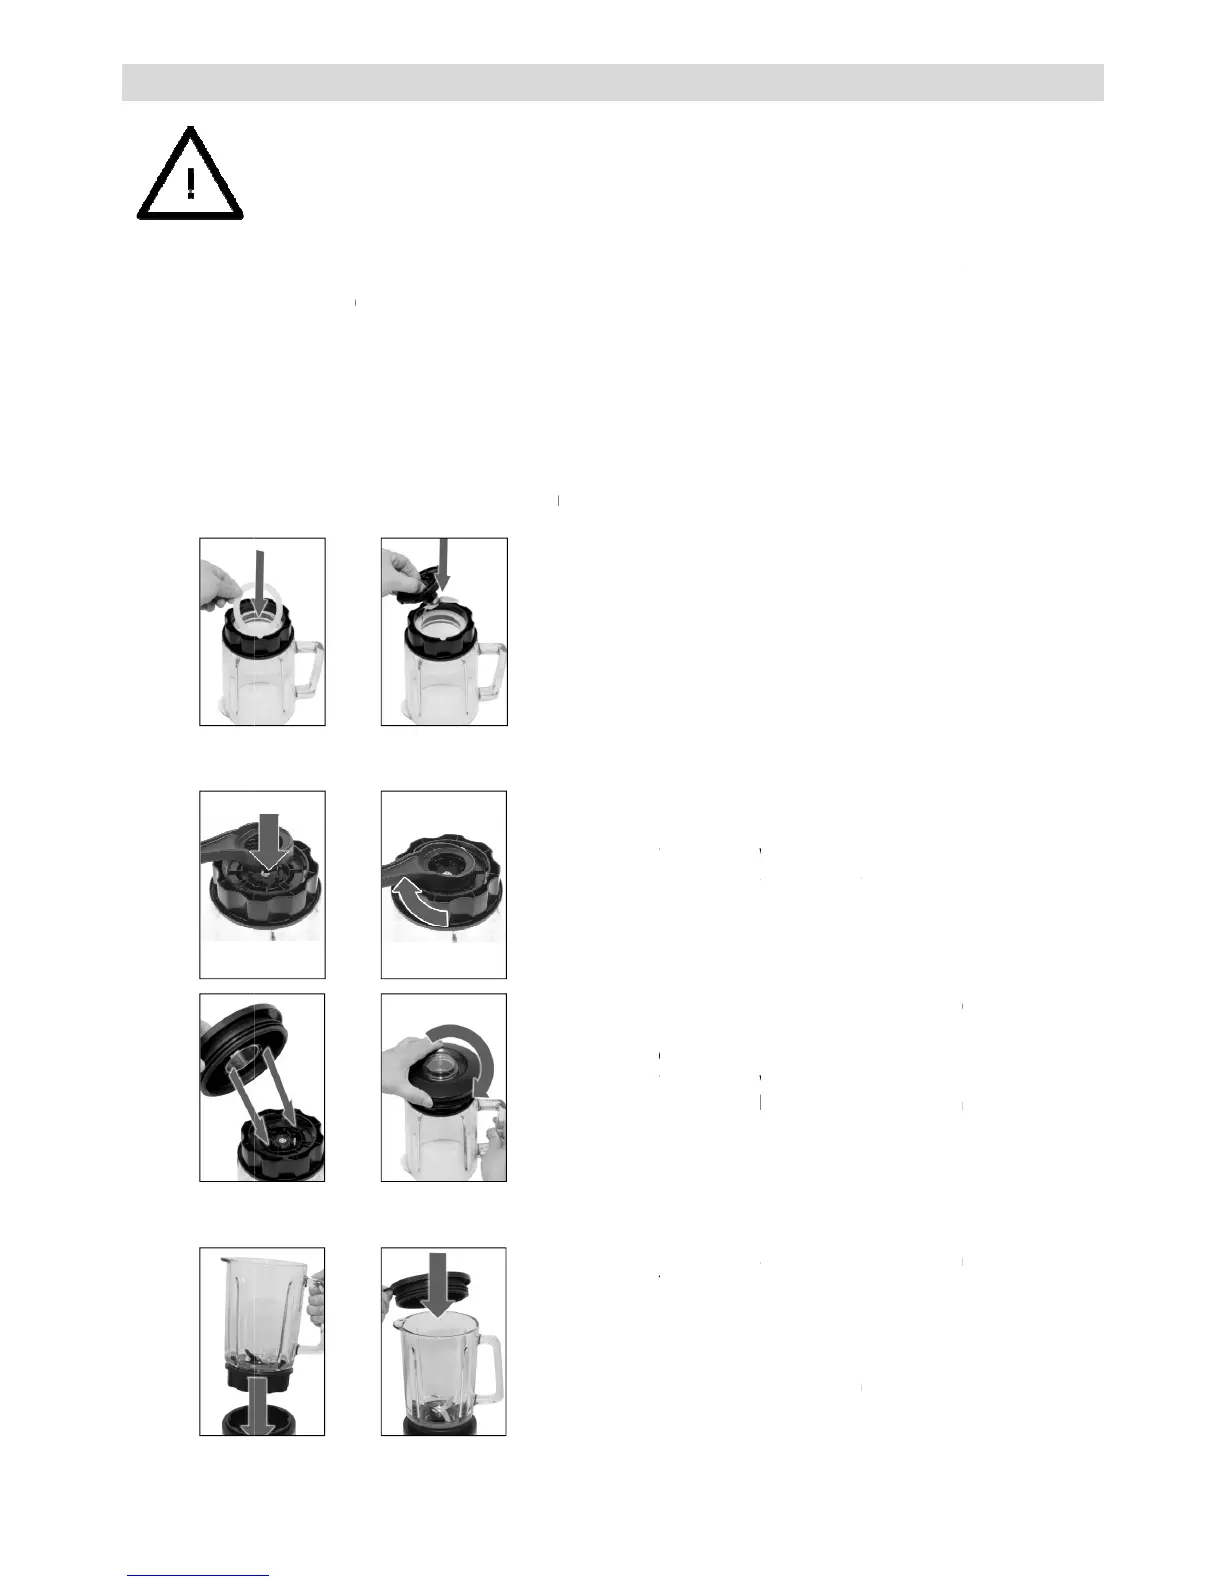
Insert the rubber gasket. Mind that it sits correctly.
Now hold of the blade unit from below, fit the 4
notches of the blade unit in
and cautiously insert the blade unit into the glass jar.
the enclosed assembling aid tool
Put on the assembling aid tool
Hold the glass jar with one hand, turn the
or the cover as a tool for
Inside the cover there are 2 detents, which are put into
the notches at the blade unit.
to fasten the blade unit thoroughly.
Take the glass jar at its handle and put it on the base
unit. This can be done in various posi
lace the top cover on the glass jar and press it on
firmly. The plastic lip must cover the spout.
nsert the small measuring cup into the cover’s
opening. Both detents of the measuring cup should
match the notches at the cover. Lock the measuring
up by turning it clockwise to the stop.
Always handle cutting tools with care to avoid injuries!
Only assemble the appliance at standstill!
s made of glass and thus, it is fragile.
Handle the glass jar with care to avoid injuries due to breakage
position and disconnect the powe
Insert the rubber gasket. Mind that it sits correctly.
Now hold of the blade unit from below, fit the 4
notches of the blade unit in
to the detents of the jar
and cautiously insert the blade unit into the glass jar.
the enclosed assembling aid tool
Put on the assembling aid tool
Hold the glass jar with one hand, turn the
or the cover as a tool for
Inside the cover there are 2 detents, which are put into
the notches at the blade unit.
th one hand, turn the blade unit
to fasten the blade unit thoroughly.
Take the glass jar at its handle and put it on the base
unit. This can be done in various posi
lace the top cover on the glass jar and press it on
firmly. The plastic lip must cover the spout.
nsert the small measuring cup into the cover’s
opening. Both detents of the measuring cup should
match the notches at the cover. Lock the measuring
up by turning it clockwise to the stop.
Always handle cutting tools with care to avoid injuries!
Only assemble the appliance at standstill!
s made of glass and thus, it is fragile.
Handle the glass jar with care to avoid injuries due to breakage
Insert the rubber gasket. Mind that it sits correctly.
Now hold of the blade unit from below, fit the 4
to the detents of the jar
and cautiously insert the blade unit into the glass jar.
the enclosed assembling aid tool
Hold the glass jar with one hand, turn the
Inside the cover there are 2 detents, which are put into
th one hand, turn the blade unit
to fasten the blade unit thoroughly.
Take the glass jar at its handle and put it on the base
unit. This can be done in various posi
lace the top cover on the glass jar and press it on
firmly. The plastic lip must cover the spout.
nsert the small measuring cup into the cover’s
opening. Both detents of the measuring cup should
match the notches at the cover. Lock the measuring
up by turning it clockwise to the stop.
Always handle cutting tools with care to avoid injuries!
Only assemble the appliance at standstill!
s made of glass and thus, it is fragile.
Handle the glass jar with care to avoid injuries due to breakage
Insert the rubber gasket. Mind that it sits correctly.
Now hold of the blade unit from below, fit the 4
to the detents of the jar
and cautiously insert the blade unit into the glass jar.
Inside the cover there are 2 detents, which are put into
th one hand, turn the blade unit
Take the glass jar at its handle and put it on the base
lace the top cover on the glass jar and press it on
nsert the small measuring cup into the cover’s
opening. Both detents of the measuring cup should
match the notches at the cover. Lock the measuring
Handle the glass jar with care to avoid injuries due to breakage
 Loading...