5. Choose the desired language. Select >> to show more choices.
6. Choose the number of sensors wired to the analyzer.
7. For Sensor 1 (DO), identify the manufacturer of the sensor, Rosemount
Analytical or other.
8. Identify the application. Biopharm is biopharmaceutical manufacturing. Other is
aeration basins, boiler feedwater, etc.
9. Select the desired units. The screen at left appears only if Rosemount and
Other were selected in steps 7 and 8, respectively. Otherwise, the choice ppb
does not appear. Choose ppb if the sensor is the 499A TrDO.
10. Choose pH, redox, or ORP for sensor 2.
11. Choose temperature units.
12. The main display appears. The outputs and alarms are assigned to default val-
ues. To change settings, refer to Section 5.0, Programming the Analyzer. To rein-
stall factory settings and return to Quick Start, see Section 5.10.
# of sensors?
One
TTwwoo
Temperature in?
**CC **
F
S1Manufacurer?
RRoosseemmoouunntt
Other
S1Application?
Biopharm
OOtthheerr
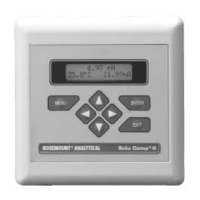
4. When the analyzer is powered up for the first time, Quick Start screens appear. Using Quick Start is easy.
a. A blinking field shows the position of the cursor.
b. Use the # or $ key to move the cursor left or right. Use the " or ' key to move the cursor up or down or to
increase or decrease the value of a digit. Use the " or ' key to move the decimal point.
c. Press ENTER to store a setting. Press EXIT to leave without storing changes. Pressing EXIT also returns the
display to the previous screen.
EEnngglliisshh
Français
Español >>
S2Measure?
ppHH
Redox ORP
S1 units in?
ppppmm
ppb %sat
 Loading...