5 Undo the four screws and remove the disc
shield.
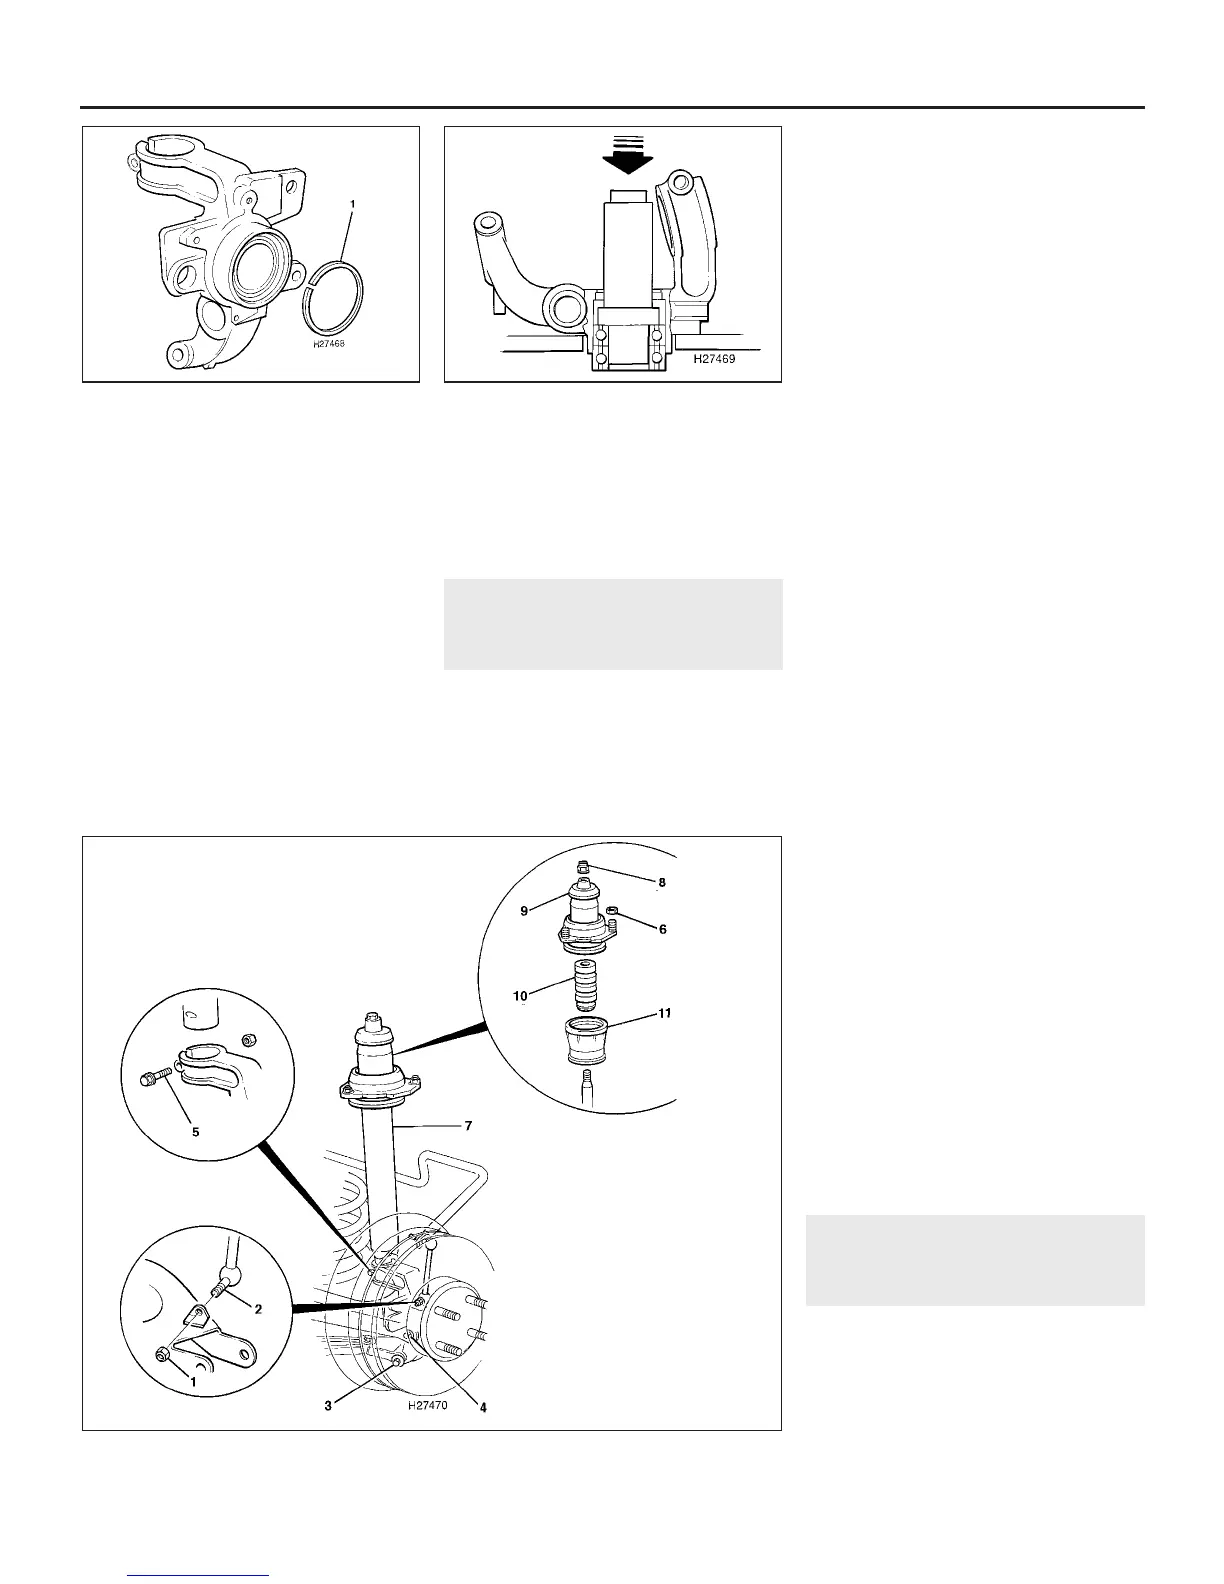
6 Extract the bearing retaining circlip, then
support the hub carrier face-down on blocks
or on a press bed. Using a tube or mandrel in
contact with the edge of the outer bearing,
drive or press the bearing out (see
illustrations).
7 Fit the new bearing in the same way,
ensuring that it is pressed fully home to the
shoulder in the hub carrier. Keep the bearing
square as it is fitted, otherwise it will jam, and
continued pressure could cause the outer
race to crack. If the bearing does jam, tap or
press it out, remove any burrs in the bore of
the carrier and try again.
8 Secure the bearing with the circlip, then
refit the disc shield.
9 Tap the hub flange into the bearing and fit a
new retaining nut. Tighten the nut to the
specified torque, and secure by staking the
nut flange into the groove in the hub. Tap on
the nut cover.
10 Refit the hub carrier to the car as
described in the previous Section.
13 Rear shock absorber -
removal and refitting
3
Note: The following procedures are applicable
equally to cars with standard suspension or
self-levelling damper units.
Removal
1 Chock the front wheels, prise off the rear
wheel trim and slacken the wheel nuts. Jack
10•10 Suspension and steering systems
12.6b . . . then remove the bearing from
the hub using a mandrel
12.6a Extract the rear hub bearing
retaining circlip (1) . . .
1380 Rover 800 Series Remake
1 Connecting link retaining nut
2 Anti-roll bar connecting link
3 Trailing link retaining through
bolt
4 Transverse link retaining bolt
5 Shock absorber clamp bolt
6 Upper mounting retaining nut
7 Shock absorber
8 Shock absorber spindle nut
9 Upper mounting
10 Bump-stop
11 Dust cover
up the rear of the car and support it on axle
stands. Remove the rear roadwheel.
2 Undo the retaining bolt and release the
flexible brake hose support bracket from the
shock absorber strut.
3 Undo the nut and release the anti-roll bar
connecting link from the suspension lower
transverse link (see illustration).
4 Place a jack below the transverse link, and
raise the link slightly.
5 Undo the nut and remove the through-bolt
and washers securing the hub carrier to the
trailing link.
6 Undo the nut and remove the bolt securing
the hub carrier to the transverse link.
7 Undo the nut and clamp bolt securing the
shock absorber strut to the hub carrier.
8 Lower the jack slightly, and release the hub
carrier from the shock absorber strut. If the
strut is tight, spread the slot in the hub carrier
with a screwdriver, and tap the carrier down
with a copper or plastic mallet.
9 From inside the luggage compartment,
remove the trim as necessary to gain access
to the shock absorber upper mounting.
10 Undo the three nuts securing the upper
mounting to the body, and remove the shock
absorber from under the wheelarch.
11 If the upper mounting is to be removed,
undo the shock absorber spindle nut and
withdraw the upper mounting, followed by the
bump-stop and dust cover.
12 Examine the shock absorber for signs of
fluid leakage. Check the spindle for signs of
wear or pitting along its entire length, and
check the shock absorber body for signs of
damage or corrosion. Test the operation of
the shock absorber, while holding it in an
upright position, by moving the spindle
through a full stroke, and then through short
strokes of 50 to 100 mm. In both cases, the
resistance felt should be smooth and
continuous. If the resistance is jerky or
uneven, or if there is any visible sign of wear,
damage or fluid leakage, renewal is
necessary. Also check the condition of the
upper mounting, bump-stop and dust cover,
and renew any components as necessary.
Refitting
13 Refitting is a reversal of removal. Tighten
all nuts and bolts to the specified torque, but
do not fully tighten the transverse and trailing
link retaining nuts until the weight of the car is
on the roadwheels.
14 Rear coil spring -
removal and refitting
3
Removal
1 Refer to Section 13 and carry out the
operations described in paragraphs 1 to 6
inclusive, with the exception of paragraph 2.
2 Ease the hub carrier away from the trailing
link, and move the trailing link end clear as
much as possible.
13.3 Rear shock absorber attachment details


 To Next Page
 Loading...
