moderate finger pressure. If adjustment is
required, proceed as follows.
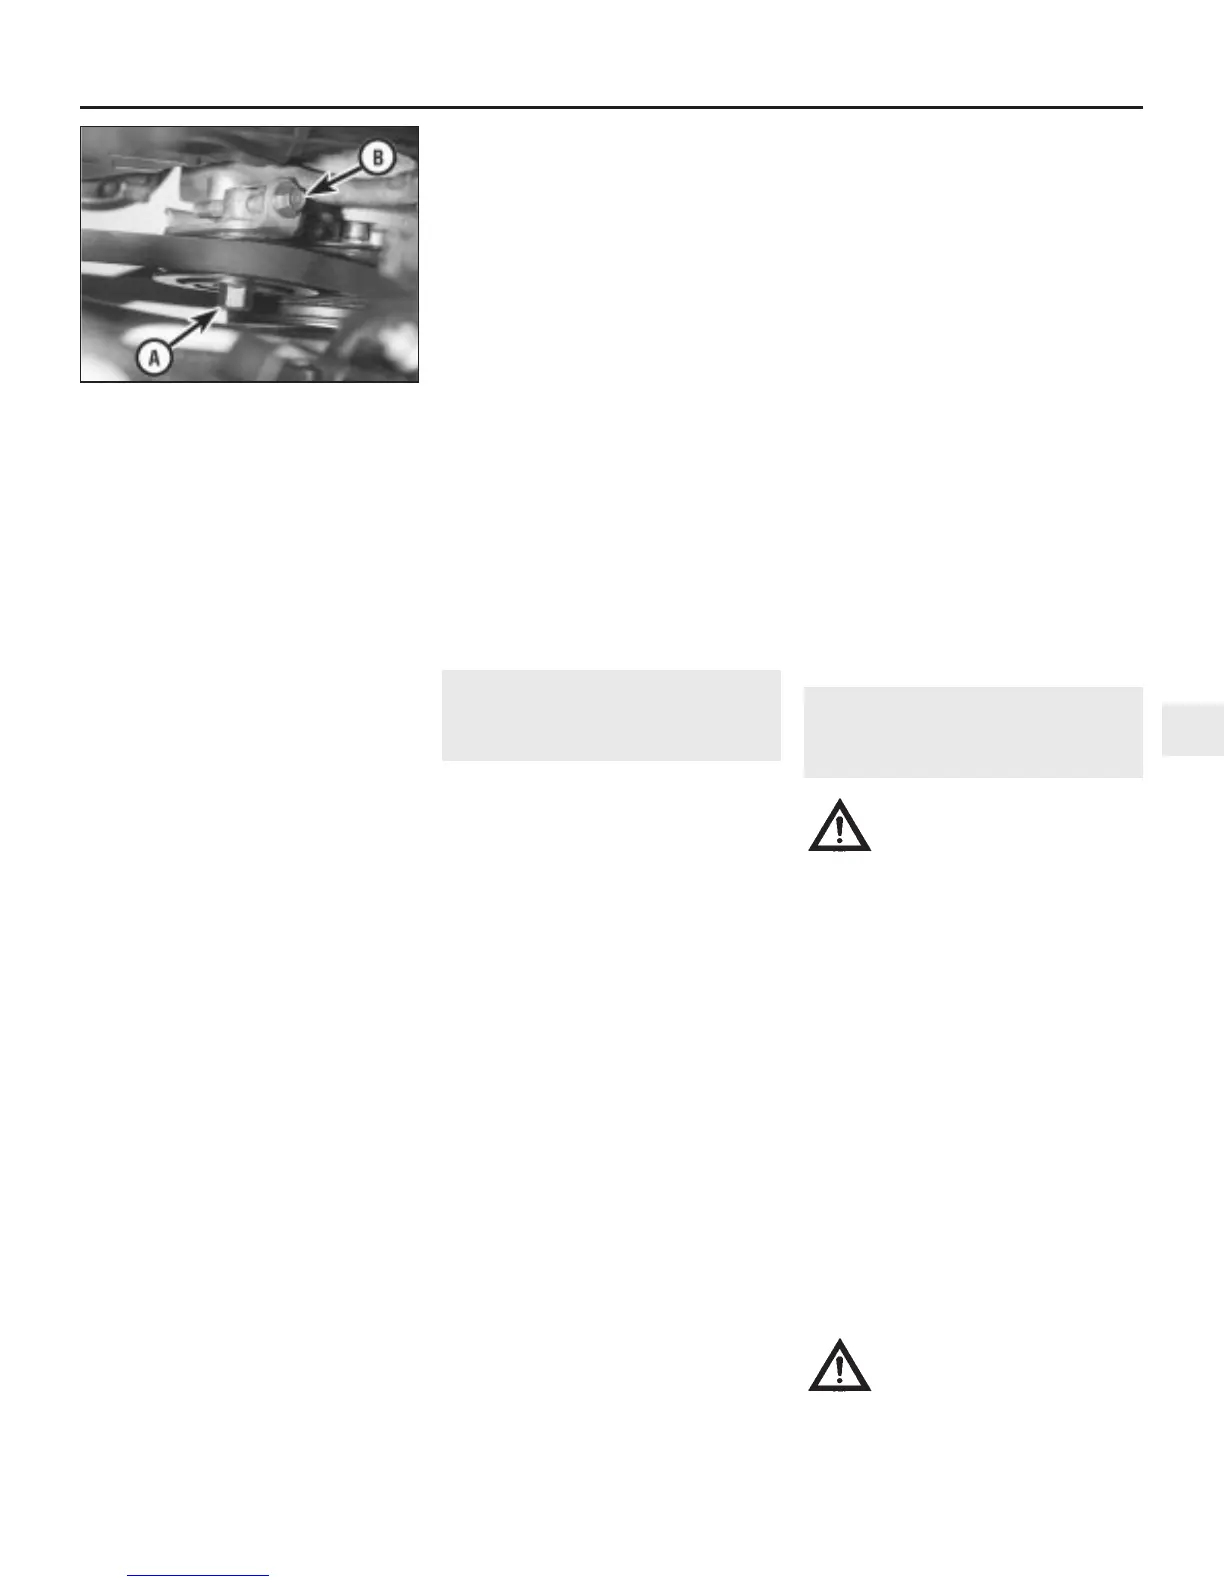
35 Slacken the bolt in the centre of the
tensioner jockey wheel, then turn the
adjusting bolt, behind the adjuster, to obtain
the correct belt tension (see illustration).
When the adjustment is correct, tighten the
jockey wheel bolt.
Renewal - 4-cylinder engines
36 Open the bonnet, jack up the front of the
vehicle (where applicable) and support it
securely on an axle stands, remove the
roadwheel, then remove the cover from inside
the wheelarch.
37 The routing of the drivebelt around the
pulleys is dependant on the drivebelt type and
whether or not air conditioning is fitted. Before
removing the drivebelt, it’s a good idea to
sketch the belt run around the pulleys; this will
save a lot of frustration when it comes to
refitting.
38 If the existing drivebelt is to be refitted,
mark it, or note the maker’s markings on its
flat surface, so that it can be installed in the
same way.
39 To renew the drivebelt, slacken the belt
tension fully as described above according to
type, noting that where an automatic
tensioner is fitted, it is only necessary to turn
the tensioner centre bolt clockwise, using a
spanner, to release the belt tension. Slip the
belt off the pulleys then fit the new belt
ensuring that it is routed correctly. With the
belt in position, adjust the tension as
previously described, or simply release the
tensioner bolt.
40 Using a spanner applied to the crankshaft
pulley bolt, rotate the crankshaft through at
least two full turns clockwise to settle the
drivebelt on the pulleys, then check that the
drivebelt is properly installed.
41 Refit the cover and roadwheel, then lower
the vehicle to the ground.
Renewal - V6 engines
42 Open the bonnet, jack up the front of the
vehicle (where applicable) and support it
securely on an axle stands, remove the
roadwheel, then remove the cover from inside
the wheelarch.
43 If the existing drivebelt is to be refitted,
mark it, or note the maker’s markings on its
flat surface, so that it can be installed the
same way.
44 Depending on which drivebelt is to be
renewed, it will probably be necessary to
remove one (or both) of the other drivebelts
first, to gain access. Note also, that if the
power steering pump drivebelt is to be
renewed, it will be necessary to support the
engine under the sump on a jack (with
interposed block of wood) and undo the two
bolts on the right-hand engine mounting, to
allow the belt to pass through.
45 To renew the drivebelt, slacken the belt
tension fully as described above according to
type. Slip the belt off the pulleys then fit the
new belt. With the belt in position, refit the
engine mounting bolts (where applicable) and
adjust the tension as previously described.
46 Using a spanner applied to the crankshaft
pulley bolt, rotate the crankshaft through at
least two full turns clockwise to settle the
drivebelt on the pulleys, then check that the
drivebelt is properly installed.
47 Refit the cover and roadwheel, then lower
the vehicle to the ground.
17 Engine compartment wiring
check
2
1 With the vehicle parked on level ground,
apply the handbrake firmly and open the
bonnet. Using an inspection light or a small
electric torch, check all visible wiring within
and beneath the engine compartment.
2 What you are looking for is wiring that is
obviously damaged by chafing against sharp
edges, or against moving suspension/
transmission components and/or the auxiliary
drivebelts, by being trapped or crushed
between carelessly-refitted components, or
melted by being forced into contact with the
hot engine castings, coolant pipes, etc. In
almost all cases, damage of this sort is
caused in the first instance by incorrect
routing on reassembly after previous work has
been carried out.
3 Depending on the extent of the problem,
damaged wiring may sometimes be repaired
by rejoining the break or splicing-in a new
length of wire, using solder to ensure a good
connection, and remaking the insulation with
adhesive insulating tape or heat-shrink tubing,
as appropriate. If the damage is extensive,
given the implications for the vehicle’s future
reliability, the best long-term answer may well
be to renew that entire section of the loom,
however expensive this may appear.
4 When the actual damage has been
repaired, ensure that the wiring loom is re-
routed correctly, so that it is clear of other
components, and not stretched or kinked, and
is secured out of harm’s way using the plastic
clips, guides and ties provided.
5 Check all electrical connectors, ensuring
that they are clean, securely fastened, and
that each is locked by its plastic tabs or wire
clip, as appropriate. If any connector shows
external signs of corrosion (accumulations of
white or green deposits, or streaks of “rust”),
or if any is thought to be dirty, it must be
unplugged and cleaned using electrical
contact cleaner. If the connector pins are
severely corroded, the connector must be
renewed; note that this may mean the renewal
of that entire section of the loom - see your
local Rover dealer for details.
6 If the cleaner completely removes the
corrosion to leave the connector in a
satisfactory condition, it would be wise to
pack the connector with a material which will
exclude dirt and moisture, preventing the
corrosion from occurring again.
7 Check the condition of the battery
connections - remake the connections or
renew the leads if a fault is found. Use the
same techniques to ensure that all earth
points in the engine compartment provide
good electrical contact through clean, metal-
to-metal joints, and that all are securely
fastened.
8 Refer to Section 11 for details of spark plug
(HT) lead checks.
18 Air conditioning system
check
1
Warning: The air conditioning
system is under high pressure. Do
not loosen any fittings or remove
any components until after the
system has been discharged. Air conditioning
refrigerant must be properly discharged into
an approved type of container, at a dealer
service department or an automotive air
conditioning repair facility capable of
handling the refrigerant safely. Always wear
eye protection when disconnecting air
conditioning system fittings.
1 The following maintenance checks should
be performed on a regular basis, to ensure
that the air conditioner continues to operate at
peak efficiency:
(a) Check the auxiliary drivebelt. If it’s worn
or deteriorated, renew it (see Section 16).
(b) Check the system hoses. Look for cracks,
bubbles, hard spots and deterioration.
Inspect the hoses and all fittings for oil
bubbles and seepage. If there’s any
evidence of wear, damage or leaks, renew
the hose(s).
(c) Inspect the condenser fins for leaves,
insects and other debris. Use a “fin
comb” or compressed air to clean the
condenser.
Warning: Wear eye protection
when using compressed air!
(d) Check that the drain tube from the front
of the evaporator is clear - note that it is
normal to have clear fluid (water) dripping
Every 12 000 miles 1•19
16.35 Air conditioning compressor
drivebelt tensioner jockey wheel bolt (A),
and adjusting bolt (B) on V6 engines
1
1380 Rover 800 Series Remake
 Loading...