5 If oil leakage is noted, disconnect the
various hoses and pipes, and check that all
are clear and unblocked. Remove the air
cleaner assembly cover, and check that the
hose is clear and undamaged. Always ensure
that the air cleaner filter element is clean as
this is a vital part of the system. If it is not due
for renewal but appears dirty, it may be
possible to clean it as described in Sec-
tion 12.
34 Fuel filter renewal
1
Warning: Petrol is extremely
flammable, so extra precautions
must be taken when working on
any part of the fuel system. Do
not smoke, or allow open flames or bare
light bulbs, near the work area. Also, do not
work in a garage if a natural gas-type
appliance with a pilot light is present. While
performing any work on the fuel system,
wear safety glasses, and have a suitable
(Class B) fire extinguisher on hand. If you
spill any fuel on your skin, rinse it off
immediately with soap and water.
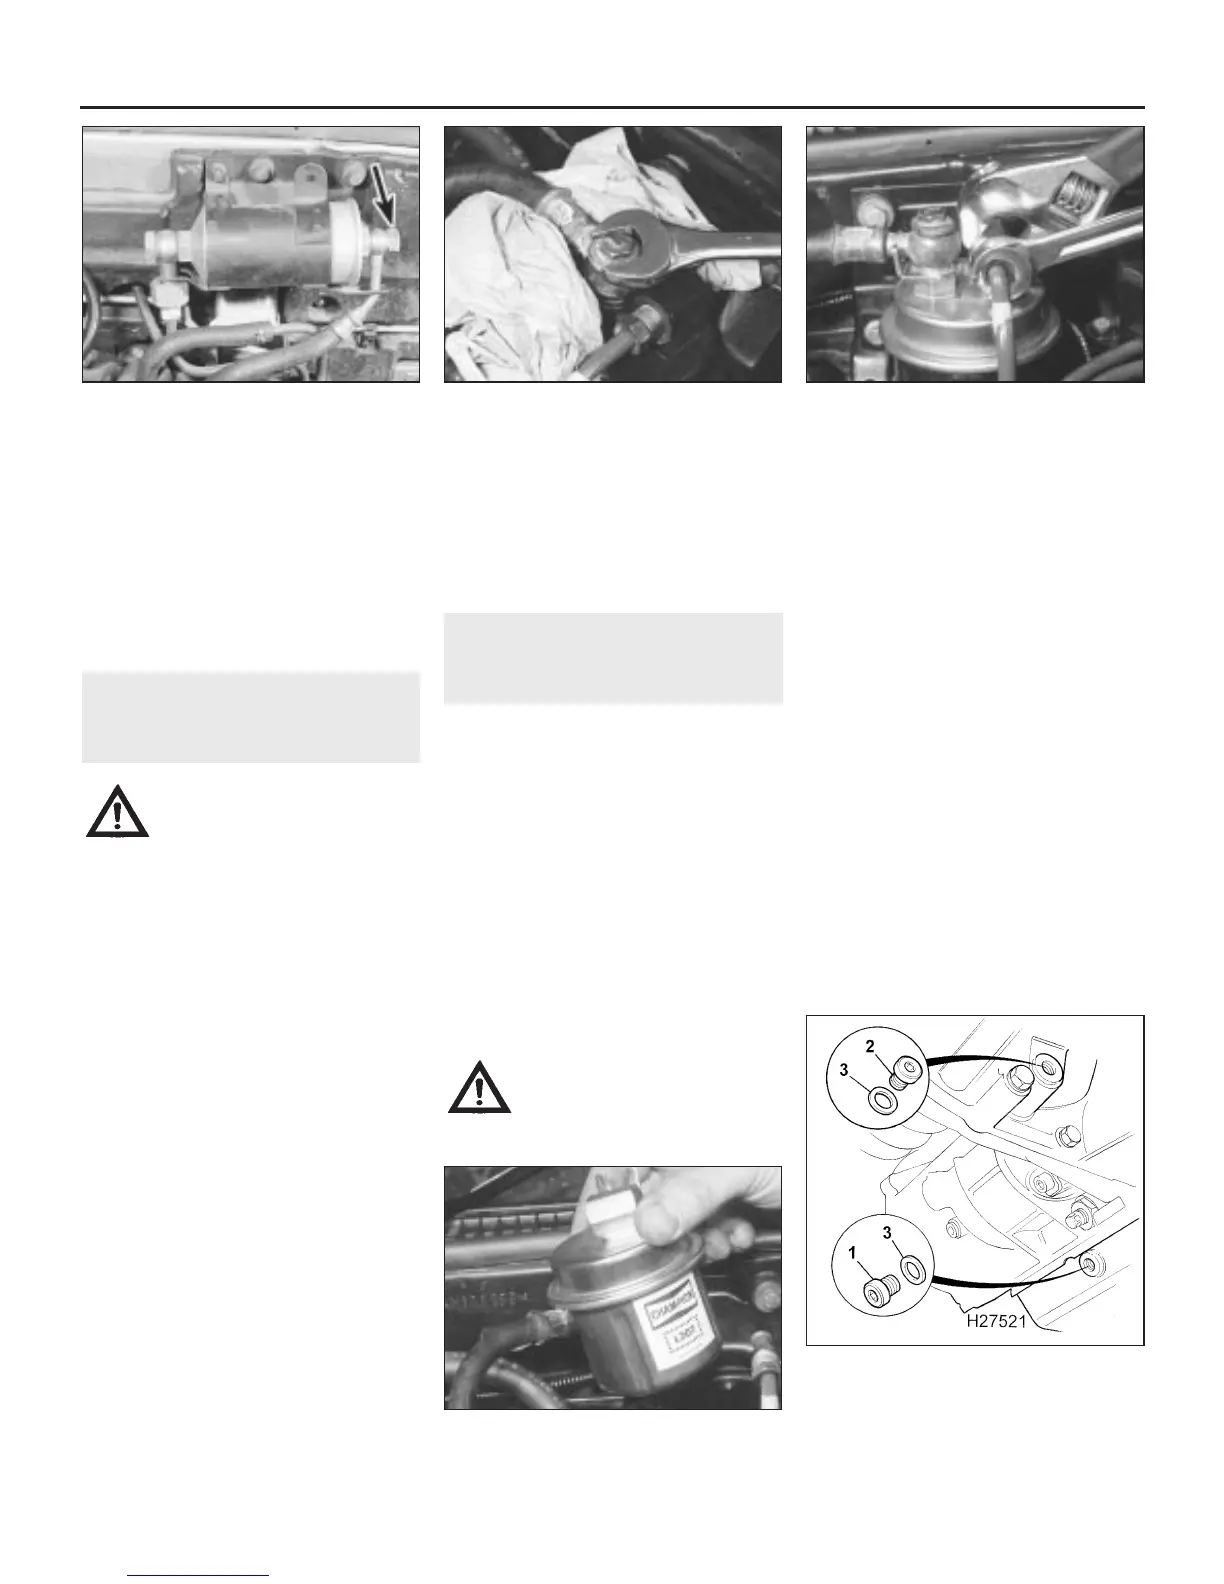
1 On all engines, a fuel filter is provided in the
fuel pump outlet line and is located on the left-
hand side of the engine compartment
bulkhead. The filter performs a vital role in
keeping dirt and other foreign matter out of
the fuel system, and so must be renewed at
regular intervals, or whenever you have
reason to suspect that it may be clogged.
2 Disconnect the battery negative (earth) lead
(refer to Chapter 5, Section 1).
3 Place absorbent rags around the fuel filter
outlet union banjo bolt, then slowly unscrew
the bolt itself or, on later models, the small
bleed screw in the centre of the bolt, to relieve
the system pressure (see illustrations). If a
bleed screw was fitted, tighten it once the
pressure has been released.
4 On 4-cylinder engines, unscrew the filter
inlet and outlet union banjo bolts, and recover
the four copper washers. On V6 engines,
unscrew the inlet union nut and withdraw the
pipe from the filter head (see illustration).
Now unscrew the outlet union banjo bolt and
recover the two copper washers.
5 Undo the filter bracket retaining nuts or
bolts, and remove the filter (see illustration).
6 Refitting is the reverse sequence to
removal, but use new copper washers on the
banjo unions.
35 Automatic transmission fluid
renewal
1
1 The automatic transmission fluid should be
changed when the transmission is warm after
the vehicle has been driven for two or three
miles.
2 Position the vehicle over an inspection pit,
on vehicle ramps, or jack it up, but make sure
that it is level.
3 Place a large container beneath the
transmission and thoroughly clean the area
around the drain plug(s). On 4-cylinder engine
models, undo the two socket-headed drain
plugs - one on the side of the sump pan, and
one on the transmission casing (see
illustration). On V6 engine models undo the
single drain plug on the end of the
transmission casing at the front. Allow the
fluid to drain into the container.
Warning: Take care to avoid
scalding - the transmission fluid
will be very hot. Remove the
dipstick to speed up the
draining operation.
4 When all the fluid has drained (this may take
quite some time) clean the drain plug(s) then
refit, together with new seals and tighten
securely.
5 Lower the vehicle to the ground and apply
the handbrake securely.
6 Place a funnel in the dipstick tube and fill
the transmission with the specified type of
fluid. Only add about half the specified
amount before checking the level on the
dipstick.
7 On 4-cylinder engine models, slowly add
more fluid until the level just shows on the
dipstick. Now start the engine with the
selector lever in “P” and check the fluid level
on the dipstick immediately (don’t wait for the
engine to warm up). Add fluid as necessary
until the level is up to the “MAX” mark on the
“COLD” side of the blade then refit the
dipstick. Recheck the level as described in
Section 31, with the engine fully warmed-up,
at the earliest opportunity.
8 On V6 engine models, slowly add more fluid
until the level is within the shaded sector on
the dipstick blade. Refit the dipstick, drive the
car until it is fully warmed-up, then recheck
the level as described in Section 31.
1•24 Every 24 000 miles
35.3 Automatic transmission fluid drain
plug locations on 4-cylinder engine models
1 Sump pan drain plug
2 Transmission casing drain plug
3 Sealing washers
34.5 Undo the filter bracket retaining nuts
or bolts, and remove the filter
34.4 On V6 engines, unscrew the inlet
union nut and withdraw the pipe from the
filter head
34.3b Unscrewing the banjo union bolt on
V6 engines
34.3a Fuel filter outlet union banjo bolt
(arrowed) on 4-cylinder engines
1380 Rover 800 Series Remake
 Loading...