tightened to the specified torque (see
illustration).
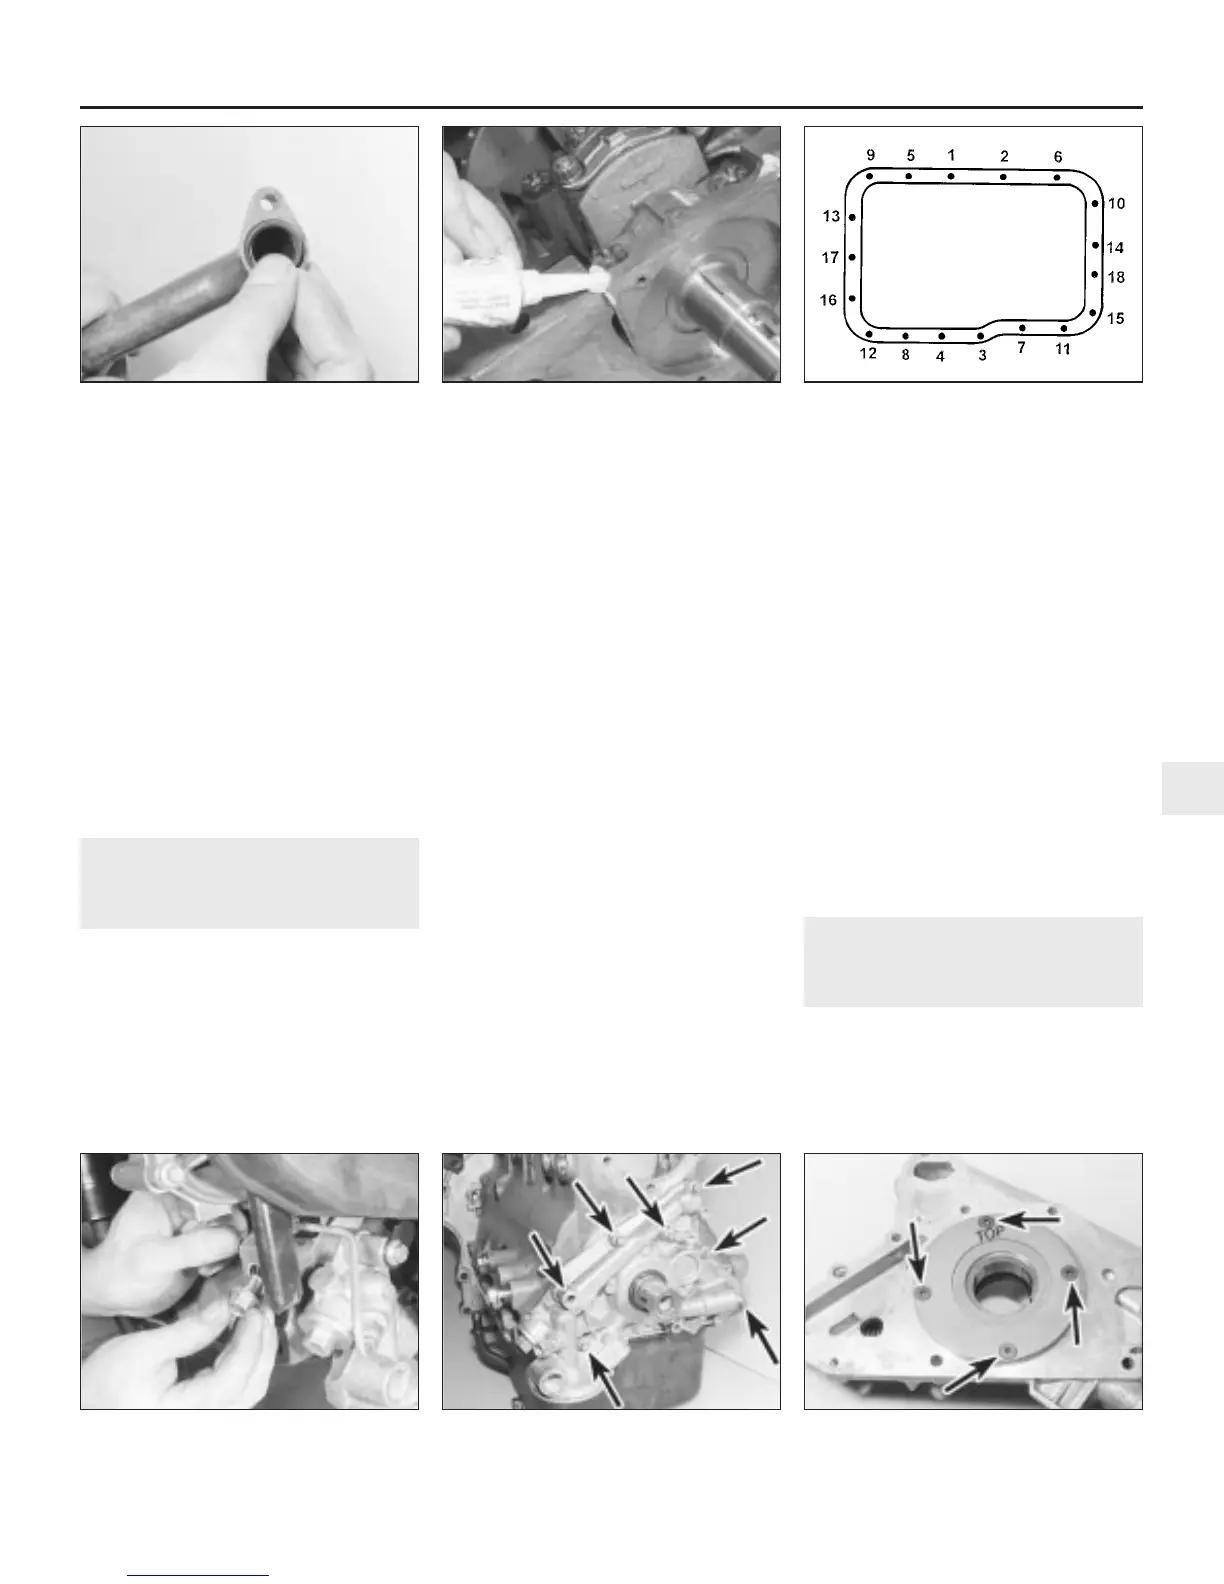
15 Apply a bead of RTV sealant to the joint
between Nos 1 and 5 main bearing caps and
the edge of the crankcase (see illustration).
Apply gasket sealant to the sump and
crankcase mating faces, then place a new
gasket in position.
16 Refit the sump, and tighten the retaining
bolts progressively, and in sequence, to the
specified torque (see illustration).
17 Refit the crankcase breather hose and
turbocharger oil return hose.
18 Refit the exhaust front section as
described in Chapter 4.
19 Refit the longitudinal support member.
20 Lower the car to the ground, reconnect
the battery and fill the engine with oil as
described in Chapter 1.
14 Oil pump -
removal and refitting
4
Removal
1 Remove the timing belt as described in
Section 7 or 8 according to engine type. On
“T” series engines also remove the timing belt
tensioner as described in Section 9.
2 Drain the engine oil and remove the oil filter
as described in Chapter 1.
3 On early “M” series engines, remove the
starter motor as described in Chapter 5. Using
a socket and long handle, slacken the
crankshaft pulley centre retaining bolt. Lock
the flywheel ring gear, through the starter
motor aperture, using a large screwdriver or
similar tool to prevent the crankshaft rotating
as the pulley bolt is undone. Remove the bolt
and withdraw the pulley.
4 On later “M” series engines and all “T”
series engines, withdraw the sprocket from
the crankshaft.
5 Remove the Woodruff key from the slot in
the crankshaft.
6 Unscrew the oil pipe unions on the side of
the filter housing, then undo the bolt securing
the oil pipe retaining clip and timing belt
backplate to the crankcase (see illustration).
Where fitted unscrew the oil cooler feed and
return pipe unions from the pump housing.
7 Undo the retaining bolts and remove the
timing belt lower backplate.
8 Undo the housing retaining bolts, and
withdraw the assembly from the crankshaft
and crankcase (see illustration). Recover the
gasket.
Refitting
9 Ensure that the pump housing and
crankcase mating faces are thoroughly clean,
with all traces of old gasket and sealer
removed.
10 Apply a bead of RTV sealant to the
vertical joint between the main bearing cap
and the crankcase, and smear jointing
compound to both faces of a new gasket.
Place the gasket in position on the crankcase.
11 Lubricate the lip of the oil seal, then locate
the pump housing in place.
12 Fit the retaining bolts, and tighten them to
the specified torque.
13 Refit the timing belt lower backplate.
14 Reconnect the oil pipe and where
applicable, the oil cooler unions, and refit the
pipe support clip retaining bolt.
15 Place the Woodruff key in its crankshaft
groove, then refit the crankshaft pulley,
retaining bolt and washer.
16 Refit the crankshaft sprocket on later “M”
series engines and all “T” series engines.
17 On early “M” series engines, refit the
crankshaft pulley and tighten the retaining bolt
to the specified torque. Prevent the crankshaft
rotating using the same method as used for
removal when tightening the bolt. Refit the
starter motor as described in Chapter 5.
18 Refit the timing belt as described in
Section 7 or 8 as applicable.
19 Fit a new oil filter, and fill the engine with
oil as described in Chapter 1.
15 Oil pump - dismantling,
inspection and reassembly
3
Dismantling
1 With the pump housing removed from the
engine, undo the four Torx retaining bolts on
the housing rear face, and lift off the pump
cover (see illustration).
4-cylinder engine – in-car engine repair procedures 2A•15
13.16 Sump retaining bolt tightening
sequence
13.15 Apply sealant to the main bearing
cap joints
13.14 Fit a new O-ring to the pick-up pipe
flange
15.1 Oil pump cover retaining bolts
(arrowed)
14.8 Oil pump housing retaining bolts
(arrowed)
14.6 Undo the bolt securing the oil pipe
retaining clip and timing belt backplate
2A
1380 Rover 800 Series Remake
H28968
 Loading...