connecting rod is clear by probing with a piece
of wire. Temporarily remove the big-end bearing
caps and the old bearing shells, wipe clean the
rod and cap bearing recesses, and inspect them
for nicks, gouges and scratches. After checking
the rods, replace the old shells, slip the caps into
place, and tighten the bolts finger-tight.
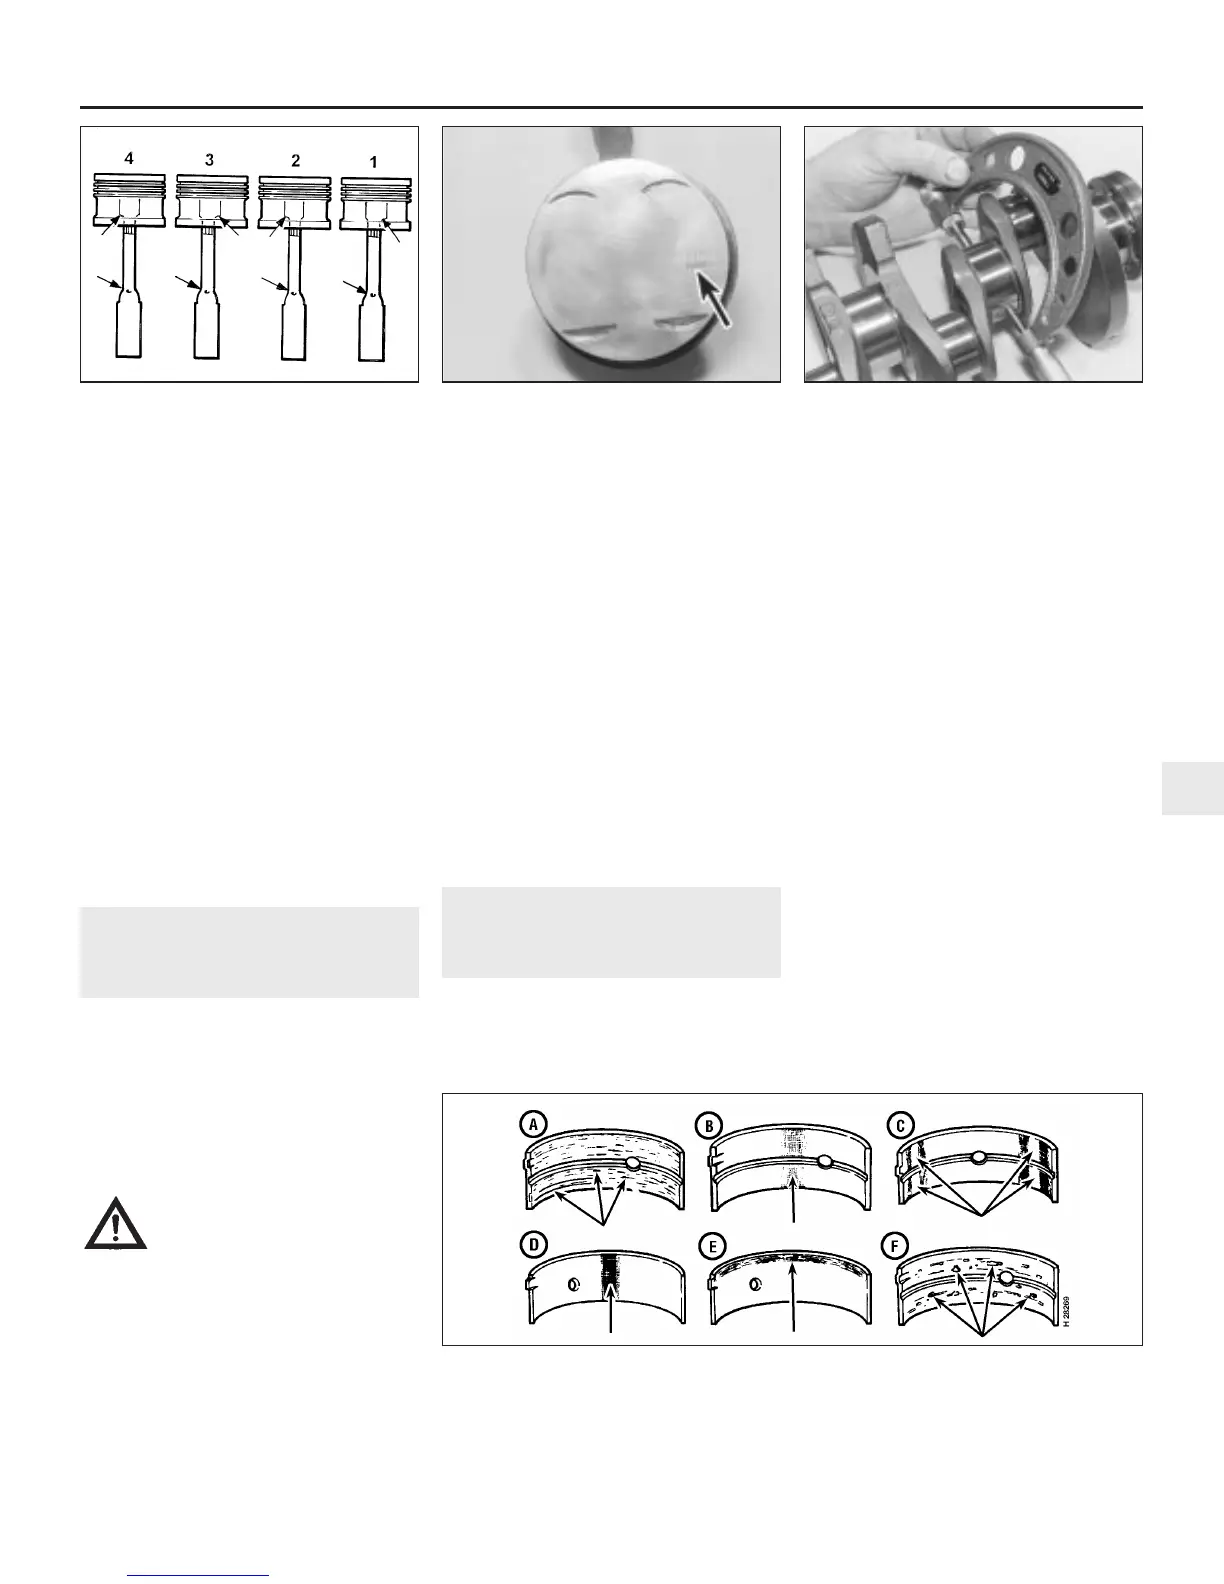
15 To refit the pistons to their connecting
rods on “M” series engines, start with No 1
and insert the connecting rod into the piston,
so that the offset at the gudgeon pin end of
the rod is towards the side of the piston
marked FRONT on its top face (see
illustrations). Insert the gudgeon pin, and refit
the retaining circlips. Ensure that the circlips
fully enter their grooves.
16 Assemble the No 3 piston and connecting
rod in the same way.
17 Assemble the No 2 and No 4 pistons and
connecting rods in the same way, but with the
offset at the gudgeon pin end of the rod away
from the side of the piston marked FRONT.
17 Crankshaft - inspection
3
Note: Always check first what replacement
parts are available before planning any
overhaul operation. A Rover dealer, or a good
engine reconditioning specialist/automotive
parts supplier, may be able to suggest
alternatives which will enable you to overcome
the lack of replacement parts.
1 Clean the crankshaft, and dry it with
compressed air if available.
Warning: Wear eye protection
when using compressed air! Be
sure to clean the oil holes with a
pipe cleaner or similar probe.
2 Check the main and crankpin (big-end)
bearing journals for uneven wear, scoring,
pitting and cracking.
3 Remove all burrs from the crankshaft oil
holes with a stone, file or scraper.
4 Using a micrometer, measure the diameter
of the main bearing and crankpin (big-end)
journals, and compare the results with the
Specifications at the beginning of this Chapter
(see illustration).
5 By measuring the diameter at a number of
points around each journal’s circumference,
you will be able to determine whether or not
the journal is out-of-round. Take the
measurement at each end of the journal, near
the webs, to determine if the journal is
tapered.
6 If the crankshaft journals are damaged,
tapered, out-of-round, or worn beyond the
limits specified in this Chapter, the crankshaft
must be taken to an engine overhaul
specialist, who will regrind it, and who can
supply the necessary undersize bearing
shells.
7 Check the oil seal journals at each end of
the crankshaft for wear and damage. If either
seal has worn an excessive groove in its
journal, consult an engine overhaul specialist,
who will be able to advise whether a repair is
possible, or whether a new crankshaft is
necessary.
18 Main and big-end bearings -
inspection
4
Note: Always check first what replacement
parts are available before planning any
overhaul operation. A Rover dealer, or a good
engine reconditioning specialist/automotive
parts supplier, may be able to suggest
alternatives which will enable you to overcome
the lack of replacement parts.
1 Even though the main and big-end bearing
shells should be renewed during the engine
overhaul, the old shells should be retained for
close examination, as they may reveal
valuable information about the condition of
the engine (see illustration).
2 Bearing failure occurs because of lack of
lubrication, the presence of dirt or other
foreign particles, overloading the engine, and
corrosion. Regardless of the cause of bearing
failure, it must be corrected before the engine
is reassembled, to prevent it from happening
again.
3 When examining the bearing shells, remove
them from the cylinder block/crankcase and
main bearing caps, and from the connecting
rods and the big-end bearing caps, then lay
them out on a clean surface in the same
general position as their location in the
engine. This will enable you to match any
bearing problems with the corresponding
crankshaft journal. Do not touch any shell’s
bearing surface with your fingers while
checking it, or the delicate surface may be
scratched.
4 Dirt or other foreign matter gets into the
engine in a variety of ways. It may be left in
the engine during assembly, or it may pass
Engine removal and general engine overhaul procedures 2C•15
17.4 Measuring the main bearing journal
diameters
16.15b The pistons are marked FRONT on
their top face (arrowed) on “M” series
4-cylinder engines
16.15a Connecting rod offset and oil squirt
hole relationship on “M” series 4-cylinder
engines
18.1 Typical bearing failures
A Scratched by dirt; dirt embedded in bearing
material
B Lack of oil; overlay wiped out
C Improper seating: bright (polished) sections
D Tapered journal; overlay gone from entire
surface
E Radius ride
F Fatigue failure: craters or pockets
2C
1380 Rover 800 Series Remake
H27537
 Loading...