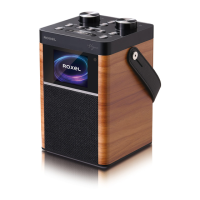
The Roxel DAB Radio Vogue is a portable wireless speaker designed to provide a comprehensive stereo digital multimedia experience. It integrates DAB, Bluetooth, FM, USB, and TF card playback, making it a versatile audio device.
Function Description:
This product supports Band III DAB/DAB+ digital signal reception, ensuring access to a wide range of digital radio stations. For FM enthusiasts, it offers Band II 87.5-108 MHz FM reception with RDS function. The device features Bluetooth 5.0 standard for seamless wireless connectivity with Bluetooth-enabled devices. It boasts a 2.8-inch TFT color display for clear visual feedback. A real-time clock function with automatic time updates via DAB is included, along with two sets of alarm clock functions, offering DAB, FM, or Buzzer as alarm sound sources. Power is supplied by a built-in 7.4V/1800mAH rechargeable lithium battery, and the system supports multi-language operation (nine languages).
Important Technical Specifications:
- Output power: RMS 10W
- Signal to noise ratio: ≥70dBA
- Distortion: ≤ 5%
- Frequency response: 100HZ-18KHZ
- Audio input interface: DAB, FM, BT, USB, TF, Aux
- Adjustment form: Button or Remote
- Input power: 7.4V/1800mAh rechargeable lithium ion battery
- USB/Micro SD maximum input sensitivity: 0dBm
- DAB receiving input sensitivity: -97dBm
- FM receiving input sensitivity: -105dBm
- Working environment temperature: -10°C ~ 50 °C
- Storage temperature: -20°C ~ 70 °C
- Product size specification: 120120185 mm
- Product Net weight: about 1.2kg
Usage Features:
Power ON/OFF:
To power on or off the device, move the power switch located on the back to the ON/OFF side. Ensure the telescopic antenna is pulled out for optimal reception when using radio functions.
Charging Instructions:
Fully charge the radio using the supplied AC adapter (9V/0.5A) before the first use. A solid red LED light under the charging port indicates that the device is charging. The LED indicator will turn green when fully charged.
DAB Radio Mode:
Upon power-on, the device automatically enters DAB mode and begins searching for available DAB stations, which are then stored. If stations have been previously searched, you can long-press the SCAN button to perform an automatic search. Rotate the TUNE knob to select a desired DAB station, then press the ENTER (TUNE) button to play. Adjust the volume by rotating the VOLUME knob. Press the MUTE (VOLUME) knob to mute the sound. Short-press the MENU•INFO button to view current station information, including text, signal strength, program type, episode name, channel number/frequency, signal error rate, bit rate, time, and date.
Saving DAB Stations to Preset:
- Long-press the SCAN button (if a full scan was previously done, proceed to step 2).
- Find the desired radio station by rotating the TUNE knob.
- Select the channel you wish to save and press the ENTER button.
- Press and hold the PRESET button for 3 seconds.
- Choose an available (Empty) slot from the preset store screen.
- Press the ENTER button to save the channel.
Alternatively, you can long-press the Shortcut button 1/2/3 to add the current radio station to preset list 1/2/3.
Recalling DAB Preset Stations:
Short-press the PRESET button to recall the preset radio list. Rotate the TUNE knob to select a DAB station, then press the ENTER button to play. You can also use the Shortcut button 1/2/3 to directly access preset radio station 1/2/3.
FM Radio Mode:
- Press the MODE.LUM button to switch to FM mode.
- Long-press the SCAN button for 2-3 seconds to start automatic searching for FM radio channels. Available channels will be stored after the search.
- Scan Setting: Long-press the MENU•INFO button for 2-3 seconds to enter the menu setup list. Rotate the TUNE knob to select "Scan Setting," press ENTER to confirm. Rotate the TUNE knob to choose "All stations" or "Strong stations," then press ENTER to confirm. "All stations" stores all available channels, while "Strong stations" stores only strong signal radio stations.
- Press the PRESET button to access the stored Radio station list. Rotate the TUNE knob to select the desired station and press ENTER to play. You can also use the Shortcut button 1/2/3.
- Rotate the TUNE knob to adjust radio frequency by 0.05MHz at a time. Rotate and hold the TUNE knob for 3 seconds to start automatic searching for the next/previous radio station.
- Long-press the PRESET button to add the current radio station to the radio list. Rotate the TUNE knob to select the desired list number, then press ENTER to confirm. You can also long-press the Shortcut button 1/2/3.
Bluetooth Music Playback:
- Press the MODE.LUM button to switch to Bluetooth mode.
- Enable Bluetooth on your device, search for "Roxel Vogue," and click to connect.
- Play music or audio files from your Bluetooth-enabled device. Rotate the TUNE knob (or press the SKIP button) to navigate tracks. Adjust volume with the VOLUME knob.
- Press the ENTER button to play/pause music. Press the VOLUME knob to mute sound.
- Long-press the ENTER button to disconnect Bluetooth.
USB/Micro SD Card Playback:
- Insert a USB or micro SD card (up to 64GB supported) and press the MODE.LUM button to switch to USB/SD mode. Music will play automatically.
- Rotate the TUNE knob (or press the SKIP button) to go to the next/previous song. Adjust volume with the VOLUME knob.
- Press the ENTER button to play/pause music. Press the VOLUME knob to mute sound.
- Press the PRESET button to switch loop playback modes: Repeat All, Repeat One, or Random.
- Supports audio decoding formats: MP3 / WAV / FLAC / WMA / APE.
System Setup:
Long-press the MENU•INFO button for 2-3 seconds to enter the menu setup list. Rotate the TUNE knob to select sub-menu items, then press ENTER to confirm. Short-press the MENU•INFO button to return during operation.
Time and Date Setup:
- Automatic: In DAB radio mode, if a DAB signal is available, the device will automatically set the local time.
- Manual: Long-press the MENU•INFO button for 2-3 seconds to enter the menu setup list. Rotate the TUNE knob to select <Time/Date>, then press ENTER. Select <Set Time /Date>, , , , or .
- Set Time /Date: Press ENTER to set time & date (Date - Month - Year - Hour - Minute). Rotate the TUNE knob to select numbers and press ENTER to confirm.
- Set Hour System: Press ENTER to set 24h/12h. Rotate the TUNE knob to select and press ENTER to confirm.
- Set Date Format: Press ENTER to set the date format. Rotate the TUNE knob to select and press ENTER to confirm.
Alarm Clock Setup (2 sets):
- Press the ALARM button to enter alarm clock settings.
- Rotate the TUNE knob to select Alarm 1 / Alarm 2, then press ENTER to confirm.
- Alarm: Press ENTER to select ON/OFF.
- Time: Press ENTER to set alarm time. Rotate the TUNE knob to select numbers, press ENTER to confirm.
- Source: Press ENTER to select FM/DAB/Buzzer as the alarm source, press ENTER to confirm.
- Repeat: Press ENTER to select Once/Daily/Weekends/Workday, press ENTER to confirm.
- Volume: Press ENTER to set alarm volume. Rotate the TUNE knob to select volume, press ENTER to confirm.
- When the alarm rings, short-press the snooze button to activate snooze function (5 minutes).
- Press the ALARM button (or STANDBY button) to stop the alarm; the device will enter standby mode.
Sleep Timer Setup:
- Long-press the MENU•INFO button for 2-3 seconds to enter the menu setup list. Rotate the TUNE knob to select SLEEP, then press ENTER.
- Rotate the TUNE knob to select 15 minutes / 30 minutes / ... / 2 Hours.
- Press the ENTER button to confirm the sleep timer setting.
- The device will enter standby mode after the selected duration. If "OFF" is selected and confirmed, the sleep timer will be turned off.
Maintenance Features:
- General Care: Clean the device only with a dry cloth.
- Ventilation: Do not block any ventilation openings. Install the device according to the manufacturer's instructions.
- Heat Sources: Do not use near radiators, heaters, stoves, or other heat-producing devices.
- Power Cord: Protect the power cord from being walked on or pinched, especially at plugs, convenience receptacles, and the point where it connects to the device.
- Attachments: Only use attachments/accessories specified by the manufacturer.
- Unplugging: Unplug the device during lightning storms or when unused for long periods.
- Servicing: Refer all servicing to qualified service personnel.
- Battery Safety: The device has a built-in rechargeable lithium-ion battery. Do not disassemble the device, as there is a danger of explosion. Do not expose the battery to excessive heat (sunshine, fire, etc.). Replace the battery only with the same or equivalent type.
- Disposal: This product should not be disposed of with other household waste in the EU. Follow government guidelines and recycle responsibly to prevent environmental harm.