This document describes a coffee urn, designed for brewing and keeping coffee warm. It is intended for use in service areas by qualified personnel familiar with equipment operation and health and safety regulations. The user is responsible for any damage resulting from misuse.
Function Description
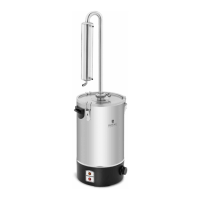
The coffee urn is designed to brew coffee and maintain its temperature. It operates by heating water, which then percolates through ground coffee in a filter basket. The brewed coffee is dispensed via a valve.
Important Technical Specifications
The document provides specifications for several models: RRC-WBDWTC6G, RC-WBDWTC14G, RRC-WBDWTC6GO, and RC-WBDWTC14GO. All models operate on a supply voltage of 230V~ / 50Hz and have an IPX3 protection class.
Models RRC-WBDWTC6G and RC-WBDWTC14G:
- Rated Power: 950 W (RRC-WBDWTC6G) and 1500 W (RC-WBDWTC14G)
- Capacity: 6 liters (RRC-WBDWTC6G) and 14 liters (RC-WBDWTC14G)
- Dimensions (Width x Depth x Height): 310x280x450 mm (RRC-WBDWTC6G) and 375x345x520 mm (RC-WBDWTC14G)
- Weight: 3.3 kg (RRC-WBDWTC6G) and 4.7 kg (RC-WBDWTC14G)
Models RRC-WBDWTC6GO and RC-WBDWTC14GO:
- Rated Power: 950 W (RRC-WBDWTC6GO) and 1500 W (RC-WBDWTC14GO)
- Capacity: 6 liters (RRC-WBDWTC6GO) and 14 liters (RC-WBDWTC14GO)
- Dimensions (Width x Depth x Height): 320x300x440 mm (RRC-WBDWTC6GO) and 380x370x515 mm (RC-WBDWTC14GO)
- Weight: 3.3 kg (RRC-WBDWTC6GO) and 4.7 kg (RC-WBDWTC14GO)
Usage Features
Preparation for Operation:
- Placement: The unit should be placed on a level, stable, clean, fireproof, and dry surface, away from hot surfaces and out of reach of children and individuals with reduced mental, sensory, or intellectual functions. Ambient temperature should be between 10°C and 25°C, and relative humidity should not exceed 85%. Ensure good air circulation. The mains plug must be easily accessible. Verify that the power supply matches the identification plate specifications.
- Initial Cleaning: Before first use, all components and the tank must be disassembled and washed.
Assembly and Operation:
- Lid: To remove or install the lid (1), align with the side locks. Turn the lid handle (1) counter-clockwise to unlock and clockwise to lock.
- Internal Components: Remove the filter basket (d) and percolator ascending tube (c) from inside the tank (3).
- Dispenser Valve: Before filling with water, ensure the dispenser valve stem (6) is in the closed position (C). Block the dispenser water outlet if necessary. The valve stem (6) is controlled by turning it clockwise or counter-clockwise.
- Filling with Water: Fill the tank with water. The water level must be between the minimum and maximum fill lines marked inside the tank. Do not operate the unit if the water level is outside this range.
- Percolator Tube: Place the percolator ascending tube (c) at the bottom of the tank (3). Insert the end of the tube with its base into the heating section at the tank's bottom. Ensure it is correctly installed (A).
- Filter Basket: Pre-wet the filter basket (d) with water to prevent fine coffee grounds from entering the water. Fill the filter basket (d) with the desired amount of evenly ground coffee.
- Filter Basket Placement: Place the filter basket (d) onto the percolator ascending tube (c). Guide the tube through the filter basket's opening until resistance is felt. Integrated safety units keep it in a fixed position (B).
- Lid Installation: Place the lid on the tank and lock it (as per step 1).
- Power Connection: Connect the unit's plug to an electrical outlet.
- Indicators: The unit has two LED indicators: a red LED (D - "Heating") for water heating and a yellow LED (E - "Keep warm") for temperature maintenance.
- Start-up: Turn the power switch (7) to position I ("ON") (F). The control LED will light up.
- Brewing Process: Once boiling temperature is reached and the entire load is filtered, the red "Heating" LED will turn off. The unit will switch to temperature maintenance mode, and the yellow "Keep warm" LED (F) will light up.
- Removing Filtered Load (Caution): After brewing, the used filter insert can be removed. Unlock the lid and carefully remove the filter basket and percolator tube from the tank. Caution: Risk of burns!
- Dispensing: The unit includes a dedicated base (10) for placing a container before dispensing. This base consists of a drainer (b) and a sieve (a) to prevent spills. Install the sieve inside the drainer. Place the base on the edge of the unit and lock it with fasteners.
- Dispensing Beverage: To dispense, unblock the dispenser valve (H) and move its stem up/down to the correct position (I) to start or stop the liquid flow.
- Shut-down: After use, turn the power switch (7) to position O ("OFF") (G).
- Disconnect: Disconnect the unit from the mains supply.
- Cooling: Allow the unit and beverage to cool completely before emptying residual liquid and starting a new brewing process.
- Overheat Protection: The unit has a dry overheating protection system. If operated with water below the minimum level, it will automatically switch off. Brewing can be restarted after 10 minutes.
Maintenance Features
Cleaning and Maintenance:
- Disconnect Power: Always unplug the unit and allow it to cool completely before cleaning, adjusting, replacing accessories, or when not in use.
- Cleaning Agents: Use only non-corrosive and mild cleaning agents designed for food-contact surfaces.
- Drying: After cleaning, thoroughly dry all components before re-using the unit.
- Storage: Store the unit in a dry, cool place, protected from moisture and direct sunlight.
- Water Exposure: Do not spray the unit with a water jet or immerse it in water. Ensure no water enters through the ventilation openings in the casing.
- Ventilation Openings: Clean ventilation openings with a brush and compressed air.
- Regular Inspection: Perform regular inspections for technical fitness and any damage.
- Cleaning Tools: Use a soft cloth for cleaning. Do not use sharp or metallic objects (e.g., wire brushes, metal spatulas) as they can damage the surface.
- Chemicals: Do not clean with acidic substances, medical products, diluents, fuel, oil, or other chemicals, as these can damage the unit.
- Post-use Cleaning: Clean the unit after each use; do not leave it dirty.
- Filter Replacement: Regularly change the coffee filters.
Disposal of Used Units:
- This product should not be disposed of with normal household waste.
- Take it to a collection point for recycling electrical and electronic equipment, as indicated by the symbol on the product, instructions, or packaging.
- The materials used are recyclable. Reusing and recycling contribute significantly to environmental protection.
- Contact your local administration for information on appropriate disposal points.