4
Before every ride, please perform the following inspection:
1. Ensure that quick release skewers and thru axles are properly adjusted and tight.
2. Wipe the stanchions and outer legs clean and check entire fork for any obvious damage.
3. Check the headset for proper adjustment.
4. Ensure that the front brake cable is properly routed and check brake adjustment.
Whenever the performance of the fork is noticed to have diminished or it has reached
a service interval (whichever occurs rst), perform the following procedures:
SAFETY MAINTENANCE
PERFORMANCE MAINTENANCE
3. Install the headset crown race (as per manufacturer’s instructions) rmly against the
top of the fork crown.
4. Clean and lubricate the headset bearings and races.
5. Insert the steerer tube into the head tube of the frame.
6. Install the upper bearings, stem spacers, and stem.
7. Install the stem cap and bolt. Tighten the bolt to headset manufacture’s specications.
8. Install the handlebars to desired height and torque stem pinch screws or stem
clamping system to manufacturer’s specications. Adjust the headset until you feel no
play and drag.
9. Install the brakes and adjust per manufacturer’s instructions.
10. Install the front wheel into the dropout counter bore. The quick release must be
tightened after it is properly seated into the dropout counter bores to manufacturer’s
specications.
11. Make sure to check the tire clearance. To check tire clearance, remove the air
pressure and/or spring stacks and compress the fork completely to make sure a
minimum of 1/4’’ (6.4mm) of clearance exists between the top of the tire and the
bottom of the crown.
12. Your new fork is designed to break-in during your rst few rides (about 20 hour total
riding time). Prior to break-in, you may notice your fork feels tight and slightly sluggish.
Following the break-in period, your fork will feel much smoother and will react to
bumps much better than when you rst put in on your bike.
1. Disassemble fork and thoroughly clean grease and residue from each part.
2. Inspect all parts for damage such as cracks, abrasions, and normal wear. If any parts
are found to be damaged or excessively worn in anyway, replace them immediately.
Stop using this product until the damaged or worn parts have been replaced. If all the
parts are in usable condition, proceed to step 3.
3. Apply a liberal amount of approved grease to the upper and lower bushing, stanchion,
valve assembly, and wipers. Fill the wiper pocket with a generous amount of grease.
Do not use a lithium grease as it can cause damage to the bushing material and the
seals.
5. Check top caps, brake posts and shaft bolt for
proper torque.
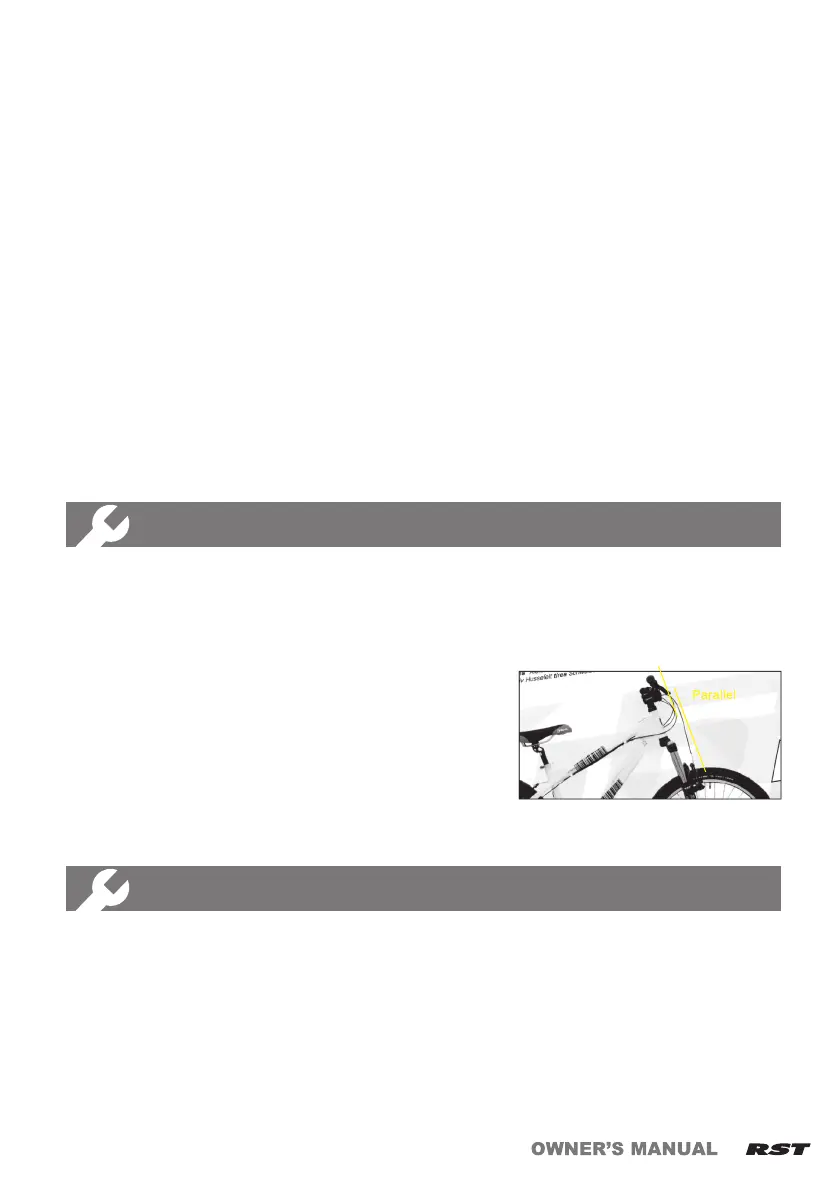
6. Please pay particular attention to ensure that
steerer and stanchion tubes are still parallel.
(Bending of the fork forward or backward is a
common trait of hard landings.)