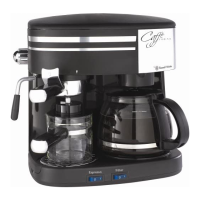
This document provides instructions for the Caffè Torino coffee maker by Russell Hobbs.
Function Description
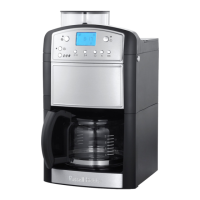
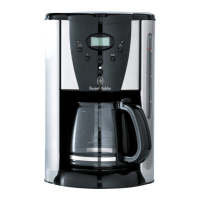
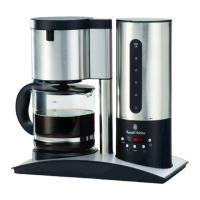
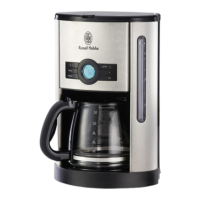
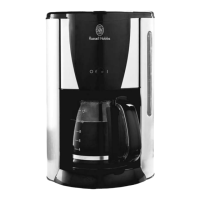
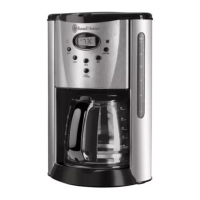
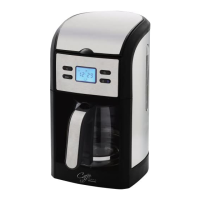
The Caffè Torino is a drip coffee maker designed for household use. It allows users to brew coffee immediately or set a timer for delayed brewing. The device features a reservoir for water, a filter holder for ground coffee, a carafe to collect brewed coffee, and a hotplate to keep the coffee warm. A non-drip valve prevents coffee from dripping onto the hotplate when the carafe is removed. The coffee maker includes a digital display for showing the time and brewing settings, along with buttons for setting hours, minutes, and controlling the brewing process.
Important Technical Specifications
- Power Supply: The device requires a 13A BS1362 fuse in a 13A BS1363 plug and must be earthed.
- Water Capacity: The reservoir should be filled with at least 2 cups of water, but not above the maximum mark. Overfilling can cause excess water to escape from the overflow at the rear.
- Brewing Time: The hotplate keeps coffee warm for 2 hours after brewing is complete, then automatically switches off.
- Filter Type: Designed for filter-ground coffee.
- Display: Digital display showing time (AM/PM) and brewing status (e.g., "Auto" for timer mode, animated tumbler for brewing, full carafe for warm-keeping).
Usage Features
Before First Use
Fill the reservoir to the max mark with water and run the coffee maker without coffee. Discard the hot water and clean the device.
Positioning
Place the coffee maker on a stable, level, heat-resistant surface. Route the cable to prevent it from overhanging or being tripped over. Do not plug it in until ready to use.
Water Fill
- Use the carafe to fill the reservoir, avoiding overfilling.
- Remove the carafe from the hotplate.
- Press the lever at the rear of the carafe handle to open the carafe lid.
- Use the grip to open the coffee maker lid, exposing the reservoir, filter holder, and filter.
- Fill the reservoir with at least 2 cups of water, but not above the max mark.
- Close the carafe lid and place the carafe on the hotplate.
Coffee Fill
- Place filter-ground coffee into the filter. The suggested starting amount is one scoop per cup of water, adjustable to individual taste and coffee type.
- Use the grip to close the coffee maker lid.
Power Up
- Plug the coffee maker into a power socket (and switch it on if applicable).
- The display will show "12:00".
- Ignore the display.
- Press the coffee button; the light will illuminate.
- Coffee will begin to drip into the carafe after a few seconds.
Setting the Timer for Later Brewing
- Set the current time: Press and release the 'h' (hour) and 'min' (minute) buttons to set the correct time. Verify AM or PM is correctly displayed.
- Set the brewing time:
- Press and release the timer button to enter timer mode. "Auto" will flash on the display.
- Press and release the 'h' and 'min' buttons to set the desired brewing start time. Verify AM or PM is correctly displayed.
- If no button is pressed within 5 seconds, the display reverts to the current time, and you must restart from step 2c.
- Press and release the coffee button. The display will revert to the current time, and "Auto" will show to confirm the timer is set.
- At the set time, "Auto" will disappear, the light will come on, and brewing will start.
- The timer setting is retained until the device is unplugged or reset.
Stopping Brewing
- To cancel the timer before brewing: Press the coffee button twice (first press starts brewing, second stops it and resets the display) OR press the timer button once, then immediately press the coffee button. Ensure "Auto" is no longer displayed.
- To stop brewing in progress: Press the coffee button. The light will turn off, and the display will darken after about 10 seconds.
Checking Brewing Time
Press and release the timer button. "Auto" will flash, and the set brewing time will display for about 5 seconds before reverting to the current time.
Keep Warm Function
After brewing, the hotplate remains on for 2 hours to keep coffee warm. It then switches off, the light goes out, and the display darkens.
Animated Display
- During brewing, the display shows a tumbler pouring into a carafe.
- While keeping coffee warm, the display shows a full carafe.
Pouring
Remove the carafe from the hotplate and pour from the spout. Replace the carafe on the hotplate to keep coffee warm. Some resistance may be felt when replacing the carafe due to the non-drip valve.
Quick Cup
The carafe can be removed at any time to pour coffee. The non-drip valve will prevent dripping onto the hotplate. Replace the carafe within 30 seconds to avoid overflowing.
Finished
- When the carafe is empty, press the coffee button to switch off the hotplate.
- Unplug the coffee maker and allow it to cool fully (or for 10 minutes before refilling) before cleaning.
Ground Coffee
For best results, use medium-ground or filter-ground coffee. Start with two rounded teaspoons per cup and adjust to taste.
Storing Coffee
Store coffee in an airtight container in a cool, dry place or the fridge to preserve flavor.
Milk
Use warm or hot milk to avoid overcooling coffee.
Bottled Water
If using bottled water, ensure it is still water without added ingredients or flavorings. Carbon dioxide in sparkling water can adversely affect coffee flavor.
Taste
Do not reheat coffee in the coffee maker, as this can damage the device and make the coffee undrinkable. Brewed coffee left for more than an hour will degrade in flavor; it's best to discard it and make a fresh pot.
Maintenance Features
Care and Maintenance
- Unplug the coffee maker and let it cool completely.
- Use the grip to open the lid.
- Use the filter handle to lift out the filter and tip used coffee grounds into the bin.
- Use the tabs on the filter holder to lift it out of the coffee maker.
- Wipe the outer surfaces of the coffee maker with a damp cloth.
- Wash the filter, filter holder, and carafe in warm soapy water, rinse thoroughly, and dry.
- Replace the filter holder in the coffee maker, ensuring the non-drip valve faces the front.
- Replace the filter in the filter holder.
- Use the grip to close the coffee maker lid.
- Replace the carafe on the hotplate.
- Do not wash any part in a dishwasher.
- Do not immerse the coffee maker in any liquid.
- Do not use harsh or abrasive cleaners or solvents.
Descaling
Regular descaling is essential, even in soft water areas, to prevent scale buildup (limescale or phosphate scale) which causes overheating and reduces the coffee maker's lifespan.
- Use a proprietary descaler suitable for plastic-bodied products, following its instructions.
- After descaling, empty the carafe.
- Operate the coffee maker twice more with fresh water (without coffee) to ensure no chemical residues remain.
- Products returned under guarantee with faults due to scale will incur a repair charge.
Safety Precautions
- Use and store out of reach of children.
- Do not immerse in liquid or use in bathrooms/outdoors.
- Place on a stable, level, heat-resistant surface.
- Keep away from hot surfaces and steam.
- Ensure lid is properly closed before use.
- Do not over-tilt the carafe when pouring.
- Do not connect to external timers or remote control systems.
- Unplug when not in use, before moving, or cleaning.
- Fill reservoir from a jug or carafe, not directly from the tap.
- Do not fill above the max mark.
- Place carafe on hotplate before brewing.
- Allow to cool for 10 minutes before adding water or reusing to avoid spitting.
- Do not use for purposes other than described.
- Do not put the carafe in a microwave oven.
- Do not attempt to reposition the carafe handle.
- Keep away from hotplates, hobs, and burners.
- Do not use unapproved accessories.
- Do not use if damaged or malfunctioning.
- Return damaged cables/plugs to avoid hazard.
This product is for household use only.