9
• Always check that food is correctly cooked through (e.g. for pork, poultry, etc. till the juices run clear). Cook sh till the
esh is opaque throughout.
• Adding chilled ingredients straight from the refrigerator can rapidly decrease the temperature of the water and therefore
add signicantly to the overall cooking time. In a similar way, adding a lot of ingredients to the cooking pot can also
lower the water temperature.
SOUS VIDE COOKING GUIDE TABLE
Food Temperature
Time (hours)
Notes
min. max.
Beef steaks (llet, ribeye,
sirloin, rump, etc.)
Medium rare: 56ºC 1 1 ½
Timings based on a 200 - 250 g
portion.
Medium: 60ºC 1 ½ 2
Well done: 68ºC 2 2 ½
Lamb, veal, duck, venison,
etc. (cutlets, loin, steaks, etc.)
Pink: 56ºC 1 ½ 3 ½
Timings based on a 200 - 250 g
portion.
Well done: 68ºC 2 4
Pork (chops, llet, loin, etc.)
Juicy/tender: 63ºC 1 ½ 3
Timings based on a 200 - 250 g
portion.
Well done: 70ºC 3 5
Chicken breast
Juicy/tender: 60ºC 1 ½ 3
Timings based on a 200 - 250 g
portion.
Well done: 70ºC 2 4
Chicken leg, wing, thigh
Juicy/tender: 63ºC 3 ½ 5 ½
Well done: 72ºC 4 ½ 6 ½
Fish, (salmon, cod, etc.)
Soft, aky 55ºC 1 2
Timings based on a 150 - 200 g
portion.
Firm, well cooked 65ºC 1 ½ 2 ½
Root vegetables (carrots,
swede, celeriac, etc.)
80ºC 4 6
Cut into even sized pieces, 15-20
mm in size.
It is important that you cook ingredients at the specied temperature for at least the minimum specied time. Any heat up
time that the water may require after adding the ingredients is not included. To guide you, the timer will only start when the
water temperature has reached the temperature you have set. Always wait until the timer shows that you have cooked the
ingredients for at least the minimum length of time shown above.
q
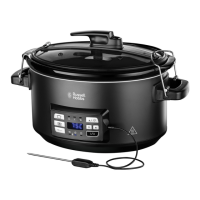
TEMPERATURE PROBE FUNCTION
The temperature probe function is ideal for cooking roasts and other larger cuts of meat. The temperature probe monitors
the internal temperature of the meat and ensures that it does not overcook and dry out.
USING THE TEMPERATURE PROBE FUNCTION
1. Add the joint to the cooking pot. Cover with the glass lid and lock it into place.
2. Plug in the appliance. The main control display will ash “----”. This indicates that the heat is o and the appliance is ready
to be programmed.
3. Connect the temperature probe to the socket on the side of the control panel (g. F).
4. Insert the temperature probe into the joint. There are three holes in the lid where you can do this (g. H). Choose the one
which allows you to insert the probe into the joint at the thickest part (g. I). Don’t let the probe touch any bones in the
joint. If needed, you can use the rack to elevate the joint nearer to the temperature probe. Note that it is only the tip of
the probe that senses the temperature.
5. Press the Temperature Probe (
q
) button. The target temperature (g) light will come on, indicating that you are
setting the temperature that you want the food to be cooked to.
6. The default cooking temperature is set at 82°C. Use the u and d buttons to adjust the temperature (from 38ºC to 91ºC).
7. Press the I/O button to begin cooking. The actual temperature light (k) will come on, and the display will show the
temperature that the probe is sensing from where it is located inside the food.
8. When the internal temperature of the meat has reached the target temperature, the unit will beep twice and
automatically switch to a cycle that holds the food at the target temperature. To help you keep track of the length of time
the food has been held at that temperature, the display will start counting up from zero (00:00).
• Check the temperature probe occasionally during cooking to make sure it hasn’t changed position due to the meat
shrinking.
 Loading...