Do you have a question about the Russell Hobbs RHSB250 and is the answer not in the manual?
Key specifications and capabilities of the Pro Elite Kitchen Machine, including motor power and included accessories.
Crucial safety precautions to prevent injury and appliance damage during operation and use.
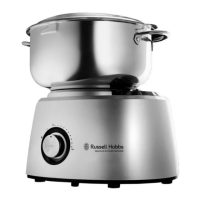
Visual identification of all components and attachments for the kitchen machine.
Steps for unpacking, cleaning, and placing the machine correctly before first use.
Explains power-up, speed control, pulse function, and splashguard use.
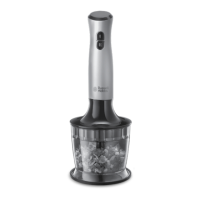
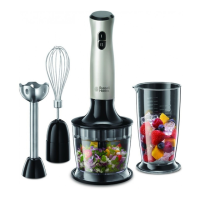
Guidance on using the mixing bowl, mincer, dry mill, and blender jug accessories.
Tips and guidelines for specific tasks like bread making, egg whites, and cream whipping.
Procedures for cleaning the machine and its components to ensure longevity and hygiene.
Proper procedures for storing the kitchen machine when not in use.
Troubleshooting steps, maintenance advice, and how to obtain service for the appliance.
Guidance on environmentally friendly disposal of the product and its components.
Guidance on how to safely replace or adapt the appliance's power plug.
Details regarding the product's warranty coverage, duration, and claim process.
The Russell Hobbs Pro Elite Kitchen Machine, model RHSB250, is a versatile and powerful appliance designed for a wide range of kitchen tasks. It serves as a comprehensive solution for mixing, kneading, blending, mincing, grinding, and sausage stuffing, making it a valuable addition to any household kitchen. Its robust design and multiple functionalities aim to simplify complex cooking processes and enhance efficiency.
At its core, the Pro Elite Kitchen Machine is powered by a powerful 1200W motor, engineered for low-noise operation, ensuring a quieter kitchen environment. This motor drives a full metal gear system, which is crucial for achieving consistent and perfect mixing results across various ingredients and tasks. The appliance features dual attachment drives: a high-speed drive specifically for the glass blending jug and dry mill, and a high-torque drive for the balloon whisk set, dough hook set, and mincer. This dual-drive system optimizes performance for each attachment, ensuring efficient operation whether you're whipping cream or grinding meat.
The machine incorporates intelligent circuitry that maintains a consistent operating speed regardless of the load, preventing slowdowns when processing heavier mixtures. Speed control is electronic and step-less, offering variable speeds from a minimum of 50rpm to a maximum of 250rpm, along with a pulse function ("P"). The pulse function provides short bursts of high speed, ideal for greater control over mixing or blending processes.
The primary mixing function utilizes an oversized 5.8L stainless steel bowl, equipped with convenient handles and a transparent splashguard. This large capacity is suitable for preparing substantial quantities of dough, batters, and other mixtures. The unique double whisk and dough hook system is a key feature, designed to increase efficiency by ensuring thorough incorporation of ingredients.
For blending, the machine includes a 1.5L glass blending jug, perfect for soups, sauces, smoothies, and cocktails. It also comes with a dry mill attachment, complete with a filter lid, specifically designed for processing herbs, nuts, and coffee beans. The mincer attachment is another significant component, offering three different mincing grades to suit various preferences. Additionally, the mincer includes a Kebbe maker and a sausage stuffing accessory, expanding its utility beyond basic meat grinding.
Safety is paramount in the design of the Pro Elite Kitchen Machine. It features a professional-grade system with safety protection locks, ensuring that attachments are securely in place before operation. Non-slip rubber feet provide stability on countertops, minimizing movement and vibration during use.
Before first use, it is essential to unpack the appliance, remove all protective packaging, and thoroughly clean all parts. The kitchen machine should be placed on a firm, stable, and level surface, with the power cord positioned away from edges to prevent accidental tripping.
When using the mixing bowl, the splashguard is recommended to prevent spatter. It locks onto the bowl with small latches. The motor drive cover is used to cover the drive not in use, ensuring safety and preventing splashes into the motor. When using the high-torque drive, the cover should be locked onto the high-speed drive by turning it clockwise. Conversely, when using the high-speed drive, the cover is removed by turning it anti-clockwise and placed on the high-torque drive.
For the mixing bowl with dough hook and balloon whisk sets, the motor drive cover must be locked into the high-speed drive. The drive shaft, mixing bowl, and chosen accessory (dough hook or balloon whisk set) are placed on the power unit/base. Ingredients are added, and the splashguard is fitted. Speed control starts at a lower setting and is adjusted as needed. The dough hook set is ideal for heavier substances like cookie dough, yeast dough, and pastry dough, as well as incorporating nuts, chocolate chips, and hardened butter. The balloon whisk set is for lighter substances such as cream, egg whites, sauces, and thin batters. It's crucial to use only the supplied mixing bowl and ensure it's properly placed to avoid damage. Accessories should only be fitted or removed when the machine is switched off and unplugged. To ensure longevity, continuous operation should not exceed 15 minutes, followed by a 30-minute cooling period.
When using the mincer accessory, meat should be trimmed of excess fat and sinew, then chilled in the freezer to prevent gumming. Blades, augur, and the inside shoot should be washed and dried. Meat is cut into 3cm cubes and fed into the mincer, with the stainless steel bowl placed beneath the exit shoot. The safety pusher is used to press meat into the mincer body. Similar to mixing, continuous mincing should not exceed 15 minutes, with a 30-minute cooling period afterward.
For the dry mill, ingredients should fill no more than half the jar. The sealing ring is fitted into the blade base, which is then inverted and screwed onto the jar. The mill is placed onto the power unit/base and locked. Maximum speed or pulse control is used for processing. After processing, the blade unit can be replaced with a filter lid for storage. Continuous dry milling should not exceed 3 minutes, followed by a 10-minute cooling period.
The glass jug blender requires the sealing ring to be correctly fitted into the blade base before the jug is screwed on. Ingredients, up to 600g food and 0.9L water, are added. The filler cap is placed and turned in the lid, and the lid is turned clockwise to lock onto the jug. The blender is then placed onto the power unit/base and locked. Speed or pulse control is selected. The jug, lid, or filler cap should not be moved while the machine is operating. Hot liquids should be allowed to cool below 40°C before blending to prevent the jug from cracking. Continuous blending should not exceed 3 minutes, followed by a 10-minute cooling period. If adding solid ingredients during blending, the machine should be turned off, blades stopped, and the lid removed before adding. Liquid ingredients can be added through the filler cap hole.
Proper cleaning and maintenance are vital for the longevity and optimal performance of the Russell Hobbs Pro Elite Kitchen Machine. After each use, the machine should be switched off, unplugged, and allowed to cool down. Cleaning immediately after use prevents residues from setting.
The stainless steel mixing bowl and its components are dishwasher safe. It is recommended to remove the drive pin from the bowl for thorough cleaning. After cleaning, a small amount of vegetable oil on the drive pin helps with lubrication.
Most accessories, except for the whisk holder of the balloon whisk set and the blender's blade/base assembly, are dishwasher safe. The whisk holder should be hand-washed in warm soapy water, rinsed, and dried. The blender's blade/base assembly should be washed under running water and dried; it should never be left to stand in water or soap solution to prevent bearing lubricant from washing out. While dishwasher use is generally safe, it may affect the cosmetic finish of accessories over time, causing them to dull. This is normal and does not indicate damage.
The external surfaces of the power unit/base should be wiped with a clean, damp cloth and immediately buffed with a soft, dry cloth. The power unit/base should never be immersed in water or any other liquid. Some foods may discolour plastic parts, which is normal and harmless. Discolouration can be removed by rubbing with a cloth dipped in vegetable oil. Harsh or abrasive cleaning agents and solvents should not be used.
For the blender, the jug and lid should be washed in warm soapy water, rinsed, and air-dried. The blade unit should be removed and cleaned with a nylon brush in warm soapy water.
For storage, ensure all parts are completely clean and dry. The appliance should be stored in its original box or a clean, dry place. The power cord should never be wrapped around the appliance.
In case of technical problems, the machine should be switched off, and no attempt should be made to repair it. It should be returned to an authorised service facility for examination, adjustment, or repair. Only original spare parts should be used for replacements. If the supply cord is damaged, it must be replaced by the manufacturer or an authorised service agent to avoid electrical hazards.
| Power | 550 W |
|---|---|
| Speed Settings | 2 |
| Product Type | Hand Blender |
| Material | Stainless Steel |
| Color | Stainless Steel |
| Warranty | 2 year |