Do you have a question about the Ryobi A25RT02 and is the answer not in the manual?
Details the policy for exchanging RYOBI power tools within the first 30 days of purchase.
Specifies what defects in workmanship or materials are covered by the warranty.
Provides instructions on how to obtain warranty service or repair for the product.
Emphasizes reading and understanding the operator's manual before use.
Advises preventing body contact with grounded surfaces to avoid electric shock.
Highlights the importance of a clean work area to prevent accidents.
Mandates the use of the articulating router cutter bit guard for safety.
Warns against reaching into the cutting path with hands or fingers.
Directs feeding the workpiece against the cutter's rotation for safety.
Symbol indicating not to expose to rain or use in damp locations.
Symbol instructing to read the manual to reduce the risk of injury.
Symbol advising to wear safety goggles or glasses for eye protection.
Explains 'DANGER' signal word for imminent hazards leading to death or serious injury.
Explains 'WARNING' signal word for potential hazards leading to death or serious injury.
Explains 'CAUTION' signal word for potential hazards leading to minor/moderate injury.
Provides guidelines for selecting and using appropriate extension cords.
Explains grounding requirements and procedures for preventing electric shock.
Details the required power supply voltage, frequency, and AC/DC compatibility.
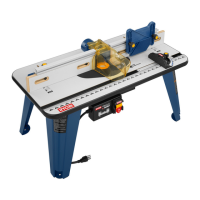
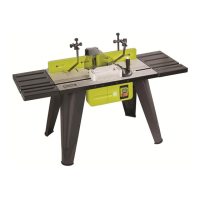
Lists key specifications such as table dimensions, cutter diameter, and weight.
Details the articulating guard for operator protection from the cutter.
Explains the featherboard's role in safe workpiece movement and its adjustability.
Describes the switch assembly with a built-in locking feature for safety.
Instructions on how to turn the router table on and off.
Safety warning to remove the switch key when the tool is not in use.
Instructions for unpacking the product, checking parts, and handling damage.
Warning against operating the product if parts are damaged or missing.
Safety warning to not connect to power until assembly is finished.
Overview of the steps involved in assembling the router table components.
Step-by-step instructions for attaching the switch box to the router table.
Instructions for attaching the table legs to the router table top.
Explains pre-drilled holes for depth adjustment and lists compatible router models.
Detailed steps for attaching the router to the insert plate using screws.
Instructions for installing the assembled router and insert plate into the router table.
Instructions for ensuring the insert plate is level using adjusting screws.
Steps for attaching the fence assembly using carriage bolts and knobs.
Instructions for inserting and removing throat plates based on cutter size.
Instructions for attaching the featherboard using bolts and lock knobs.
Instructions for inserting the starting pin for pivot point use.
Instructions for installing the miter gauge into the table slot.
Information on attaching a vacuum hose to the vacuum port.
Instructions for clamping the router table to a workbench for stability.
Instructions for bolting the router table to a workbench for secure placement.
Warning against complacency and emphasizing constant care during operation.
Lists the intended applications for the router table.
Provides rules and steps for performing a routing operation safely.
Instructions for safely inserting and removing router cutters.
Recommendation for making cuts in multiple passes for depth control.
Instructions for positioning the fence to support and guide the workpiece.
Warning to use only identical replacement parts during servicing.
General advice on cleaning the product, avoiding solvents on plastic parts.
Warning against contact of chemicals with plastic parts, causing damage.
Placeholders for identifying the product's model and serial number.
Information on purchasing replacement parts online or by phone.
Guidance on finding authorized service centers online or by phone.
Contact information for customer or technical support.
| Power Source | Battery |
|---|---|
| Battery Voltage | 18 V |
| Number of Pieces | 1 |
| Battery Type | Lithium-Ion |
| Weight | 1.2 kg |