EasyManua.ls Logo

Ryobi ART3 User Manual

Ryobi ART3
11 pages
To Next Page IconTo Next Page
Page #1 background imageLoading...
Page #1 background image
ART3
ROUTER TABLE
OWNER’S OPERATING MANUAL
Double
Insulated
THANK YOU FOR BUYING A RYOBI ROUTER TABLE
Your new router table has been engineered and manufactured to Ryobi’s high standard for
dependability, ease of operation and operator safety. Properly cared for, it will give you years of rugged,
trouble free performance.
Pay close attention to the Rules for Safe Operation, Warnings and Cautions.
If you use your router table properly and only for what it is intended, you will enjoy years of safe,
reliable service.
Thank You again for buying Ryobi tools.
SAVE THIS MANUAL FOR FUTURE REFERENCE
CAUTION: Carefully read through this entire owners manual before using
your router table.
ART3-manual(RTA).qxd 9/10/04 4:23 PM Page A1
Question and Answer IconNeed help?

Do you have a question about the Ryobi ART3 and is the answer not in the manual?

Ryobi ART3 Specifications

General IconGeneral
BrandRyobi
ModelART3
CategoryTools
LanguageEnglish

Summary

Router Compatibility Warning

Introduction to the Router Table

Manual Reading Caution

Eye Protection Recommendation

Rules for Safe Operation

Know Your Power Tool

Understand the operator's manual, router manual, and tool labels for safe operation.

Connection Warning Before Assembly

Do not connect power until assembly and adjustments are complete and instructions are read.

General Electric Tool Safety Precautions

Follow basic safety rules like using guards, removing keys, keeping area clean, etc.

Specific Safety Rules for Router Table

Feed Work Against Cutter Rotation

Always feed work into the cutter against its direction of rotation to prevent kickback.

Use Overhead Guard

Always use the overhead guard for protection during operation.

Avoid Awkward Hand Positions

Maintain stable footing and avoid awkward hand positions for safer operation.

Keep Fingers Clear of Cutter

Keep hands away from the revolving cutter; use fixtures when necessary.

Use On-board Switched Outlet

Ensure the router is plugged into the table's switched outlet when mounted.

Features

Fence Assembly

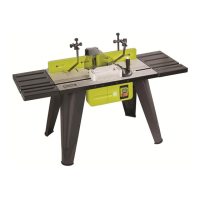
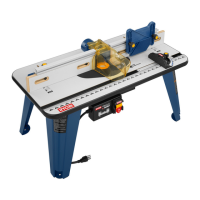
Provides an adjustable surface to support and guide work, compensating for stock reduction.

Undertable Guard

Ensures hands, clothing, and objects do not contact cutter or collet during operation.

Safety Guard

Provides a barrier to protect the operator from accidental contact with the cutter.

Live Tool Indicator

Illuminates when the tool is connected to the supply, warning of connected power.

Specification

Assembly

Leg Assembly

Attaching the legs to the router table by aligning holes and using threaded inserts.

Switch Box Assembly

Securing the switch box underneath the router table with screws.

Under Table Guard Assembly

Attaching the under table guard to the table using bolts.

Fence Assembly

Positioning the fence on the table and securing it with nuts and lock knobs.

Pressure Clamp Assembly

Mitre Gauge / Feather Board Assembly

Mitre Gauge

Assembling the protractor and gauge, then sliding into the mitre gauge track.

Feather Board

Securing the feather board to the table using knobs for workpiece support.

Attach Router to Table

Mounting to a Stable Work Surface

Operation

Install/Change Cutter

Unplug router and table before installing or changing cutters.

Operation

Set Cutting Depth

Set the cutter depth as per instructions provided with your router.

Select and Insert Throat Plate

Choose and insert the correct throat plate for the cutter size.

Position the Fence or Mitre Gauge

Position the fence or mitre gauge to guide work piece for cutting operations.

Adjust the Step Risers

Adjust step risers to support work piece exiting the cutter.

Using the Pressure Clamp and Feather Board

Use clamp for vertical support and feather boards for lateral support.

Operation

Preparing for Operation

Unplug router, plug into table outlet, and ensure correct power connection.

Fitment of the Table Extension

Attach extension bars and slide extension table onto them.

Fitment of the Table Dust Extraction System

Attach dust extraction module and connect hose using appropriate sleeve.

Router Switch Lock on Clamp

Prepare for operation by locking the router switch with the provided clamp.

Maintenance

General Maintenance

Clean with cloths, avoid solvents, and check fasteners for tightness.

Environmental Protection

Guarantee

Related product manuals