OPERATION
WARNING
Failure to unplug your router table could result in
accidental starting causing serious injury.
WARNING
To prevent damage to the spindle or spindle lock,
always allow motor to come to a complete stop
before engaging spindle lock.
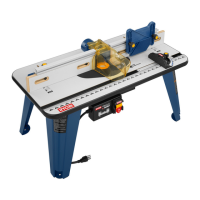
■ Remove hex cap screws securing the rear under
table guard to the table. Take guard out of the way,
exposing the spindle.
■ Follow the instructions on Installing/Removing Cutters
found in your Operator’s Manual.
WARNING
Do not attempt to use any other router with this
table. Failure to heed this warning could result in
improper operation of the tool and serious
personal injury.
■ Return the under table guard to its proper position
and secure by inserting and tightening hex screws
previously removed.
WARNING
If you are changing a cutter immediately after
use, be careful not to touch the cutter or collet
with your hands or fingers. They will get burned
because of the heat build up from cutting. Always
use the wrench provided.
WARNING
Always wear safety goggles or safety glasses
with side shields during power tool operation or
when blowing dust. If operation is dusty, also
wear a dust mask.
SET CUTTING DEPTH
■ Set the cutter depth as per instructions provided with
your router.
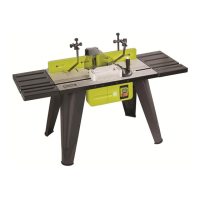
SELECT AND INSERT THROAT PLATE (Fig. 10)
■ Router table is shipped with an assortment of five
circular throat plates. The throat plate provides a
stable surface around the cutter and prevents objects
from falling through the throat and damaging the
spindle.
■ The selection of the proper size throat plate depends
on the size and shape of the cutter you are using.
When inserted, the throat plate opening should be
within approximately 6.35 mm of the outer most edge
of the cutter.
■ To insert the throat plate, position the throat plate
over the throat opening in the router table and snap
throat plate down. To remove throat plate, pull gently
until the throat plate snaps out.
POSITION THE FENCE OR
MITRE GAUGE (Fig. 11)
For any router operation, you will use either the fence or
the mitre gauge to help guide your work through the
cutter.
■ To position the fence: Loosen the fence lock knobs by
turning them counterclockwise. Loosen the fence lock
knobs just enough so that the fence moves freely.
Position the fence the proper distance from the cutter
based on the amount of material you plan to remove.
Tighten the fence lock knobs.
■ To position the mitre gauge: Simply loosen the mitre
gauge lock knob, rotate the mitre to the desired angle
and retighten the lock knob.
ADJUST THE STEP RISERS (Fig. 12)
■ The step risers (13), located on the out feed side of
the fence, enable you to support your work piece as it
exits the cutter. The step risers will provide support
for routing operations that remove up to 3 mm of
material. The step risers are adjustable in 0.8 mm
increments.
■ To adjust the step risers loosen the two knob bolts on
the rear of the fence and push the riser forward and
toward the throat. (Fig.12).
■ Retighten knob bolts and repeat as neccessary for
the opposite side.
USING THE PRESSURE CLAMP AND
FEATHER BOARD
■ The pressure clamp provide vertical support or work
pieces by holding the pieces securely to help
minimize chatter.
■ The feather boards apply pressure to work piece
sideways towards router table fence providing control
of work piece.
5
ART3-manual(RTA).qxd 9/10/04 4:23 PM Page 5