EasyManua.ls Logo

Ryobi P2505 - User Manual

Ryobi P2505
34 pages
Print Icon
To Next Page IconTo Next Page
Loading...
OPERATOR’S MANUAL
MANUEL D’UTILISATION
MANUAL DEL OPERADOR
18 VOLT PRUNING SHEAR
SÉCATEUR 18 V
TIJERAS DE PODAR DE 18 V
P2505
WARNING: To reduce the
risk of injury, the user must read and
understand the operator’s manual
before using this product.
TABLE OF CONTENTS
General Power Tool Safety
Warnings ......................................... 2-3
Pruning Shear Safety Warnings ..........4
Symbols .......................................... 5-6
Features ..............................................6
Assembly ............................................7
Operation ............................................8
Maintenance ................................. 9-10
Parts Ordering/Service ........ Back Page
AVERTISSEMENT : Pour
réduire les risques de blessures,
l’utilisateur doit lire et veiller à bien
comprendre le manuel d’utilisation avant
d’employer ce produit.
TABLE DES MATIÈRES
Instructions de sécurité générales
pour outils électriques ..................... 2-3
Avertissements de sécurité pour les
sécateurs ............................................4
Symboles ........................................ 5-6
Caractéristiques ..................................6
Assemblage ........................................7
Utilisation ........................................ 8-9
Entretien ........................................ 9-10
Commande de pièces/
réparation .......................... Páge arrière
ADVERTENCIA: Para reducir
el riesgo de lesiones, el usuario debe leer
y comprender el manual del operador
antes de usar este producto.
ÍNDICE DE CONTENIDO
Advertencias de seguridad
para herramientas eléctricas ........... 2-3
Advertencias de seguridad de las
tijeras de podar ...................................4
Símbolos ......................................... 5-6
Características ....................................6
Armado ...............................................7
Funcionamiento .............................. 8-9
Mantenimiento .............................. 9-10
Pedidos de piezas/
servicio ........................... Pág. posterior
SAVE THIS MANUAL FOR
FUTURE REFERENCE
CONSERVER CE MANUEL
POUR FUTURE RÉFÉRENCE
GUARDE ESTE MANUAL
PARA FUTURAS CONSULTAS
Question and Answer IconNeed help?

Do you have a question about the Ryobi P2505 and is the answer not in the manual?

Overview

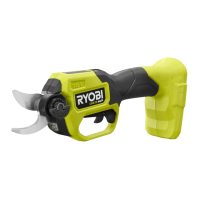
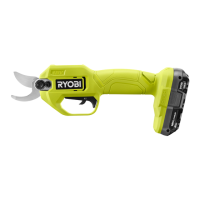
The Ryobi P2505 is an 18-volt pruning shear designed for personal, family, or household use, with a limited warranty of three years. For business or commercial use, it carries a 90-day warranty. This tool is intended for cutting and pruning small branches and is capable of cutting material with a diameter of up to 1 inch (25.4 mm).

Function Description:

The pruning shear is a battery-operated power tool that provides a clean and efficient way to trim branches. It features a cutting blade and a fixed blade that work together to make precise cuts. The tool is activated by a switch trigger, which, when pressed, engages the motor and moves the blades. To prevent accidental starting, a lock-out trigger must also be engaged. An integrated LED light illuminates the work area when the switch trigger is pressed, remaining on for approximately 30 seconds after the trigger is released or the battery is removed. The tool is designed for quick, tool-free blade removal, making sharpening or replacement straightforward. A blade sheath is included to protect the sharp blades when the tool is not in use, preventing accidental contact and damage to the blades during transport or storage.

Important Technical Specifications:

  • Motor: 18 Volt DC
  • Cutting Capacity: 1 inch (25.4 mm)
  • Power Source: 18V battery pack (Li-ion)
  • Blade Type: Cutting blade and fixed blade, 5 cm (2 in) cutting blade.

Usage Features:

  • Battery Pack Installation/Removal: To install, align the battery pack with the battery port and push until the latches click into place, ensuring it is securely seated. To remove, press the latches on both sides of the battery pack and pull it out. Always remove the battery pack before making any adjustments, cleaning, or servicing the tool to prevent accidental starting.
  • Operating Position: Maintain a firm grip on the handle while cutting. The proper operating position involves holding the tool comfortably and securely.
  • Starting the Tool: To activate the pruning shear, first engage the lock-out trigger, then press the switch trigger. The blades will make one cut per trigger press. If the trigger is released before the cut is complete, the blade will return to the open position.
  • Cutting Technique: Position the open blades around the branch to be cut. For a cleaner cut, it is recommended to cut at an angle. Press and hold the switch trigger until the blade closes completely. Release the trigger, and the blades will automatically return to the fully open position.
  • Safety Precautions:
    • Always wear eye protection with side shields (ANSI Z87.1 compliant) and head protection, especially when cutting overhead.
    • Keep hands and all body parts away from the blades. Do not attempt to remove cut material or hold material to be cut while the blades are moving.
    • Clear the cutting area of all objects, such as cords, lights, wires, or loose strings, to prevent entanglement.
    • Never cut material larger than 1 inch in diameter.
    • Stop the motor when there are delays in cutting or when moving between cutting locations.
    • Do not use the tool in bad weather conditions, particularly when there is a risk of lightning.
    • Hold the tool by insulated gripping surfaces only, as the blade may contact hidden wiring, leading to electric shock.
    • Ensure the power switch is off and the battery pack is removed when clearing jammed material or servicing the tool.
    • Carry the tool by the handle with the blade stopped and avoid operating the power switch inadvertently.
    • Always fit the blade cover when transporting or storing the tool.
    • Do not grasp exposed cutting blades or edges.
    • Store the unit in a dry, locked place, out of reach of children and untrained individuals.
    • Keep the unit clean of clippings and other materials to prevent them from lodging in the blades.
    • Never douse or squirt the unit with water or any other liquid. Keep handles dry, clean, and free from debris.

Maintenance Features:

  • Cleaning the Pruning Shear:
    • Remove the battery pack.
    • Clean the body and handles with a soft, dry cloth after each use. Avoid using water and soap.
    • Keep the unit free of clippings and other materials that might lodge in the blades.
  • Lubricating the Blade:
    • Remove the battery pack.
    • For easier operation and longer blade life, lubricate the blade before and after each use. For extended use, lubricate the blade during operation.
    • Place the nozzle of the lubricant container against the steel ball on the product and add lubricant oil into the bolt hole.
  • Replacing or Sharpening the Blade:
    • Always remove the battery pack before performing blade maintenance.
    • Wear heavy gloves and/or wrap the cutting edges with rags or other material to protect hands from injury.
    • Place the product on a level surface, standing on its base.
    • Raise the tab on the blade change knob.
    • Turn the blade change knob counterclockwise to loosen and remove it. Note that the knob is spring-loaded, so hold it firmly.
    • Once the knob is removed, press on the spring to release and remove the blade bolt.
    • Hold the cutting blade with one hand and remove the alignment pin with the other.
    • Remove the cutting blade.
    • To sharpen: Rub a 300-400 grit sharpening stone across the edges of both the cutting blade and the fixed blade.
    • To replace: Discard the old blade and place the new or sharpened blade back into the unit in the open position.
    • Hold the blade in place and insert the alignment pin, ensuring it is fully inserted with no gap.
    • Insert the blade bolt through the alignment pin and blade, rotating it slightly to align the flat sides with the oblong hole.
    • While holding the blade bolt, press the blade change knob against the spring and push in as you turn it clockwise. Avoid cross-threading.
    • Finger tighten the blade bolt until resistance is felt, but do not overtighten.
    • Lower the tab on the blade change knob, ensuring the three locking pins align and the tab lays flat in the locked position. Adjust slightly if necessary.
  • General Maintenance:
    • Periodically inspect the product for damaged, missing, or loose parts (screws, nuts, bolts, caps). Tighten all fasteners and caps securely. Do not operate the product until all damaged or missing parts are replaced.
    • Avoid using solvents when cleaning plastic parts, as they can damage or weaken the plastic. Use clean cloths to remove dirt, dust, oil, and grease.
    • Do not allow brake fluids, gasoline, petroleum-based products, or penetrating oils to contact plastic parts, as these chemicals can cause damage and serious personal injury.
  • Storing the Pruning Shear:
    • Remove the battery pack before storing.
    • Clean all foreign material from the shear.
    • Always place the sheath on the cutting blades.
    • Store in a place inaccessible to children.
    • Keep away from corrosive agents like garden chemicals and de-icing salts.

Ryobi P2505 Specifications

General IconGeneral
BrandRyobi
ModelP2505
CategoryPower Tool
LanguageEnglish

Related product manuals