Do you have a question about the Ryobi P550 and is the answer not in the manual?
Keep work area clean and well lit.
Handle battery operation and chargers safely.
Stay alert, dress properly, avoid accidental starting.
Use tools properly, maintain them, and store them safely.
Tool service must be performed by qualified personnel only.
Follow specific safety guidelines for operating the tool.
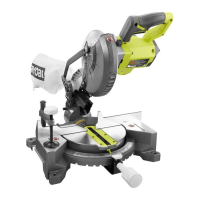
Details about the saw's specifications like arbor, diameter, speed, motor.
Familiarize yourself with operating features and safety rules.
Information about the included saw blade and its cutting capacity.
Instructions for using the carrying handle for transport.
Information about the clamp that secures the saw at desired miter angles.
Function of the button for locking the spindle during blade changes.
Details on how to use the switch lock to prevent accidental starting.
How to use the switch trigger and prevent unauthorized use.
Describes the preset angles for miter table adjustments.
How to lock the saw arm at desired bevel angles.
Describes the fence's role in holding the workpiece.
Explains the electric brake for quick blade stopping.
Information about the protective lower blade guard.
Instructions for carefully unpacking the tool.
Details on how to securely mount the saw to a workbench.
Instructions for installing the dust guide.
Instructions for installing and removing the dust bag.
How to install and use the work clamp for workpiece security.
Step-by-step guide for installing the saw blade.
Step-by-step guide for removing the saw blade.
Procedure to align the miter table with the fence.
Procedure to align the saw blade with the fence.
Procedure to align the saw blade to the miter table.
Explains the meaning of LED indicators on the charger.
Instructions for charging the battery pack.
Specific instructions for charging a battery pack at normal temperatures.
Instructions for charging a battery pack that is hot.
Steps to install the battery pack into the tool.
Steps to remove the battery pack from the tool.
General guidance and warnings for cutting operations.
Instructions for cutting small molding and trim, including auxiliary fence.
Procedure for making straight and miter crosscuts.
Procedure for making a straight bevel cut.
Procedure for making compound miter cuts.
Guidance on supporting long workpieces during cutting.
Chart and advice for setting compound miter angles.
Instructions for cutting crown molding accurately.
Method for cutting crown molding by laying it flat.
How to cut warped material to avoid kickback.
Advice on clamping wide workpieces.
Information on saw arm pivot adjustments.
Information on bevel pivot adjustments.
Explanation of the depth stop function and factory settings.
How to adjust the depth stop for cutting capacity.
General cleaning and care guidelines for the tool.
Information on battery care, life, and handling.
Instructions for removing and recycling battery packs.
Location of model and serial numbers for identification.
Information required when ordering repair parts.
| Type | Reciprocating Saw |
|---|---|
| Voltage | 18V |
| Power Source | Cordless |
| Stroke Length | 1-1/8 inches |
| No Load Speed | 0-3, 000 SPM |
| Strokes Per Minute (SPM) | 1, 100 - 3, 000 SPM |