8 – English
OPERATION
NOTICE:
Do not force the saw. Forcing the saw may overheat the
motor and break saw blades. Use clamps or another
practical way to secure and support the workpiece to a
stable platform.
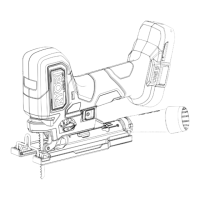
ORBITAL MOTION
See Figure 8, page 12.
The blade of the saw can be set to cut in an orbital motion.
This feature is adjustable and provides faster, more efficient
cutting. With orbital motion the blade cuts through the work
on the upstroke but does not drag across the work on the
downstroke. To adjust the orbital motion, rotate the orbital
adjustment knob to the desired setting. Refer to the chart
below to find the right setting for your application.
NOTE: Setting the orbital position to a lower setting will
result in a smoother finish but slower cut. A higher setting
will result in a rougher finish but faster cut.
STRAIGHT CUTTING
See Figure 9, page 12.
A straight cut can be made by clamping a piece of wood or
straightedge to the workpiece and guiding the edge of the
saw base against it. Make the cut from one direction only.
Don’t cut halfway and complete the cut from the opposite end.
SCROLL CUTTING
See Figure 10, page 12.
Scroll cuts can be made with the jig saw by guiding the
direction of the cut with applied pressure on the handle.
NOTE: Tighter tolerance scroll cutting may require the use
of a scroll cutting blade (not included).
WARNING:
Excessive side pressure to the blade could result in bro-
ken blades or damage to the material being cut.
ANGLE CUTTING (BEVEL CUTTING)
See Figures 11 - 12, page 13.
The base can be angled 45˚ left or right for bevel cutting,
with positive stops at 0˚ and 45˚ (left or right). A protractor is
recommended when accurate cuts are required.
Remove the battery pack.
If attached, remove the vacuum attachment.
Remove the hex key from the storage compartment.
Loosen the base pivot screw until the base can be moved.
NOTE: Do not completely remove screw.
Slide the base forward until the base can move freely
left and right.
Align the pointer on the housing with the desired angle
indicated on the scale on the saw base.
Orbital
Setting
Material
Type
Suggested
Blade Type
TPI
(Teeth per inch)
Speed
Setting
Orbital
Action
0
Counter Top, Laminate
Board
Wood Cutting Blade
10-12 (Down
Stroke Blade)
Position 3-4 No Orbit
Thin Sheet Metal Metal Cutting Blade 14-24 Positions 6 or A No Orbit
1
Plastics and PVC Wood Cutting Blade 10-12 Positions 4-6 or A Minimal Orbit
Scrolling or Curving Cuts
in Wood
Scrolling Wood Blade 10-12 Position 4-6 or A No Orbit (Setting 0)
2
Plywood, Decking and
Hardwood
Wood Cutting Blade 6-12 Position 4-6 or A Medium Orbit
3
General Lumber and
Soft Wood
Wood Cutting Blade 6-10 Positions 4-6 or A Maximum Orbit