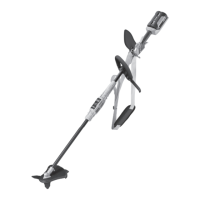
6
WARNING
When using the grass trimmer string head, the
JUDVV GHÀHFWRU PXVW EH DWWDFKHG WR WKH EODGH JXDUG
Installing the REEL EASY grass trimmer head
Ŷ Install the drive connector and string head housing
into the gear shaft. Place the Allen wrench through
the hole in the upper flange washer and the hole in the
gear head. Using the wrench, turn the drive connector
counterclockwise to tighten securely.
Ŷ Reinstall the spool. For the straight shaft attachment
with the REEL EASY string trimmer head, the spool
should be placed so “This side out for straight shaft” is
visible on the line spool.
Ŷ Replace the bump knob by inserting it into the centre
of the line spool.
Ŷ Replace the grass trimmer head cover, aligning latches
with openings in the grass trimmer head. Press cover
and grass trimmer head together until both latches
snap securely into the openings.
Ŷ ,QVWDOOWKHFXWWLQJOLQHPPOLQHGLDPHWHU5HIHUWR
“String replacement” later in the manual for additional
information.
Ŷ Install the grass deflector into the blade guard.
Installing the PRO CUT II
Ŷ Stop the engine.
Ŷ Remove the installed line head.
Ŷ Install the cupped washer. Install the drive shaft into the
gear shaft. Place the Allen wrench through the hole in
the upper flange washer and the hole in the gear head.
Using the combination wrench, turn the small drive
shaft counterclockwise and tighten securely.
Ŷ Install the PRO CUT II grass trimmer head on the drive
shaft until fully seated.
Ŷ Install the spool retainer and turn counter-clockwise.
Ŷ Install the cutting line. See “Installing the line to the
PRO CUT II head”.
Installing the line to the PRO CUT II head
8VH D PRQR¿ODPHQW OLQH ZLWK D GLDPHWHU RI PP
Use original manufacturer’s replacement line for best
performance. A 2.4 mm line is not compatible with the PRO
CUT II head. For the head to secure the line safely, a 2.7
mm line must be used.
Ŷ Stop the engine.
Ŷ Remove the old line by pulling it from the holes located
on the top of the line head.
Ŷ Gather two of the pre-cut lengths of trimmer line
provided or cut two pieces of trimmer line 28 cm each.
Ŷ Insert the line into the LOAD slots located on the sides
of the line head. This line should be pushed in until
approximately 2 cm protrudes from the holes on the top
of the line head.
Ŷ Once the line protrudes 2 cm from the holes on the top
of the line head, gently pull back slightly to ensure the
line is gripped properly.
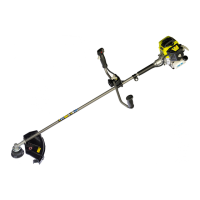
CONVERTING FROM GRASS TRIMMER TO BRUSH-
CUTTER (BLADE)
WARNING
When using the REEL EASY grass trimmer head and
PRO CUT II WKH JUDVV GHÀHFWRU PXVW EH DWWDFKHG
to the blade guard. When using the blade, the grass
GHÀHFWRU PXVW EH UHPRYHG IURP WKH EODGH JXDUG
Removing the REEL EASY grass trimmer head
Ŷ Stop the engine.
Ŷ Open the REEL EASY grass trimmer head by
depressing the latches on each side. The contents of
the bump head are spring loaded, so keep your other
hand over the string head cover while depressing the
latches.
Ŷ Remove the string head cover, bump knob, and line
spool.
Ŷ Place the Allen wrench through the hole in the upper
flange washer and the hole in the gear head. Using a
wrench, turn the drive connector clockwise to remove.
Ŷ Remove the drive connector and string head housing
from the gear head.
NOTE: Store the disassembled parts together for later use.
Ŷ Remove the grass deflector from the blade guard.
Installing the blade
WARNING
Be certain all knobs and fasteners are fully tightened
before operating the product. Periodically check
for tightness during use to avoid serious injury.
WARNING
Please note that the blade nut is a Nylon locking nut,
to be used for one time assembly only. After the Nylon
locking nut has been assembled once, it must not be
re-used. When installing/re-installing the blade onto the
gearbox assembly, use a new Nylon locking nut. Failure
to follow this procedure can result in serious injury.
To reduce the risk of injury, keep the blade protector on the
blade at all times. Remove the blade protector only during
cutting operations.
Ŷ Centre the blade on the upper flange washer and make
sure the blade sits flat. Install the cupped washer and
make sure it sits well into the gear shaft. Install the
blade washer with the raised centre away from the
blade.
Ŷ Install the blade nut.
Ŷ Place the Allen wrench through the hole in the upper
flange washer and the hole in the gear head. Using the
wrench, turn the blade nut at least 4 turns after finger
WLJKWFRXQWHUFORFNZLVHWRWLJKWHQ1P