15
REMOVING THE CHUCK
1. Turn the feed handles to lower the chuck to the lowest
position.
2. Place a ball joint separator (not shown) above the
chuck and tap it lightly with a hammer or rubber
mallet to cause the chuck to drop from the spindle.
NOTE: Never hit the chuck directly with the hammer
or rubber mallet.
NOTE: To avoid possible damage to the chuck, raise the
jaws all the way rst and be prepared to catch the chuck
as it falls.
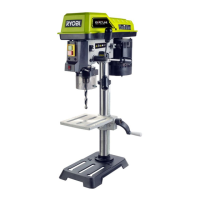
MOUNTING DRILL PRESS TO WORK SURFACE
See Figure 16.
If the drill press is to be used in a permanent location,
secure it to a workbench or other stable surface.
If the drill press is to be used as a portable tool, fasten
it permanently to a mounting board that can easily be
clamped to a workbench or other stable surface. The
mounting board should be of sufcient size to avoid tipping
while drill press is in use. Any good grade plywood or
chipboard with a 19 mm (3/4") thickness is recommended.
1. Mark holes on surface where drill press is to be
mounted using holes in drill press base as a template
for hole pattern.
2. Drill holes through mounting surface.
3. Place drill press on mounting surface, aligning holes
in the base with holes drilled in the mounting surface.
4. Insert bolts (not included) and tighten securely with
lock washers and hex nuts (not included).
If lag bolts are used, make sure they are long enough
to go through holes in drill press base and material the
drill press is being mounted to. If machine bolts are
used, make sure bolts are long enough to go through
holes in drill press, the material being mounted to, and
the lock washers and hex nuts.
NOTE: All bolts should be inserted from the top. Install
the lock washers and hex nuts from the underside of
the workbench.
Once the drill press is securely mounted on a sturdy
surface:
1. Check for vibration when the motor is switched ON.
2. Adjust and retighten the mounting hardware as
necessary.
3. Check the table assembly to assure smooth movement
up and down the column.
4. Check to assure that the spindle shaft moves smoothly.
CHUCK KEY STORAGE
See Figure 17.
Storage holder for the chuck key is located on the right
side of the drill press.
BEVEL DRILLING
See Figure 18.
INSTALLING THE HEAD
See Figure 11.
WARNING
The Drill Press head is heavy and should be lifted with
the help of two people to safely assemble the drill press
head on the column.
1. Position the head onto the column with the chuck
positioned over the table.
NOTE: This tool is heavy. Get help when needed.
2. Slide the head down as far as it will go. Align the table
assembly with the base and then tighten the two head
set screws with the hex key.
INSTALLING FEED HANDLES
See Figure 12.
1. Attach the three feed handles by screwing them into
the threaded holes in the hub assembly.
INSTALLING THE CHUCK
See Figures 13-15.
WARNING
Before any assembly of the chuck to the drill press
head, clean all mating surfaces with a non-petroleum
based product. Any oil or grease used in the packing of
these parts must be removed otherwise the chuck may
come loose during operation.
1. Clean out the tapered hole in the chuck with a clean
cloth and a non-alcohol based cleaner. Wipe clean all
oil residue and any dirt or grime thoroughly.
2. Clean tapered surfaces on the spindle in the same
manner as above.
NOTE: Make sure there are no foreign particles
sticking to the surfaces. The slightest piece of dirt or
oil residing on any of these surfaces will prevent the
chuck from seating properly. This will cause the drill
chuck and bit to wobble.
3. Position chuck on spindle. Chuck should be fully
opened to avoid damaging jaws.
4. Unlock the table support lock and swing the table
away from the bottom of the chuck.
5. Insert the chuck onto the spindle, pushing upwards all
the way.
6. Using a piece of scrap wood to protect the chuck, rmly
tap the chuck into place using a mallet or hammer.
CAUTION
Risk of property damage. To avoid damage to the
chuck, never drive the chuck on the spindle with a metal
hammer.