14
ASSEMBLY AND ADJUSTMENTS
WARNING
For your own safety, never connect plug to power
source outlet until all assembly steps are complete and
you have read and understood the safety and operating
instructions.
WARNING
The drill press is a heavy power tool and should be lifted
with the help of two people or more to safely assemble
it.
ASSEMBLING COLUMN TO BASE
See Figure 5.
1. Place the base on a at, stable surface.
2. Align screw holes in the column assembly with screw
holes in the base.
3. Place a hex bolt in each hole.
4. Tighten each hex bolt using an adjustable wrench.
INSTALLING TABLE TO COLUMN ASSEMBLY
See Figures 6-10.
1. Insert the table bracket lock handle into the threaded
hole at the rear of the table bracket.
NOTE: Install the handle from left to right, so it enters
the non-threaded side of the table bracket first.
2. Feed the worm gear through the table crank hole in the
table bracket. Make sure the worm gear meshes with
the inside gear.
NOTE: Do not remove the lubrication from the worm
gear.
3. Feed the rack through the slot in the table bracket so
that the teeth are facing out and the longer smooth
end faces up. The worm gear should engage the rack.
4. Using both hands, slide the entire table and rack onto
the column until the bottom of the rack is positioned in
the base collar and against the column.
5. Tighten the table bracket lock handle to lock the table
assembly to the column.
NOTE: Do not overtighten.
6. Slide the rack ring, bevel-side down, over the column
until the beveled side engages the beveled end of the
rack.
7. Tighten the set screw in the collar using the hex key.
To avoid column or collar damage, do not overtighten
the set screw.
NOTE: You should be able to move the table from side
to side.
8. Install table crank handle over the end of worm gear so
that the at side of the shaft aligns with the set screw.
9. Tighten the set screw using the hex key.
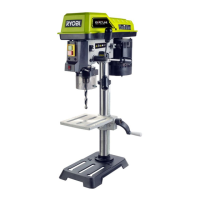
CARTON CONTENTS
UNPACKING AND CHECKING CONTENTS
WARNING
If any part is missing or damaged, do not plug the drill
press in until the missing or damaged part is replaced,
and assembly is complete.
Carefully unpack the drill press and all its parts, and
compare against the list below.
To protect the drill press from moisture, a protective
coating has been applied to the machined surfaces.
Remove this coating with a soft cloth moistened with
kerosene or WD-40.
WARNING
To avoid re or toxic reaction, never use gasoline,
naphtha, acetone, lacquer thinner or similar highly
volatile solvents to clean the drill press.
Apply a coat of paste wax to the table, column and
machined surfaces of base to prevent rust. Wipe all
parts thoroughly with a clean dry cloth.
Item Description Quantity
1 Head assembly 1
2 Table 1
3 Base 1
4 Rack 1
5 Column assembly 1
6 Rack ring 1
7 Feed handles 3
8 Worm gear 1
9 Table lock handle 1
10 Table crank handle 1
11 Hex bolts 3
12 Chuck 1
13 Chuck key 1
14 4 mm hex key 1
15 3 mm hex key 1