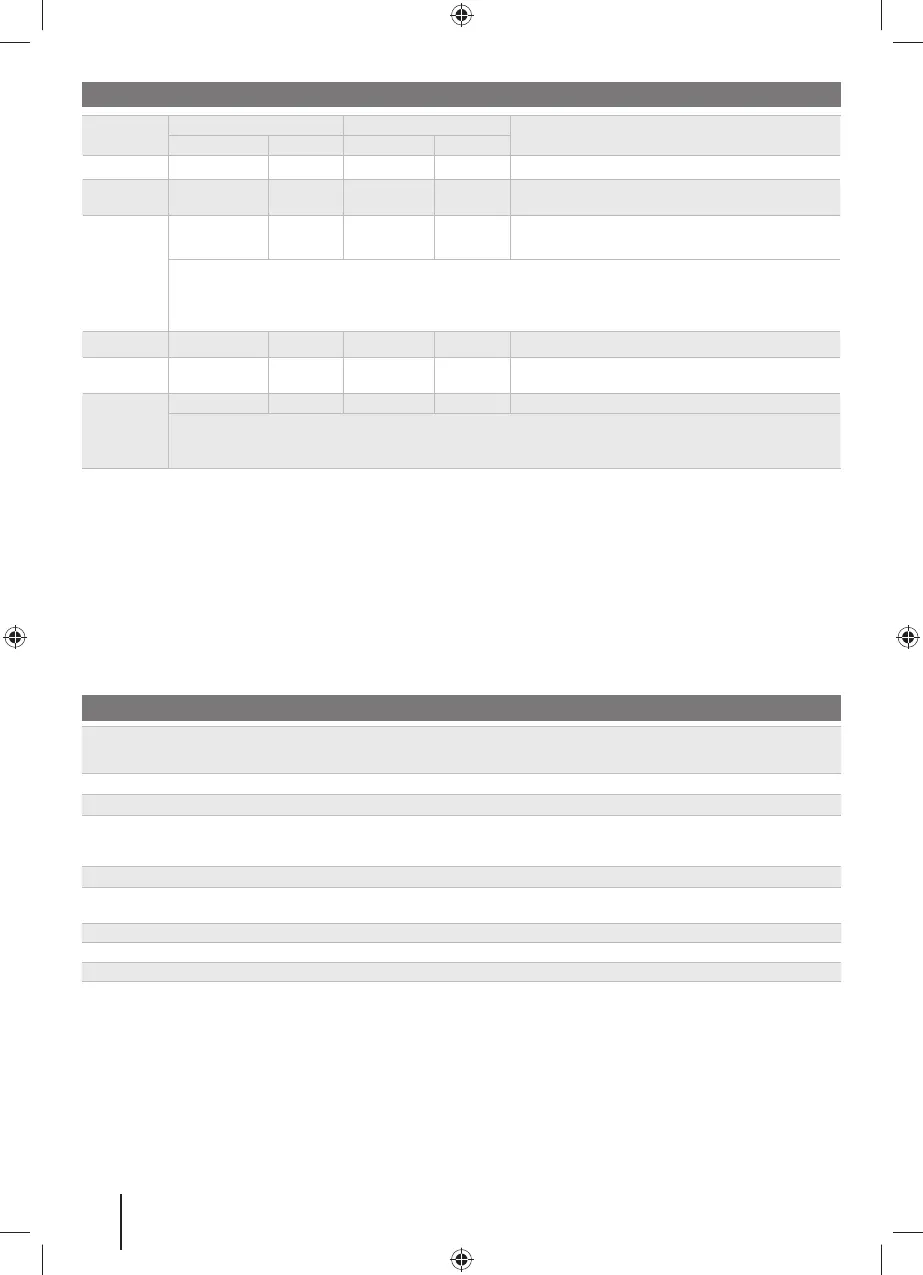
MAINTENANCE SCHEDULE
Inspect before
each use
Every 25 hours
Every 50 hours
or yearly
Before storage
Once a month
during storage
Check the brake operation. x
Check the tyre pressure. x
Check the side discharge chute and
operator presence safety interlock
systems.
x
Check for loose fasteners. x x
Remove all foreign materials from the
product.
xx
Check / Replace the mulching blades. x x
Clean the battery terminals. x
Check and charge the battery. x x
NOTE: Maintenance should be performed more frequently when the product is used in dusty areas.
When the product has exceeded the maximum fi gures specifi ed in the table, maintenance should still be cycled according to the intervals of
time or hours stated herein.
If you are unsure how to perform any of the maintenance items listed above, have the product serviced by an authorised service centre only.
CHARGER LED INDICATOR
Charger
status
Connected to LED
Status
Power supply Mower Charger Mower
Standby Yes No On Off Ready to charge battery pack
Charging Yes Yes On Slow fl ashing —
Charger error
Yes Yes Off Fast fl ashing
Battery temperature, battery capacity, or charger may be
faulty.
If the LED status shows error, wait for about 15 minutes to allow the battery and charger to cool down.
If the LED status repeats a second time, reset the charger or reinsert the battery.
If a diff erent charger charges normally, the charger may be defective.
If a diff erent battery charges normally, battery capacity may be faulty.
Fully charged Yes Yes On On Fast charging is complete; charger maintains charge mode.
Interlock No Yes Off Fast fl ashing
The plug is still connected to the mower. The mower cannot
be started.
Defective
Yes Yes On Fast fl ashing The battery pack could be defective.
If the LED status shows defective, reset the charger or reinsert the battery.
If the LED status repeats a second time, try charging a diff erent battery.
If a diff erent battery charges normally, dispose of the defective pack (see maintenance section).
12
Original Instructions

 Loading...