Do you have a question about the Sam 2PX and is the answer not in the manual?
Describes articulator's upper and lower parts simulating jaw movements and guidance.
Explains hinge axis, axis-orbital plane, and their significance in simulation.
Details how the incisal pin and table replicate tooth guidance.
Covers height, intercondylar distance, and offset mounting plate.
Details the ARCON system for anatomical TMJ simulation.
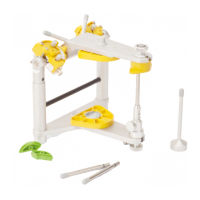
Describes the SAM 2PX as a tool for reproducing patient movements.
Explains orbital axis parallelism and model mounting relation to cranium.
Differentiates translucent and yellow cases for kits.
Emphasizes foam placement for protection and dust prevention.
Identifies the centric lock mechanism and adhesion plate.
Details magnetic mounting plate and adjustment screws.
Notes the availability of an adjustable incisal table.
Describes face bow earpiece pin and incisal pin with scale.
Covers screwtype plate, magnetic cup, and AXIOSPLIT system.
Details centric lock, protrusion adjustment, and scales.
Explains Bennett angulation indicator and housing inclination display.
Identifies condylar pathway inserts and centric locking mechanisms.
Explains the condition and action for unlocking the centric lock.
Describes the condition and action for locking the centric lock.
Lists activities for which covers are normally removed.
Describes how to remove the covers by loosening a screw.
Notes that left and right covers are different.
Explains simulation of jaw movements via articulator settings.
Describes different colored inserts and their uses for sideshift.
Illustrates impact of curved inserts on initial angle.
Details normal setting and the Bennett angle scale for adjustment.
Steps to loosen, remove, and replace Bennett guidance inserts.
Guides proper insertion and final angle setting.
Provides average values for condylar pathway inclination.
Explains how to adjust inclination from 15° to 65°.
Describes three color-coded inserts for simulating condylar pathways.
Lists specific curvature types and their HCI values.
Steps before insert change: angle set to 0°, member separation, screw loosening.
Procedure for removing, inserting, and checking curvature inserts.
Requirements for protrusion: straight inserts, open centric lock.
How to use the scale for setting protrusion values.
Details using the lever for protrusion adjustment.
Explains how to perform retrusion during lateral movement.
Inserting rods to support the articulator in a tilted position.
Improves visibility of work, suggests silicone spray.
Attaching rod to support the upper part in an open position.
Enhances view and work ease, recommends silicone spray.
Introduces the 15mm offset system for normal jaw relation.
Lists Screw Type, MPS Magnetic, and AXIOSPLIT systems.
Highlights quick exchange and conversion options.
Describes model exchange and synchronization features.
Details how to attach and secure the screw-type plate.
Guidance on seating, single-use, and model retention.
Describes setting the adhesion plate and inserting the magnetic plate.
How to check seating and orient the plate correctly.
Its role in reproducing and building tooth guidances.
Guiding surface, vertical dimension, pin support, and customization.
Detailed steps for precise table adjustment.
How to check the correct position after adjustment.
Placement in lower part and role in setting bite height.
Details on raising/lowering ranges and specific adjustment rules.
Fine-tuning in 0.05mm increments using the scale.
Step-by-step guide for micro-adjustment and locking.
Importance of skull-correct mounting and Frankfort Horizontal.
Using the facebow for optimal positioning and defining axis-orbital plane.
Essential for diagnosis, therapy, and setting pathways.
Guidance on attaching the facebow and consulting the manual.
How to use the stand for quick and precise model transfer.
Reference to a more detailed manual for model mounting.
Use of ART 385 for average or prosthetic setups.
Details on setting the device for optimal mounting.
Steps for cleaning centric lock and condylar housing.
How to lubricate moving components with silicone grease.
Cleaning the axis for smooth operation and part removal.
Cleaning all metal parts with solvent to remove residue.
Re-lubricating moving metal parts after cleaning.
Steps for inserting the condylar housing and placing the brass pressing piece.
Advice on contacting local dealers for replacement items.
Information on obtaining product catalogues and materials.
| Brand | Sam |
|---|---|
| Model | 2PX |
| Category | Medical Equipment |
| Language | English |